新版无完整背景图片滑块验证码
步骤:
1、将图片灰度,两张都要灰度
2、将图片锐化,两张都要锐化
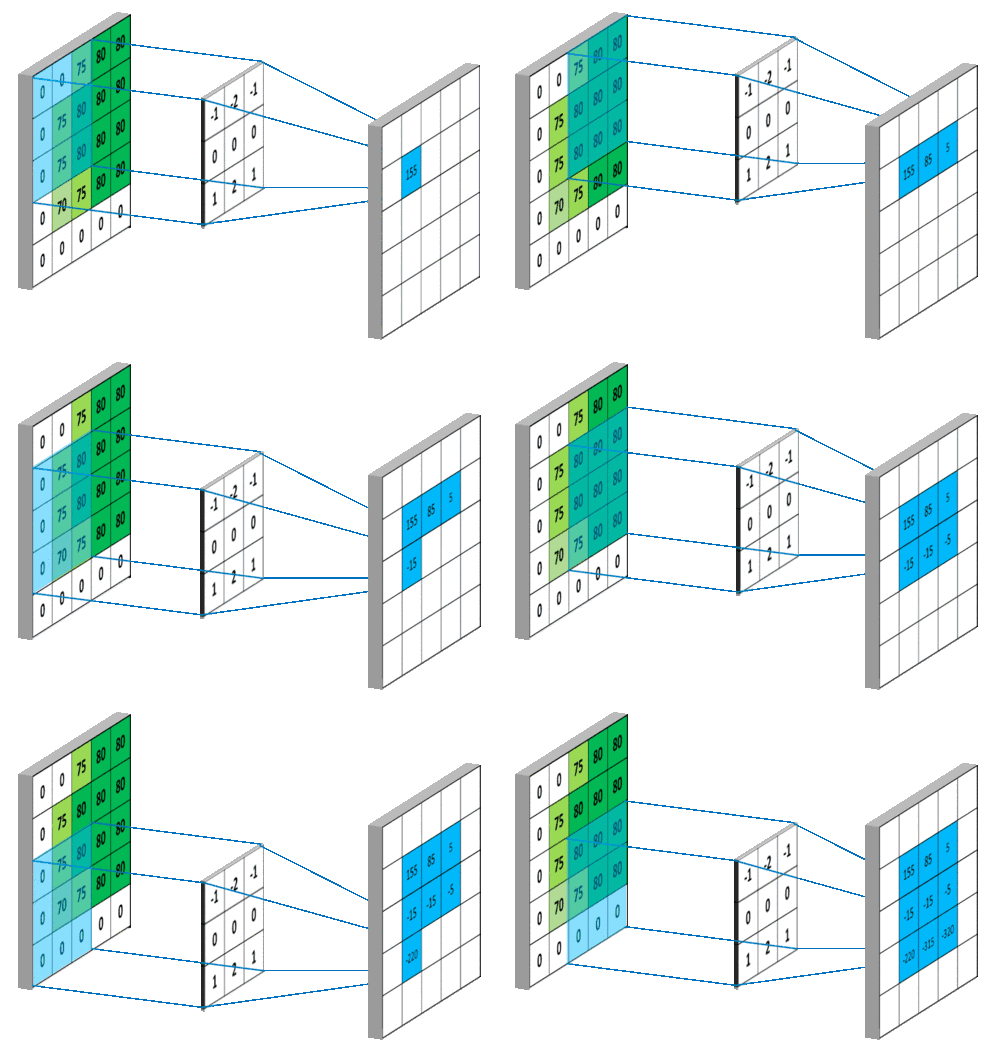
3、计算2d卷积核,两张都要计算

4、卷积结果最大的点所在区域即为与卷积核(小滑块)边缘重合度最高的区域。
那么在背景图中,与小滑块重合度最高的区域应该为缺口区域。因此我们找到的卷积结果最大的点就是背景图缺口的中心点。
import requests
import cv2
import time
import os
from scipy import signal
from selenium import webdriver	#用来驱动浏览器的
from selenium.webdriver import ActionChains	#破解滑动验证码的时候用,可拖动图片
from selenium.webdriver.common.keys import Keys

# 通过新版无原图滑块验证码
class Pass_slide:

    def __init__(self):
        self.driver = webdriver.Chrome()


    def input_user_pwd(self):
        self.driver.get('https://star.toutiao.com/')
        # 数字账号密码登录
        self.driver.find_element_by_xpath('//*[@id="app"]/div/div[1]/div[2]/div[2]/div[1]').click()
        time.sleep(1)
        self.driver.find_element_by_xpath('/html/body/div/div/div[2]/div[2]/div/div/div[2]/div[2]/div[1]/div/div[1]').click()
        time.sleep(1)
        # 输入账号
        self.driver.find_element_by_xpath('//*[@id="account-sdk"]/section/div[3]/div[1]/div[2]/div/input').send_keys(
            'username'
        )
        # 输入密码
        self.driver.find_element_by_xpath('//*[@id="account-sdk"]/section/div[3]/div[2]/div/div/input').send_keys(
            'password'
        )
        time.sleep(1)
        # 点击登录
        self.driver.find_element_by_xpath('//*[@id="account-sdk"]/section/div[6]/button').click()
        time.sleep(1)

    def slide_button(self):
        # 定位滑块位置
        # 方式一:通过图片定位位置
        # button = self.driver.find_element_by_xpath('//*[@id="account-sdk-slide-container"]/div/div[2]/img[2]')
        # 方式二: 用 Xpath 定位位置
        # button = self.driver.find_element_by_xpath(
        #     '//*[@id="account-sdk-slide-container"]/div/div[3]/div[2]/div[2]/div'
        # )
        # 方式三:通过 class 来定位
        button = self.driver.find_element_by_class_name('sc-jKJlTe')
        time.sleep(1)
        return button

    def move_to_slide(self,distance):
        # tracks是要传入的移动轨迹
        ActionChains(self.driver).click_and_hold(self.slide_button()).perform()  # 移动
        for x in self.track(distance):
            ActionChains(self.driver).move_by_offset(xoffset=x, yoffset=0).perform()
        time.sleep(0.3)
        ActionChains(self.driver).release().perform()

    def track(self, distance):  # distance为传入的总距离
        # 移动轨迹
        track = []
        current = 0  # 当前位移
        mid = distance * 4 / 5  # 减速阈值
        t = 0.2  # 计算间隔
        v = 1  # 初速度
        while current < distance:
            if current < mid:
                a = 4  # 加速度为2
            else:
                a = -3  # 加速度为-2
            v0 = v
            v = v0 + a * t  # 当前速度
            move = v0 * t + 1 / 2 * a * t * t  # 移动距离
            current += move  # 当前位移
            track.append(round(move))  # 加入轨迹
        return track

    def download_slide_auth_code_img(self):
        # 下载滑块,和背景缺口图片
        if not os.path.exists('./Auth_Slide_Img'):
            os.mkdir('./Auth_Slide_Img')
        big_img_url = self.driver.find_element_by_xpath(
            '//*[@id="account-sdk-slide-container"]/div/div[2]/img[1]').get_attribute('src')  # 缺口背景图片 地址
        small_img_url = self.driver.find_element_by_xpath(
            '//*[@id="account-sdk-slide-container"]/div/div[2]/img[2]').get_attribute('src')  # 滑块的图片 地址

        with open('Auth_Slide_Img/big_slide_img.jpg', 'wb') as f:
            f.write(requests.get(big_img_url).content)
        with open('Auth_Slide_Img/small_slide_img.jpg', 'wb') as f:
            f.write(requests.get(small_img_url).content)


    # 图片转为 灰度图片
    def img2gray(self, image):
        self.download_slide_auth_code_img()
        img_rgb = cv2.imread(image)  # 读入图片
        img_gray = cv2.cvtColor(img_rgb, cv2.COLOR_BGR2GRAY)  # 转灰度图片
        # cv2.imwrite(image, img_gray)  # 保存图片,第一个参数:path, 第二个参数:保存的图片
        return img_gray

    # 锐化边缘
    def canny_edge(self, image):
        self.img2gray(image)
        img = cv2.imread(image, 0)
        blur = cv2.GaussianBlur(img, (3, 3), 0)  # 用高斯滤波处理原图像降噪
        canny = cv2.Canny(blur, threshold1=200, threshold2=300)  # 锐化图片
        # cv2.imwrite(image, canny)  # 保存图片
        # cv2.imshow('candy', can)  # 弹出图片
        cv2.waitKey()
        cv2.destroyAllWindows()  # 关闭窗口
        return canny

    # 计算 2d 卷积
    def convole2d(self, bg_array, fillter):
        bg_h, bg_w = bg_array.shape[:2]
        fillter_h, fillter_w = fillter.shape[:2]
        c_full = signal.convolve(bg_array, fillter, mode='full')
        kr, kc = fillter_h // 2, fillter_w // 2
        c_same = c_full[
                 fillter_h - kr - 1: bg_h + fillter_h - kr - 1,
                 fillter_w - kc - 1: bg_w + fillter_w - kr - 1,
                 ]
        return c_same

    # 最终位置
    def find_max_point(self, arrays, search_on_horizontal_center=False):
        max_point = 0
        max_point_pos = None

        array_rows, arrays_cols = arrays.shape
        if search_on_horizontal_center:
            for col in range(arrays_cols):
                if arrays[array_rows // 2, col] > max_point:
                    max_point = arrays[array_rows // 2, col]
                    max_point_pos = col, array_rows // 2
        else:
            for row in range(array_rows):
                for col in range(arrays_cols):
                    if arrays[row, col] > max_point:
                        max_point = arrays[row, col]
                        max_point_pos = col, row

        return max_point_pos

    def main(self):
        self.input_user_pwd()
        canny1 = self.canny_edge('Auth_Slide_Img/big_slide_img.jpg')
        canny2 = self.canny_edge('Auth_Slide_Img/small_slide_img.jpg')
        convoled_after = self.convole2d(canny1, canny2)
        distance = self.find_max_point(convoled_after)
        print(distance)
        self.move_to_slide(distance[0])
        return distance[0]

    def is_login(self):

        try:
            time.sleep(3)
            html = self.driver.find_element_by_xpath('/html/body/div[1]/div[2]/div/div[1]/button/i').click()
            print('login success!')
            self.driver.find_element_by_xpath(
                '/html/body/div[1]/div[1]/div[2]/div[1]/div[1]/div/div[2]/div[2]/div[1]/div[2]/div[1]/span').click()
            time.sleep(1)
            self.driver.find_element_by_xpath(
                '/html/body/div[1]/div[1]/div[2]/div[1]/div[1]/div/div[3]/div/div[1]/button/i').click()
            return True
        except:
            self.driver.close()
            print('login failed trying...')
            # self.is_login()
            return False

    def movement_search(self):
        self.driver.find_element_by_xpath('/html/body/div[1]/div[1]/div[2]/div[1]/div[1]/div/div[1]/div[1]/div/div[2]/div[3]/div/div[1]/input').send_keys('口红')
        time.sleep(10)
        self.driver.find_element_by_xpath('/html/body/div[1]/div[1]/div[2]/div[1]/div[1]/div/div[1]/div[1]/div/div[2]/div[3]/i').send_keys(Keys.ENTER)
        time.sleep(6)
        self.driver.find_element_by_xpath('/html/body/div[1]/div[1]/div[2]/div[1]/div[1]/div/div[2]/div[1]/div/div[2]/div/div/div[1]/div[1]/div[1]/div[1]/div[2]/div[1]/div[1]').click()
        price1 = self.driver.find_element_by_xpath('/html/body/div[1]/div[1]/div[2]/div[1]/div[1]/div/div[1]/div/div[2]/div[2]/div[1]/div[1]/div[1]/div[1]/div/div[1]/div[1]/div/text()').extract()
        price2 = self.driver.find_element_by_xpath('/html/body/div[1]/div[1]/div[2]/div[1]/div[1]/div/div[1]/div/div[2]/div[2]/div[1]/div[2]/div[1]/div[1]/div/div[1]/div[1]/div/text()').extract()
        print(price1, price2)


run = Pass_slide()
run.main()
login_result = run.is_login()
print(login_result)

run.movement_search()