首先安装PyOpengl
pip install PyOpenGL PyOpenGL_accelerate
64bit下可能存在glut的问题,解决如下
下载地址:(选择适合自己的版本)http://www.lfd.uci.edu/~gohlke/pythonlibs/#pyopengl
下载下来的whl文件,用pip install file_name.whl进行安装后,问题解决。
在Ubuntu环境下
sudo apt-get install python-opengl
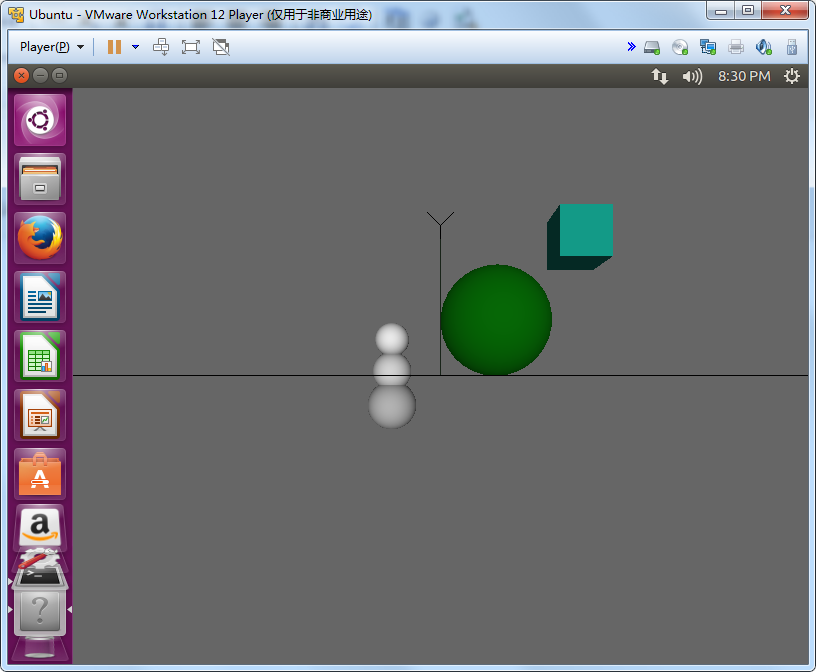
项目效果

程序框架简介:
primitive 负责具体渲染的模型,主要是生成显示列表
G_OBJ_PLANE = 1
G_OBJ_SPHERE = 2
G_OBJ_CUBE = 3

这些模型会在程序初始化的时候运行一次 Viewer的init函数中。
主框架是Viewer文件
MainLoop 里面定时调用这里注册的render函数

render 每次设置好MV矩阵,调用scene里面的render
Scene本身是一个节点的列表。每个节点会调用相应的显示列表来渲染。
代码Viewer.py
# -*- coding: utf8 -*-
from OpenGL.GL import glCallList, glClear, glClearColor, glColorMaterial, glCullFace, glDepthFunc, glDisable, glEnable,
                      glFlush, glGetFloatv, glLightfv, glLoadIdentity, glMatrixMode, glMultMatrixf, glPopMatrix,
                      glPushMatrix, glTranslated, glViewport,
                      GL_AMBIENT_AND_DIFFUSE, GL_BACK, GL_CULL_FACE, GL_COLOR_BUFFER_BIT, GL_COLOR_MATERIAL,
                      GL_DEPTH_BUFFER_BIT, GL_DEPTH_TEST, GL_FRONT_AND_BACK, GL_LESS, GL_LIGHT0, GL_LIGHTING,
                      GL_MODELVIEW, GL_MODELVIEW_MATRIX, GL_POSITION, GL_PROJECTION, GL_SPOT_DIRECTION
from OpenGL.constants import GLfloat_3, GLfloat_4
from OpenGL.GLU import gluPerspective, gluUnProject
from OpenGL.GLUT import glutCreateWindow, glutDisplayFunc, glutGet, glutInit, glutInitDisplayMode,
                        glutInitWindowSize, glutMainLoop,
                        GLUT_SINGLE, GLUT_RGB, GLUT_WINDOW_HEIGHT, GLUT_WINDOW_WIDTH
import numpy
from numpy.linalg import norm, inv
from primitive import init_primitives
from Scene import Scene
from node import Sphere
from node import SnowFigure,Cube,Plane

class Viewer(object):
    def __init__(self):
        """ Initialize the viewer. """
        #初始化接口,创建窗口并注册渲染函数
        self.init_interface()
        #初始化opengl的配置
        self.init_opengl()
        #初始化3d场景
        self.init_scene()
        #初始化交互操作相关的代码
        self.init_interaction()
        init_primitives()

    def init_interface(self):
        """ 初始化窗口并注册渲染函数 """
        glutInit()
        glutInitWindowSize(640, 480)
        glutCreateWindow("3D Modeller")
        glutInitDisplayMode(GLUT_SINGLE | GLUT_RGB)
        #注册窗口渲染函数
        glutDisplayFunc(self.render)

    def init_opengl(self):
        """ 初始化opengl的配置 """
        #模型视图矩阵
        self.inverseModelView = numpy.identity(4)
        #模型视图矩阵的逆矩阵
        self.modelView = numpy.identity(4)

        #开启剔除操作效果
        glEnable(GL_CULL_FACE)
        #取消对多边形背面进行渲染的计算(看不到的部分不渲染)
        glCullFace(GL_BACK)
        #开启深度测试
        glEnable(GL_DEPTH_TEST)
        #测试是否被遮挡,被遮挡的物体不予渲染
        glDepthFunc(GL_LESS)
        #启用0号光源
        glEnable(GL_LIGHT0)
        #设置光源的位置
        glLightfv(GL_LIGHT0, GL_POSITION, GLfloat_4(0, 0, 1, 0))
        #设置光源的照射方向
        glLightfv(GL_LIGHT0, GL_SPOT_DIRECTION, GLfloat_3(0, 0, -1))
        #设置材质颜色
        glColorMaterial(GL_FRONT_AND_BACK, GL_AMBIENT_AND_DIFFUSE)
        glEnable(GL_COLOR_MATERIAL)
        #设置清屏的颜色
        glClearColor(0.4, 0.4, 0.4, 0.0)

    def init_scene(self):
        #初始化场景,之后实现
        # 创建一个场景实例
        self.scene = Scene()
        # 初始化场景内的对象
        self.create_sample_scene()

    def create_sample_scene(self):
        # 创建一个球体
        sphere_node = Sphere()
        # 设置球体的颜色
        sphere_node.color_index = 2
        # 将球体放进场景中,默认在正中央
        sphere_node.translate(2, 2, 0)
        sphere_node.scale(4)
        self.scene.add_node(sphere_node)

        # 添加小雪人
        hierarchical_node = SnowFigure()
        hierarchical_node.translate(-2, 0, -2)
        hierarchical_node.scale(2)
        self.scene.add_node(hierarchical_node)

        #添加立方体
        cube_node=Cube()
        cube_node.color_index=5
        cube_node.translate(5,5,0)
        cube_node.scale(1.8)
        self.scene.add_node(cube_node)

        #添加Plane
        plane_node=Plane()
        plane_node.color_index=2
        self.scene.add_node(plane_node)

    def init_interaction(self):
        #初始化交互操作相关的代码,之后实现
        pass

    def main_loop(self):
        #程序主循环开始
        glutMainLoop()

    def render(self):
        #程序进入主循环后每一次循环调用的渲染函数
        # 初始化投影矩阵
        self.init_view()

        # 启动光照
        glEnable(GL_LIGHTING)
        # 清空颜色缓存与深度缓存
        glClear(GL_COLOR_BUFFER_BIT | GL_DEPTH_BUFFER_BIT)

        # 设置模型视图矩阵,目前为止用单位矩阵就行了。
        glMatrixMode(GL_MODELVIEW)
        glPushMatrix()
        glLoadIdentity()

        # 渲染场景
        self.scene.render()

        # 每次渲染后复位光照状态
        glDisable(GL_LIGHTING)
        glPopMatrix()
        # 把数据刷新到显存上
        glFlush()
    def init_view(self):
        """ 初始化投影矩阵 """
        xSize, ySize = glutGet(GLUT_WINDOW_WIDTH), glutGet(GLUT_WINDOW_HEIGHT)
        #得到屏幕宽高比
        aspect_ratio = float(xSize) / float(ySize)

        #设置投影矩阵
        glMatrixMode(GL_PROJECTION)
        glLoadIdentity()

        #设置视口,应与窗口重合
        glViewport(0, 0, xSize, ySize)
        #设置透视,摄像机上下视野幅度70度
        #视野范围到距离摄像机1000个单位为止。
        gluPerspective(70, aspect_ratio, 0.1, 1000.0)
        #摄像机镜头从原点后退15个单位
        glTranslated(0, 0, -15)
if __name__ == "__main__":
    viewer = Viewer()
    viewer.main_loop()
Scene.py
# -*- coding: utf8 -*-
class Scene(object):

    #放置节点的深度,放置的节点距离摄像机15个单位
    PLACE_DEPTH = 15.0

    def __init__(self):
        #场景下的节点队列
        self.node_list = list()

    def add_node(self, node):
        """ 在场景中加入一个新节点 """
        self.node_list.append(node)

    def render(self):
        """ 遍历场景下所有节点并渲染 """
        for node in self.node_list:
            node.render()
color.py
# -*- coding: utf8 -*-
MAX_COLOR = 9
MIN_COLOR = 0
COLORS = { # RGB Colors
    0:  (1.0, 1.0, 1.0),
    1:  (0.05, 0.05, 0.9),
    2:  (0.05, 0.9, 0.05),
    3:  (0.9, 0.05, 0.05),
    4:  (0.9, 0.9, 0.0),
    5:  (0.1, 0.8, 0.7),
    6:  (0.7, 0.2, 0.7),
    7:  (0.7, 0.7, 0.7),
    8:  (0.4, 0.4, 0.4),
    9:  (0.0, 0.0, 0.0),
}
node.py
# -*- coding: utf8 -*-
import random
from OpenGL.GL import glCallList, glColor3f, glMaterialfv, glMultMatrixf, glPopMatrix, glPushMatrix,
                      GL_EMISSION, GL_FRONT
import numpy
import color
from primitive import G_OBJ_SPHERE,G_OBJ_CUBE,G_OBJ_PLANE
from transform import scaling, translation
class Node(object):
    def __init__(self):
        #该节点的颜色序号
        self.color_index = random.randint(color.MIN_COLOR, color.MAX_COLOR)
        #该节点的平移矩阵,决定了该节点在场景中的位置
        self.translation_matrix = numpy.identity(4)
        #该节点的缩放矩阵,决定了该节点的大小
        self.scaling_matrix = numpy.identity(4)

    def render(self):
        """ 渲染节点 """
        glPushMatrix()
        #实现平移
        glMultMatrixf(numpy.transpose(self.translation_matrix))
        #实现缩放
        glMultMatrixf(self.scaling_matrix)
        cur_color = color.COLORS[self.color_index]
        #设置颜色
        glColor3f(cur_color[0], cur_color[1], cur_color[2])
        #渲染对象模型
        self.render_self()
        glPopMatrix()

    def render_self(self):
        raise NotImplementedError(
            "The Abstract Node Class doesn't define 'render_self'")

    def translate(self, x, y, z):
        self.translation_matrix = numpy.dot(self.translation_matrix, translation([x, y, z]))

    def scale(self, s):
        self.scaling_matrix = numpy.dot(self.scaling_matrix, scaling([s,s,s]))

class Primitive(Node):
    def __init__(self):
        super(Primitive, self).__init__()
        self.call_list = None

    def render_self(self):
        glCallList(self.call_list)

class Sphere(Primitive):
    """ 球形图元 """

    def __init__(self):
        super(Sphere, self).__init__()
        self.call_list = G_OBJ_SPHERE
class Cube(Primitive):
    """ 立方体图元 """
    def __init__(self):
        super(Cube, self).__init__()
        self.call_list = G_OBJ_CUBE

class Plane(Primitive):
    def __init__(self):
        super(Plane,self).__init__()
        self.call_list=G_OBJ_PLANE


class HierarchicalNode(Node):
    def __init__(self):
        super(HierarchicalNode, self).__init__()
        self.child_nodes = []

    def render_self(self):
        for child in self.child_nodes:
            child.render()

class SnowFigure(HierarchicalNode):
    def __init__(self):
        super(SnowFigure, self).__init__()
        self.child_nodes = [Sphere(), Sphere(), Sphere()]
        self.child_nodes[0].translate(0, -0.6, 0)
        self.child_nodes[1].translate(0, 0.1, 0)
        self.child_nodes[1].scale(0.8)
        self.child_nodes[2].translate(0, 0.75, 0)
        self.child_nodes[2].scale(0.7)
        for child_node in self.child_nodes:
            child_node.color_index = color.MIN_COLOR
transform.py
# -*- coding: utf8 -*-
import numpy

def translation(displacement):
    """ 生成平移矩阵 """
    t = numpy.identity(4)
    t[0, 3] = displacement[0]
    t[1, 3] = displacement[1]
    t[2, 3] = displacement[2]
    return t


def scaling(scale):
    """ 生成缩放矩阵 """
    s = numpy.identity(4)
    s[0, 0] = scale[0]
    s[1, 1] = scale[1]
    s[2, 2] = scale[2]
    s[3, 3] = 1
    return s
primitive.py
# -*- coding: utf8 -*-
from OpenGL.GL import glBegin, glColor3f, glEnd, glEndList, glLineWidth, glNewList, glNormal3f, glVertex3f,
                      GL_COMPILE, GL_LINES, GL_QUADS
from OpenGL.GLU import gluDeleteQuadric, gluNewQuadric, gluSphere

G_OBJ_PLANE = 1
G_OBJ_SPHERE = 2
G_OBJ_CUBE = 3
def make_plane():
    glNewList(G_OBJ_PLANE, GL_COMPILE)
    glBegin(GL_LINES)
    glColor3f(0, 0, 0)
    for i in xrange(41):
        glVertex3f(-10.0 + 0.5 * i, 0, -10)
        glVertex3f(-10.0 + 0.5 * i, 0, 10)
        glVertex3f(-10.0, 0, -10 + 0.5 * i)
        glVertex3f(10.0, 0, -10 + 0.5 * i)

    # Axes
    glEnd()
    glLineWidth(5)

    glBegin(GL_LINES)
    glColor3f(0.5, 0.7, 0.5)
    glVertex3f(0.0, 0.0, 0.0)
    glVertex3f(5, 0.0, 0.0)
    glEnd()

    glBegin(GL_LINES)
    glColor3f(0.5, 0.7, 0.5)
    glVertex3f(0.0, 0.0, 0.0)
    glVertex3f(0.0, 5, 0.0)
    glEnd()

    glBegin(GL_LINES)
    glColor3f(0.5, 0.7, 0.5)
    glVertex3f(0.0, 0.0, 0.0)
    glVertex3f(0.0, 0.0, 5)
    glEnd()

    # Draw the Y.
    glBegin(GL_LINES)
    glColor3f(0.0, 0.0, 0.0)
    glVertex3f(0.0, 5.0, 0.0)
    glVertex3f(0.0, 5.5, 0.0)
    glVertex3f(0.0, 5.5, 0.0)
    glVertex3f(-0.5, 6.0, 0.0)
    glVertex3f(0.0, 5.5, 0.0)
    glVertex3f(0.5, 6.0, 0.0)

    # Draw the Z.
    glVertex3f(-0.5, 0.0, 5.0)
    glVertex3f(0.5, 0.0, 5.0)
    glVertex3f(0.5, 0.0, 5.0)
    glVertex3f(-0.5, 0.0, 6.0)
    glVertex3f(-0.5, 0.0, 6.0)
    glVertex3f(0.5, 0.0, 6.0)

    # Draw the X.
    glVertex3f(5.0, 0.0, 0.5)
    glVertex3f(6.0, 0.0, -0.5)
    glVertex3f(5.0, 0.0, -0.5)
    glVertex3f(6.0, 0.0, 0.5)

    glEnd()
    glLineWidth(1)
    glEndList()

def make_sphere():
    """ 创建球形的渲染函数列表 """
    glNewList(G_OBJ_SPHERE, GL_COMPILE)
    quad = gluNewQuadric()
    gluSphere(quad, 0.5, 30, 30)
    gluDeleteQuadric(quad)
    glEndList()

def make_cube():
    glNewList(G_OBJ_CUBE, GL_COMPILE)
    vertices = [((-0.5, -0.5, -0.5), (-0.5, -0.5, 0.5), (-0.5, 0.5, 0.5), (-0.5, 0.5, -0.5)),
                ((-0.5, -0.5, -0.5), (-0.5, 0.5, -0.5), (0.5, 0.5, -0.5), (0.5, -0.5, -0.5)),
                ((0.5, -0.5, -0.5), (0.5, 0.5, -0.5), (0.5, 0.5, 0.5), (0.5, -0.5, 0.5)),
                ((-0.5, -0.5, 0.5), (0.5, -0.5, 0.5), (0.5, 0.5, 0.5), (-0.5, 0.5, 0.5)),
                ((-0.5, -0.5, 0.5), (-0.5, -0.5, -0.5), (0.5, -0.5, -0.5), (0.5, -0.5, 0.5)),
                ((-0.5, 0.5, -0.5), (-0.5, 0.5, 0.5), (0.5, 0.5, 0.5), (0.5, 0.5, -0.5))]
    normals = [(-1.0, 0.0, 0.0), (0.0, 0.0, -1.0), (1.0, 0.0, 0.0), (0.0, 0.0, 1.0), (0.0, -1.0, 0.0), (0.0, 1.0, 0.0)]

    glBegin(GL_QUADS)
    for i in xrange(6):
        glNormal3f(normals[i][0], normals[i][1], normals[i][2])
        for j in xrange(4):
            glVertex3f(vertices[i][j][0], vertices[i][j][1], vertices[i][j][2])
    glEnd()
    glEndList()


def init_primitives():
    """ 初始化所有的图元渲染函数列表 """
    make_plane()
    make_sphere()
    make_cube()