http://www.politepix.com/openears
openEars是一个开源的语音识别+TTS库,在iphone APP中有几个款用到了该库,最近了一次升级,提高了代码的效率,并升级到了xcode4。politepix网站有openEars教程.以下转载,找个时间再翻译翻译吧.
-------------------------------------------------------------------------------------------------------------------------------------------------
Welcome to OpenEars!
OpenEars is an open-source iOS library for implementing round-trip English language speech recognition and text-to-speech on the iPhone and iPad, which uses the CMU Pocketsphinx , CMU Flite , and MITLM libraries.
The current version of OpenEars is 0.91 .
This version has a number of changes under the hood and two API changes for existing API calls, so if you want to stick with the previous version 0.9.02 for now, you can still download it here and it contains all of the old support documents as PDFs as well. I’ll support 0.9.0.2 until it’s clear that 0.91 is as stable as 0.9.02 — please just identify which version you are using when seeking support.
OpenEars .91 can:
- Listen continuously for speech on a background thread, while suspending or resuming speech processing on demand, all while using less than 8% CPU on average on a first-generation iPhone (decoding speech, text-to-speech, updating the UI and other intermittent functions use more CPU),
- Use any of 8 voices for speech and switch between them on the fly,
- Know whether headphones are plugged in and continue voice recognition during text-to-speech only when they are plugged in,
- Support bluetooth audio devices (very experimental in this version),
- Dispatch information to any part of your app about the results of speech recognition and speech, or changes in the state of the audio session (such as an incoming phone call or headphones being plugged in),
- Deliver level metering for both speech input and speech output so you can design visual feedback for both states.
- Support JSGF grammars,
- Dynamically generate new ARPA language models in-app based on input from an NSArray of NSStrings,
- Switch between ARPA language models on the fly,
- Be easily interacted with via standard and simple Objective-C methods,
- Control all audio functions with text-to-speech and speech recognition in memory instead of writing audio files to disk and then reading them,
- Drive speech recognition with a low-latency Audio Unit driver for highest responsiveness,
- Be installed in a Cocoa-standard fashion using static library projects that, after initial configuration, allow you to target or re-target any SDKs or architectures that are supported by the libraries (verified as going back to SDK 3.1.2 at least) by making changes to your main project only.
In addition to its various new features and faster recognition/text-to-speech responsiveness, OpenEars now has improved recognition accuracy.
Before using OpenEars, please note that its new low-latency Audio Unit driver is not compatible with the Simulator, so it has a fallback Audio Queue driver for the Simulator provided as a convenience so you can debug recognition logic. This means is that recognition is better on the device, and that I’d appreciate it if bug reports are limited to issues which affect the device.
To use OpenEars:
1. Begin with “Getting Started With OpenEars ” which will explain how to set up the libraries your app will make use of.
2. Then read “Configuring your app for OpenEars ” which will explain how to make the OpenEars libraries available to your app projects, and lastly,
3. You’ll be ready for “Using OpenEars In Your App ” which will explain the objects and methods that will be available to your app and how to use them.
If those steps give you trouble, you can check out the Support and FAQ page.
Getting Started With OpenEars
Conventions used in these instructions:
[OPENEARS] will be used to mean the path on your system to the OpenEars folder after you downloaded and unzipped it. So, if you downloaded it to your Documents folder and your username is “username”, [OPENEARS] means
/Users/username/Documents/OpenEars
What we’ll be doing:
Downloading all of the files needed by OpenEars, moving them into place, and running a script to set up the OpenEars, Pocketsphinx, and Flite static libraries for your app. Then we’ll set the OpenEars project to a valid SDK for getting started with only if that is necessary.
Please note, instructions are now for Xcode 4 only. It is still possible to download the previous version of OpenEars and its distribution contains instructions for Xcode 3 which should be very helpful for figuring out how to install OpenEars .91 in Xcode 3. Another option is to run the sample app, which should work as well in Xcode 3 as Xcode 4, and examine how it is configured. I wish I had the time available to support and fully document both, but since I don’t, I’m opting for Xcode 4 support and documentation moving forward since the final version has been out for months now and it’s a free upgrade for developers with lots of useful new features. You can ask questions about Xcode 3 installs in the forums if you’ve already tried following the instructions in the 0.902 download and I’ll try to answer if there is time.
Before you begin:
Download the following files:
The OpenEars distribution archive here .
The Sphinxbase 0.6.1 distribution archive here .
The Pocketsphinx 0.6.1 distribution archive here .
The Flite 1.4 distribution archive here .
The Flite 8khz voices distribution archive here .
And unzip the OpenEars.zip archive in the location in which you’d like it to remain.
Step 1: put the Sphinxbase 0.6.1 archive, the Pocketsphinx 0.6.1 archive, the Flite 1.4 archive, and the Flite 8khz voice archive in the following folder:
[OPENEARS]/CMULibraries
And unarchive them there. If you like, you can move the original tar.gz archives somewhere else at this point if you don’t have your preferences set to automatically delete archives after unpacking them. That CMULibraries folder should look like this when you’re done:

IMPORTANT: the unarchived folders must be named as follows:
- flite-1.4-release
- pocketsphinx-0.6.1
- sphinxbase-0.6.1
- wince
If they are, you can proceed to step 2. If they aren’t, and they are named something else because the downloaded versions are different, please download the correct version. OpenEars 0.91 only works with Flite 1.4 and pocketsphinx 0.6.1 and sphinxbase 0.6.1. If they are named something else because of something that happened during unarchiving (for instance, there was already an unarchived folder there so the number “2″ was appended onto the end) just rename them so they match the filenames above.
Step 2: Open Terminal and run the following two commands:
cd [OPENEARS]/CMULibraries
and then
./InstallOpenEars.pl
The install script will just pause for a moment and finish if everything went fine. If so, you can proceed to step 3. If everything didn’t go fine you will have some errors in Terminal. If you have any errors, make sure of the following three things:
a. You are working with fresh unarchived downloads of the five folders. A likely error-causing case is making an installation attempt that doesn’t work out, and then instead of starting over fresh, re-running the installation script on the same folders a second time.
b. You have four unarchived folders in your CMULibraries folder called flite-1.4-release, pocketsphinx-0.6.1, sphinxbase-0.6.1, and wince as well as the install script InstallOpenEars.pl that ships with OpenEars.
c. You executed the command:
cd [OPENEARS]/CMULibraries
in Terminal (being sure to replace [OPENEARS] with the actual path to your OpenEars distribution folder!) before executing the command:
./InstallOpenEars.pl
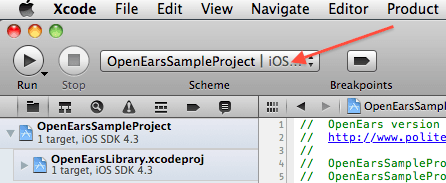
Step 3: Open OpenEarsSampleProject.xcodeproj at [OPENEARS] /OpenEarsSampleProject/OpenEarsSampleProject.xcodeproj and run and install it on a device. OpenEars is possible to run on the Simulator, but since its low-latency driver isn’t compatible with the Simulator, I have provided an alternative Simulator-compatible driver as a convenience so that you can debug recognition logic. However, the recognition on the device is much better and I only offer driver support for the device, so it is best to get used to running OpenEars on the device, and it isn’t possible to evaluate OpenEars’ recognition quality by running it on the Simulator since it uses a completely different audio driver.
Make sure that you have selected OpenEarsSampleProject in the Scheme drop-down menu in the upper left and not OpenEars (which will only cause the library to be compiled).
This should be all that most developers need to do. If this worked for you, congrats, you have configured the static library and you are ready to move on to Configuring Your App For OpenEars .
If (and only if) you get multiple build errors, you may have to take one more step of assigning the base SDK for the library and sample app. From the Finder, double-click on OpenEarsLibrary.xcodeproj — not the sample app project, the library project found at
[OPENEARS]/OpenEarsLibrary/OpenEarsLibrary.xcodeproj
In the Project Navigator, highlight the blue project icon. Then highlight the blue OpenEarsLibrary icon under the PROJECT header in the left column of the editor. Then select the tab Build Settings. Then, select a valid iOS device SDK for the setting Base SDK under the column OpenEarsLibrary so that the Resolved column displays a valid iOS device SDK. Close OpenEarsLibrary.xcodeproj.

Next, from the Finder, double-click on OpenEarsSampleProject.xcodeproj — not the library, the sample app found at
[OpenEars]/OpenEarsSampleProject/OpenEarsSampleProject.xcodeproj
In the Project Navigator, highlight the blue project icon. Then highlight the blue OpenEarsSampleProject icon under the PROJECT header in the left column of the editor. Make sure you highlight OpenEarsSampleProject and not OpenEarsLibrary if OpenEarsLibrary is visible. Then select the tab Build Settings. Then, select a valid iOS device SDK for the setting Base SDK under the column OpenEarsSampleProject so that the Resolved column displays a valid iOS device SDK.

It should now be possible to run the sample app without errors. Before running it on a device, make sure that you have selected OpenEarsSampleProject in the Scheme drop-down menu in the upper left and not OpenEars (which will only cause the library to be compiled).
If you get a single codesign error, you may need to go to the developer portal and create a provisioning profile for the sample app that is valid for your device and developer identity (app provisioning is beyond the scope of these instructions), but I think it ought to be able to work out of the box in most cases.
If you have any remaining issues you can check out the FAQ/Support page, otherwise move on to Configuring Your App For OpenEars
Configuring Your App For OpenEars
Conventions used in these instructions:
[OPENEARS] will be used to mean the path on your system to the OpenEars distribution folder after you downloaded and unzipped it. So, if you downloaded it to your Documents folder and your username is “username”, [OPENEARS] means:
/Users/username/Documents/OpenEars
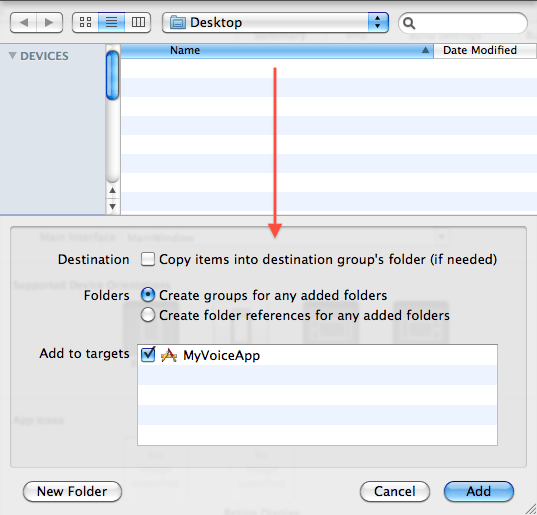
Whenever you are asked to add something to your project , this means very specifically that with your Xcode project open and in the foreground (your app project, not either of the projects that ship with OpenEars), go to the Xcode menubar and select File->Add files to (your project name), or press command-option-a. After you do this, you will always be shown the following window and you should always use the following settings for it:
What we’ll be doing:
Preparing your project to be able to use OpenEars by adding the files that the app needs, the header search paths, the frameworks, and the actual OpenEars library.
Before you begin:
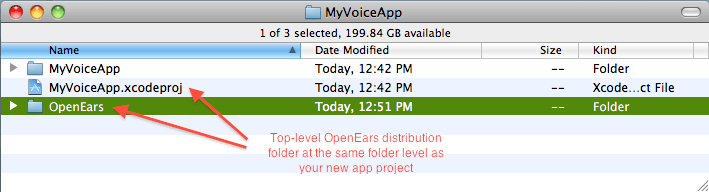
Step 1: using the [OPENEARS] folder that you successfully ran the sample app from in Getting Started With Openears, drag that [OPENEARS] folder into the root folder of your new app project, so that the project file for your app is at the same folder level as the OpenEars folder:
Next, add the following files to your app project (see “Conventions used in these instructions” above for the specifics of adding things to your project):
[OPENEARS]/OpenEarsLibrary/OpenEarsLibrary.xcodeproj
[OPENEARS]/OpenEarsLibrary/Classes/include/OpenEarsConfig.h
[OPENEARS]/CMULibraries/flite-1.4-release/include/OpenEarsVoiceConfig.h
[OPENEARS]/CMULibraries/pocketsphinx-0.6.1/model/lm/en_US/cmu07a.dic
And add the following folder to your project (make sure you add the entire folder, not its individual contents):
[OPENEARS]/CMULibraries/pocketsphinx-0.6.1/model/hmm/en_US/hub4wsj_sc_8k
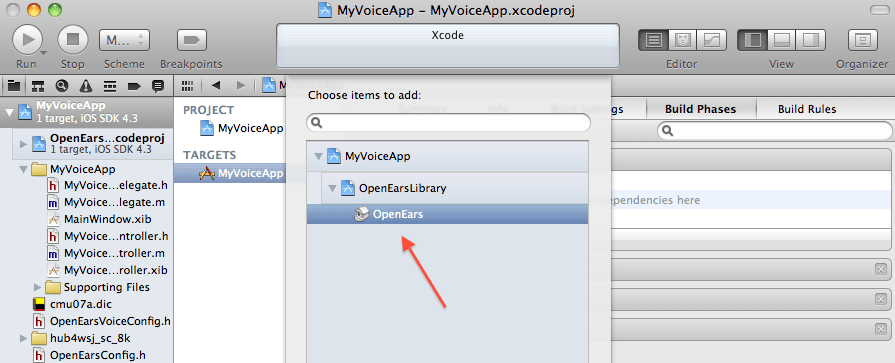
Step 2: From Xcode, select your blue project icon for your app (not the OpenEarsLibrary project) in the Project Navigator and select its target under the TARGETS header in the left-hand column in the editor. Navigate to the tab Build Phases. Click “Target Dependencies”.
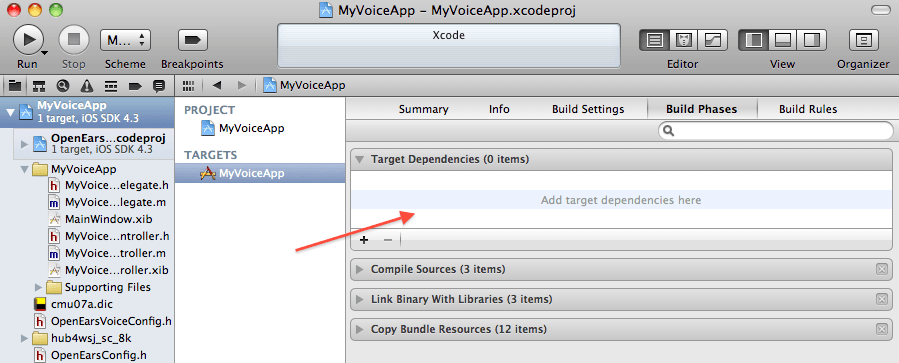
Click the plus button for Target Dependencies. Then select the gray OpenEarsLibrary icon in that dialog and click “Add”.
Step 3: In the same view, with the app target still selected underneath the header TARGETS in the left-hand pane of the editor window, navigate to the Build Phases pane and select “Link Binary With Libraries”.
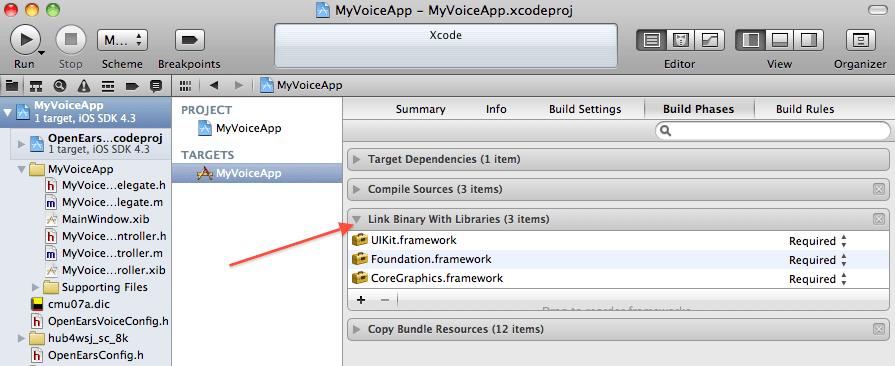
Tapping the plus button, add the OpenEars framework libOpenEarsLibrary.a found in a folder at the top called workspace:
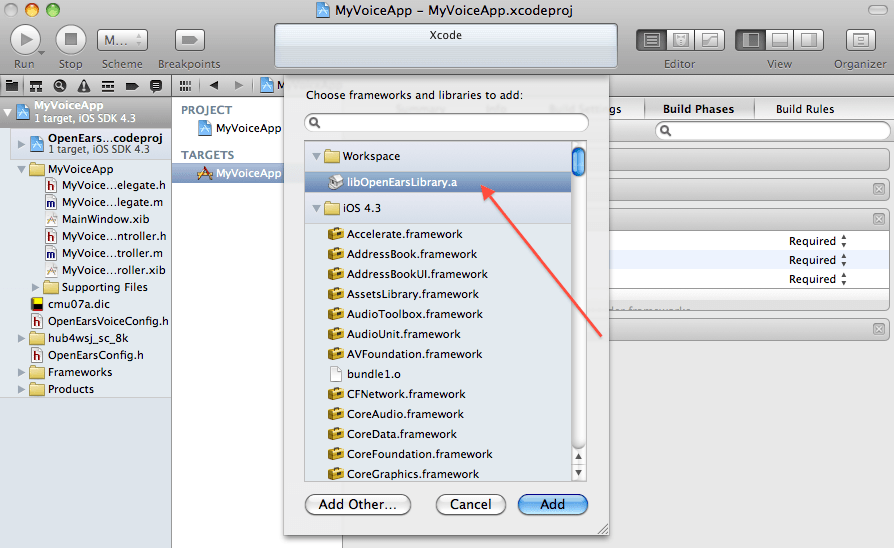
And also add the following iOS frameworks that are found in the same dialog:
AudioToolbox.framework
AVFoundation.framework
libiconv.2.4.0.dylib
Apple has informed me that it is fine to link to libiconv.2.4.0.dylib because its headers are public.
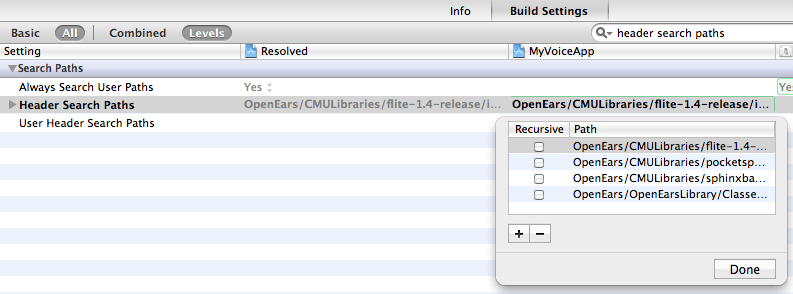
Step 4: In the same view, select your blue project icon in the left-hand editor pane under the header PROJECT and navigate to the tab “Build Settings”. Search for the build setting called Header Search Paths.
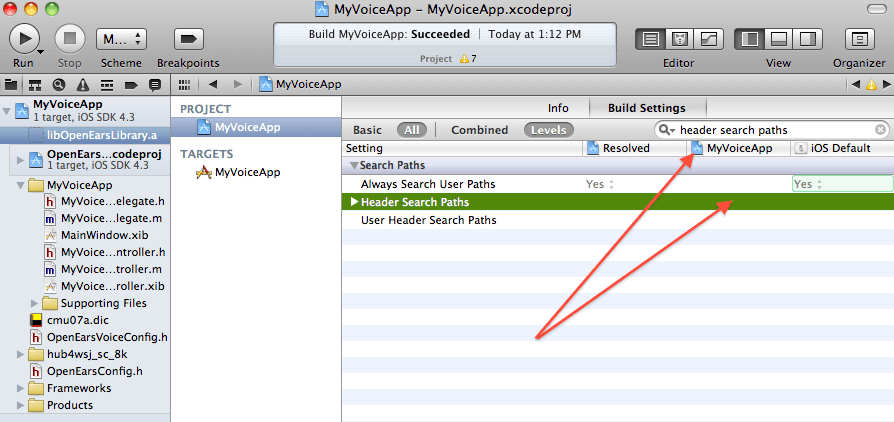
Under the column with the name of your app (as opposed to Resolved or iOS Default), double-click the Header Search Paths setting field and then click the plus button to add each of the following header search paths to your app:
OpenEars/CMULibraries/flite-1.4-release/include
OpenEars/CMULibraries/pocketsphinx-0.6.1/include
OpenEars/CMULibraries/sphinxbase-0.6.1/include
OpenEars/OpenEarsLibrary/Classes/include
None of them should have the “Recursive” checkbox checked.
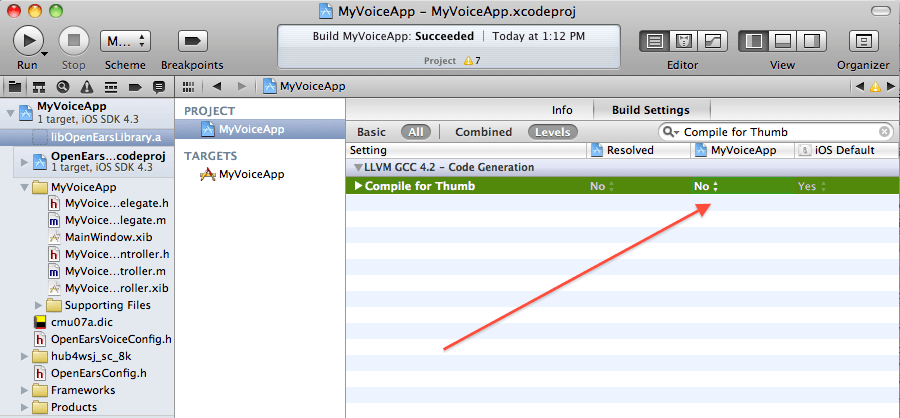
Step 6: While you are in the same view, search for the build setting “Compile for Thumb” and set it to “no”.
Step 6: Any class in which you intend to host PocketsphinxController and/or LanguageModelGenerator must have its suffix .m changed to .mm. So, if it is called MyClass.m you will need to rename it to MyClass.mm or you will get errors.
Step 7: In this class that you just renamed to mm, test whether your app is correctly configured for OpenEars by adding the lines:
#import "AudioSessionManager.h"
#import "PocketsphinxController.h"
#import "FliteController.h"
#import "OpenEarsEventsObserver.h"
#import "LanguageModelGenerator.h"
and then put the following methods anywhere (for testing purposes only, this is not the correct use of these classes at all), for example in viewDidLoad:
AudioSessionManager *audioSessionManager = [[AudioSessionManager alloc]init];
[audioSessionManager release];
PocketsphinxController *pocketsphinxController = [[PocketsphinxController alloc]init];
[pocketsphinxController release];
FliteController *fliteController = [[FliteController alloc]init];
[fliteController release];
LanguageModelGenerator *languageModelGenerator = [[LanguageModelGenerator alloc]init];
[languageModelGenerator release];
If the app can build and run, it is configured correctly to be able to use all the features of OpenEars and you’re done. Remove the test methods from the previous step since they will only cause confusion later if you leave them there, and continue on to “Using OpenEars in your app”.
If you can’t build and run, go carefully through the steps listed above again, making sure that the OpenEars folder is in the right location in your app project folder and that you haven’t made any typos in the Search Header entries or overlooked other small details.
If you continue to have issues, check out the FAQ/Support page , and if everything is working for you, congrats! Continue on to “Using OpenEars In Your App “.
Using OpenEars In Your App
Conventions used in these instructions:
[OPENEARS] will be used to mean the path on your system to the OpenEars distribution folder after you downloaded and unzipped it. So, if you downloaded it to your Documents folder and your username is “username”, [OPENEARS] means:
/Users/username/Documents/OpenEars
Whenever you are asked to add something to your project , this means very specifically that with your Xcode project open and in the foreground (your app project, not either of the projects that ship with OpenEars), go to the Xcode menubar and select File->Add files to (your project name), or press command-option-a. After you do this, you will always be shown the following window and you should always use the following settings for it:
The last convention is that when the instructions say to instantiate an object , I’m assuming that the way you’ll want to do this is to first add an instance variable and @property statement to the header of the relevant class like so:
#import "AnOpenEarsClass.h"
@interface ClassIWantToUseAnOpenEarsObjectIn : UIViewController {
     AnOpenEarsClass *myOpenEarsObject;
}

@property (nonatomic, retain) AnOpenEarsClass *myOpenEarsObject;
@end
And in the implementation file you’ll create a @synthesize, a lazy accessor method for the object, and a dealloc release as shown below:
@implementation ClassIWantToUseAnOpenEarsObjectIn
@synthesize myOpenEarsObject;

- (AnOpenEarsClass *)myOpenEarsObject {
    if (myOpenEarsObject == nil) {
        myOpenEarsObject = [[AnOpenEarsClass alloc] init];
    }
    return myOpenEarsObject;
}

- (void)dealloc {
    [myOpenEarsObject release];
    [super dealloc];
}
@end
Then, when I say to send a message to the object, I mean you will add a line like
[self.myOpenEarsObject theMethodToInvoke];
You might go about instantiating objects differently, which is fine, but in that case you’ll probably know how to change these instructions to match your own approach.
What we’ll be doing:
For a speech recognition project, learning how to define a custom language model for your app if you need to create one to ship with (this is not required if you would prefer to either link to a large general-purpose vocabulary or to create your language model at runtime using OpenEars methods), and learning how to use OpenEars classes and methods inside your own voice recognition/text-to-speech project.
Topics:
1. Adding a language model to your app
2. Using the five important classes of OpenEars
3. Configuration options
4. Handling interruptions
1. Adding a language model to your app
Why a language model?
Speech recognition works by comparing the sounds heard over the mic with
what is called a language model or a grammar, consisting of the words
that the app “knows”, their pronunciations as understood by the acoustic
model, and some rules about how probable those words are to be said or
about what grammatical contexts the words can be understood in. This is a
deep topic but it isn’t necessary to delve into it in order to get
OpenEars working to understand your users.
You aren’t required to add your language model at this step: you can also generate it dynamically in-app using the method:
- (NSError *) generateLanguageModelFromArray:(NSArray *)languageModelArray withFilesNamed:(NSString *)fileName;
that you can read about later on this page . That method lets you very easily pass an NSArray of your words in plain English that OpenEars will turn into a probability-calculated ARPA language model, e.g. [NSArray arrayWithObjects:@"WORD", @"A PHRASE", nil] will be converted for you into a complete language model that recognizes the NSStrings in the NSArray in speech. Or, you can just link a pre-rolled 5000-word vocabulary which is explained here . However, you may also want to to ship your app with a custom built-in language model to start out with, so this step explains how to create that first language model before runtime by making use of the CMU Language Tool.
JSGF or ARPA?
Assuming that you want to ship your app with a pre-created language
model, there are two options for doing this: either creating an ARPA
language model or a JSGF grammar. Going with an ARPA model will let you
use the dynamic language model creation and on-the-fly language model
switching features of OpenEars .91. If you don’t know which to use, skip
down past the JSGF section and read the section which follows starting
with the header “Using an ARPA language model”, which will explain how
to create a new language model or link an existing large language model.
Using a JSGF grammar
Explaining the intricacies of creating JSGF grammars are beyond the
scope of these instructions, so I will just say that if you have a JSGF
grammar and matching .dic file already and you know what to expect of
them, you can use JSGF by adding your JSGF (.gram) file and .dic file to
your project (see “conventions used in these instructions” above for
the details of adding those files to your app project) and then jumping
down to the PocketsphinxController section of “Using the five important
classes of OpenEars” below to learn how to start recognition using that
grammar. Otherwise, continue on to learn how to create a custom ARPA
language model for use with OpenEars by using the CMU Language Tool.
Using an ARPA language model
First of all, you will create a text file called a corpus which is just an all-caps list of the words you want Pocketsphinx to be able to recognize. An example corpus could be a file called corpus.txt consisting of nothing but the following text:
GO
|
FORWARD
|
BACKWARD
|
LEFT
|
RIGHT
|
START
|
STOP
|
TURN
|
If you have phrases or sentences that you would like to have recognized in their entirety, you can put them all on a line, for example:
GO
|
FORWARD
|
BACKWARD
|
LEFT
|
RIGHT
|
START
|
STOP IN THE NAME OF LOVE
|
TURN
|
This will make it more likely that the entire sentence will be recognized, so if you just need the components of the sentence to be recognized in different combinations, put the individual words in the sentence on their own lines.
Now go to the CMU language tool and upload your corpus by pressing “Choose file” and then “COMPILE KNOWLEDGE BASE”. The language tool will process your corpus and give you a downloadable archive linked in the sentence “For your convenience there is also a gzip’d tar file version of the above set.”.
Download and unzip the archive. In this archive will be a file with the suffix “.lm” which you should name to whatever you like with the suffix .languagemodel (for instance, myvoiceproject.languagemodel ). Do this renaming now in the Finder (not later after you have imported the file into Xcode), making sure that you don’t accidentally remove the suffix while renaming. You can verify this by dragging the file into Terminal.app and seeing what Terminal.app thinks the file is called, which will match what Xcode will think it is called. There is also a file with the suffix .dic which you should name to whatever you like with the suffix .dic (for instance, myvoiceproject.dic ). Add both the .languagemodel and .dic files to your project (see “Conventions used in these instructions” above for the specifics of adding things to projects).
Please note: the CMU language model tool is fine to use in order to convert a corpus into a language model manually in the course of configuring your own project, but it is not a public API and it is not to be used in an automated fashion by your app. For in-app language model generation, use the LanguageModelGenerator class of OpenEars.
If you want to use a pre-rolled vocabulary-sized ARPA language model for Pocketsphinx, it’s as easy as adding the following .languagemodel and .dic files to your project:
For the .languagemodel use this file from your install (note: files that end with .DMP are fine to use as ARPA language model files):
[OPENEARS]/CMULibraries/pocketsphinx-0.6.1/model/lm/en_US/hub4.5000.DMP
For the .dic use this file from the Pocketsphinx repository:
This will set you up with a matching 5000 word vocabulary for the default acoustic model which you can then tell PocketsphinxController to start with. To the best of my understanding, 5000 words is the maximum size for decent recognition performance for Pocketsphinx and reasonable resource usage on the device. Keep in mind that using such a large model will increase your memory overhead, and reduce recognition speed and recognition accuracy.
2. Using the five classes of OpenEars
There are five classes that you can create objects for in your
OpenEars-enabled app, the use of all of which can be seen in the example
app that ships with the distribution. The classes are:
AudioSessionManager
PocketsphinxController
FliteController
LanguageModelGenerator
OpenEarsEventsObserver
How to use AudioSessionManager:
AudioSessionManager needs to be instantiated and started before anything else happens in your app, because it creates the audio session that Core Audio needs for voice recognition and it delivers important information to your app such as whether the user has received a phone call or has plugged in headphones.
- It should be instantiated in your app delegate class at the time that the app loads,
- an AudioSessionManager should only be instantiated once in the lifetime of an app,
- it should remain instantiated through the entire lifetime of your app,
- and no other part of your app should override or reset the audio session (you can verify this by doing a case-insensitive search for ‘audiosession’ in your app; any occurrences of this phrase besides the ones where you correctly use AudioSessionManager in your app and outside of the actual AudioSessionManager class are going to override AudioSessionManager).
There is a good example of its use in the app delegate header and app delegate implementation of the example app in the distribution.
To use AudioSessionManager, add the line:
#import "AudioSessionManager.h"
to the class in which you will create the AudioSessionManager object and instantiate it in that class, and then send it the message
[self.myAudioSessionManager startAudioSession]
I recommend doing this at the end of method:
- (BOOL)application:(UIApplication *)application didFinishLaunchingWithOptions:(NSDictionary *)launchOptions;
inside your app delegate class.
The rest of these classes can be created in any order, do not need to be used at all if you don’t need them, and can be instantiated in different classes from each other. Not using AudioSessionManager correctly is the most common reason for problems with OpenEars, so please take a moment to review this and see that it is implemented in your own app before seeking support.[BACK TO TOPIC LIST ]
How to use PocketsphinxController:
PocketsphinxController is the class which recognizes user speech. Add PocketsphinxController to any class by adding the line:
#import "PocketsphinxController.h"
and then instantiating a PocketsphinxController object. You can send a PocketsphinxController the following five messages:
[self.myPocketSphinxController startListeningWithLanguageModelAtPath:pathToALanguageModelFileAsString dictionaryAtPath:pathToADictionaryFileAsString languageModelIsJSGF:YESorNO];
[self.myPocketSphinxController stopListening];
[self.myPocketSphinxController suspendRecognition];
[self.myPocketSphinxController resumeRecognition];
[self.myPocketSphinxController changeLanguageModelToFile:pathToALanguageModelFileAsString withDictionary:pathToADictionaryFileAsString];
startListeningWithLanguageModelAtPath:dictionaryAtPath:languageModelIsJSGF begins the recognition loop with the requested language model files that you either added up above (those should be in mainBundle), or created using the LanguageModelGenerator (those should be in the Documents folder of the app), which entails some startup time since the audio device needs to be calibrated against background levels for about 4 seconds. After this calibration, you do not need to force another calibration later — the calibration will update itself against changing background noise levels. If you are using a JSGF grammar (a .gram file), run with languageModelIsJSGF:TRUE, and if you are using an ARPA grammar (a .languagemodel or .DMP file), run with languageModelIsJSGF:FALSE.
So, if you were using a JSGF grammar called OpenEars.gram and a dictionary called OpenEars.dic you might send the following message:
NSString *gramPath = [NSString stringWithFormat:@"%@/%@",[[NSBundle mainBundle] resourcePath], @"OpenEars.gram"];
NSString *dictionaryPath = [NSString stringWithFormat:@"%@/%@",[[NSBundle mainBundle] resourcePath], @"OpenEars.dic"];
[self.pocketsphinxController startListeningWithLanguageModelAtPath:gramPath dictionaryAtPath:dictionaryPath languageModelIsJSGF:YES];
and if you were using an ARPA language model called OpenEars.languagemodel you might do it this way:
NSString *lmPath = [NSString stringWithFormat:@"%@/%@",[[NSBundle mainBundle] resourcePath], @"OpenEars.languagemodel"];
NSString *dictionaryPath = [NSString stringWithFormat:@"%@/%@",[[NSBundle mainBundle] resourcePath], @"OpenEars.dic"];
[self.pocketsphinxController startListeningWithLanguageModelAtPath:lmPath dictionaryAtPath:dictionaryPath languageModelIsJSGF:NO];
and if you were using a language model that you created dynamically, you would substitute [[NSBundle mainBundle] resourcePath] with the path to the Documents folder, which you can read about obtaining here .
stopListening ends the recognition loop and it is necessary to do this before releasing a PocketSphinxController object.
suspendRecognition does not stop the loop, but it halts speech processing of sound going in the audio input. It is usually instantaneous.
resumeRecognition begins speech processing of sound going in the audio input again. It is usually instantaneous.
changeLanguageModelToFile:withDictionary: switches out the language model for the speech recognizer to the new one you have specified without stopping the recognition loop. After calling this method, the next speech perceived will be compared to your new model instead of the old one. This method only works with ARPA models. Make sure you pass the complete path to your second model as an NSString.
You can also get the input level metering returned as a float by calling:
[self.myPocketSphinxController pocketsphinxInputLevel];
Although you can’t call this frequently enough to animate UI from it without calling it on a background thread. There is an example of an approach for multithreading this kind of level meter reading in the example app.
Only have one living instance of PocketsphinxController at any given moment.
FliteController is the class that converts text to speech. Add FliteController to any class by adding the line:
#import "FliteController.h"
and then instantiating an FliteController.h object. You can send a FliteController the following message:
[self.fliteController say:@"A phrase I'd like my app to speak out loud." withVoice:@"cmu_us_awb8k"];
Where the options for arguments you can enter after withVoice: are as follows:
cmu_us_awb8k
cmu_us_rms8k
cmu_us_slt8k
cmu_time_awb
cmu_us_awb
cmu_us_kal
cmu_us_kal16
cmu_us_rms
cmu_us_slt
You can read descriptions of what these voices are like in OpenEarsVoiceConfig.h, and if you use a voice you also have to uncomment it in OpenEarsVoiceConfig.h. This is for your own benefit; it prevents OpenEars from compiling 9 voices in so that your app size doesn’t get huge. If you try to call a voice that hasn’t been uncommented in OpenEarsVoiceConfig.h your app will crash. You can time voice processing in order to figure out which voice is optimal to use for a given device by turning on OPENEARSLOGGING in OpenEarsConfig.h.
You can also get the Flite speech level metering returned as a float by calling:
[self.fliteController fliteOutputLevel];
Although you can’t call this frequently enough to animate UI from it without calling it on a background thread. There is an example of an approach for multithreading this kind of level meter reading in the example app.
I believe it should be OK to have multiple instances of FliteController but I’d imagine that things will get weird if they try to speak simultaneously.
How to use OpenEarsEventsObserver:
OpenEarsEventsObserver is a class that delivers granular information about what is going on with the AudioSession, Pocketsphinx, and Flite in the form of delegate methods. You can instantiate as many instances of it in as many different parts of your app as you need in order to be able to respond to speech, Audio Session changes, and monitor whether Flite is speaking. It should be extremely lightweight and all of its methods are optional so you can just implement the delegate methods which relate to your goal in a particular class. To use OpenEarsEventsObserver you have to make the current class the delegate of OpenEarsEventsObserver in the following way:
a. In the header of the class you want to add an OpenEarsEventsObserver to, add:
#import "OpenEarsEventsObserver.h"
at the top and then add the protocol <OpenEarsEventsObserverDelegate> after the class inheritance declaration, just like this line from the sample app:
@interface OpenEarsSampleProjectViewController : UIViewController <OpenEarsEventsObserverDelegate> {
Then, in the class implementation where you’d like to use the delegate methods of OpenEarsEventsObserver, after instantiating your OpenEarsEventsObserver object, you will make the class its delegate as follows:
[self.myOpenEarsEventsObserver setDelegate:self];
Now you are able to implement any of the delegate methods of OpenEarsEventsObserver in that class. Here is a list of the available methods with their use described afterwards in a comment:
// Audio Session Status Methods.
- (void) audioSessionInterruptionDidBegin; // There was an interruption.
- (void) audioSessionInterruptionDidEnd; // The interruption ended.
- (void) audioInputDidBecomeUnavailable; // The input became unavailable.
- (void) audioInputDidBecomeAvailable; // The input became available again.
- (void) audioRouteDidChangeToRoute:(NSString *)newRoute; // The audio route changed.
// Pocketsphinx Status Methods.
- (void) pocketsphinxDidStartCalibration; // Pocketsphinx isn't listening yet but it started calibration.
- (void) pocketsphinxDidCompleteCalibration; // Pocketsphinx isn't listening yet but calibration completed.
- (void) pocketsphinxRecognitionLoopDidStart; // Pocketsphinx isn't listening yet but it has entered the main recognition loop.
- (void) pocketsphinxDidStartListening; // Pocketsphinx is now listening.
- (void) pocketsphinxDidDetectSpeech; // Pocketsphinx heard speech and is about to process it.
- (void) pocketsphinxDidDetectFinishedSpeech; // Pocketsphinx detected a second of silence indicating the end of an utterance
- (void) pocketsphinxDidReceiveHypothesis:(NSString *)hypothesis recognitionScore:(NSString *)recognitionScore utteranceID:(NSString *)utteranceID; // Pocketsphinx has a hypothesis.
- (void) pocketsphinxDidStopListening; // Pocketsphinx has exited the continuous listening loop.
- (void) pocketsphinxDidSuspendRecognition; // Pocketsphinx has not exited the continuous listening loop but it will not attempt recognition.
- (void) pocketsphinxDidResumeRecognition; // Pocketsphinx has not exited the continuous listening loop and it will now start attempting recognition again.
- (void) pocketsphinxDidChangeLanguageModelToFile:(NSString *)newLanguageModelPathAsString andDictionary:(NSString *)newDictionaryPathAsString; // Pocketsphinx switched language models inline.
- (void) pocketSphinxContinuousSetupDidFail; // Some aspect of setting up the continuous loop failed, turn on OPENEARSLOGGING for more info.
// Flite Status Methods.
- (void) fliteDidStartSpeaking; // Flite started speaking. You probably don't have to do anything about this.
- (void) fliteDidFinishSpeaking; // Flite finished speaking. You probably don't have to do anything about this.
You can implement as many or as few of these methods as are useful to you in a class. So, for instance, to see what speech Pocketsphinx recognized if you have a PocketsphinxController instantiated and started up, you can implement:
- (void) pocketsphinxDidReceiveHypothesis:(NSString *)hypothesis recognitionScore:(NSString *)recognitionScore utteranceID:(NSString *)utteranceID;
in your class like this:
- (void) pocketsphinxDidReceiveHypothesis:(NSString *)hypothesis recognitionScore:(NSString *)recognitionScore utteranceID:(NSString *)utteranceID {
NSLog(@"Pocketsphinx recognized the following phrase:%@", hypothesis);
}
There are thorough examples of how to use all the methods in the example app.
When you are ready to release an OpenEarsEventsObserver object in a class, make sure that you first set its delegate to nil in a line such as:
[self.myOpenEarsEventsObserver setDelegate:nil];
Then release it afterwards. We are just making sure that nothing tries to message it after it's gone.
[BACK TO TOPIC LIST
]
To use LanguageModelGenerator, instantiate it and send it the message:
[languageModelGenerator generateLanguageModelFromArray:myWordArray withFilesNamed:myPreferredFilename]
myWordArray is an NSArray filled with words you like to be able to recognize written in all capital letters, e.g.:
NSArray *myWordArray = [NSArray arrayWithObjects:@"WORD", @"OTHER", @"PHRASE TO RECOGNIZE",nil];
If you put a whole phrase as one of the array objects, that phrase will have a higher probability of being recognized in its entirety.
IMPORTANT: memory use during language generation is on the order of 60k per word, making an appropriate language model generation size something less than 200 words for an app that is otherwise running a modest memory overhead. A future version may include built-in limiting and multiple passes for large language models, but in the meantime the obligation is on the developer to generate language models that can be handled by the available memory in their app at the time of generation. This can be tested by running activity monitor during generation to watch the actual memory use during the language model generation spike in memory usage.
myPreferredFilename is an NSString stating how you'd like the .languagemodel and .dic files that LanguageModelGenerator creates to be named. So, if you pass in @"OpenEarsDynamicModel" here, you'll get a language model saved to your Documents folder with the filenames OpenEarsDynamicModel.languagemodel and OpenEarsDynamicModel.dic. These files are always saved to the Documents folder. If there is already a file there with the same name, it will be overwritten without any warning, so it is your responsibility to make sure to use unique names if this is not the behavior you want.
generateLanguageModelFromArray:withFilesNamed: returns an NSError, and when its NSError has a code of zero, i.e. there was no error, it includes a userInfo dictionary that has the full paths to your new files in it. There is an example of how to read this dictionary in order to get the paths in the sample app and I recommend checking it out. These paths are important because you will want to pass them to PocketsphinxController in order to have it switch to using your new language model, and getting them out of this dictionary can let you do that entire process programmatically. It is also useful for troubleshooting. You can read about how to obtain the path to your documents folder here .
3. Configuration options
There are a few available configuration options for OpenEars in the two config files OpenEarsConfig.h and OpenEarsVoiceConfig.h. The options in OpenEarsConfig.h can be set by commenting or uncommenting the #define lines and are as follows:
#define OPENEARSLOGGING // Turn this on to get logging output from audio driver initialization, etc. Please turn on and submit output when reporting a problem.
#define VERBOSEPOCKETSPHINX // Leave this uncommented to get verbose output from Pocketsphinx, comment it out for quiet operation. Any time that you have an issue with recognition, start by uncommenting this and OPENEARSLOGGING.
#define VERBOSEMITLM // Leave this uncommented to get a bit more output from language model generation
#define USERCANINTERRUPTSPEECH // Turn this on if you wish to let users cut off Flite speech by talking (only possible when headphones are plugged in). Not sure if this is 100% functional in v 0.91
#define kSecondsOfSilenceToDetect .7 // This is the amount of time that Pocketsphinx should wait before deciding that an utterance is complete and trying to decode it as speech. Make it longer (for instance 1.0 to have decoding take place after a second of silence, which is the Pocketsphinx default) if you find Pocketsphinx isn't letting your users finish sentences, make it shorter if you only use a small number of single words in your command and control grammar and want more responsiveness. Do not comment this out; this is not an optional constant.
In OpenEarsVoiceConfig.h, you just uncomment any of the #define lines in order to use that voice for speech. If you aren't using Flite speech, you can comment out all of them and it will reduce the size of your binary by a few MB, but one voice will still be used if you make use of LanguageModelGenerator.
[BACK TO TOPIC LIST
]
If you have any questions about how to use the things described in this
page, I would recommend taking some time to play with the example app,
which shows how everything here works.
4. Handling interruptions
Just like with every other audio app, you need to handle interruptions (e.g. an incoming phone call) and route changes (e.g. a plugged or unplugged headset) correctly when using OpenEars. In the case of OpenEars, that means stopping audio processes that are in progress at the time of interruption or route change and restarting them. There is a very clear example of how to handle this in the sample app by using the OpenEarsEventsObserver class to report a route change or interruption and stop recognition, and then restarting it when the interruption or route change is complete. If you don't react to these changes of device state at all, the odds are good that you can get a crash as a result since OpenEars will be asked to resume right in the middle of a fast loop and that behavior is undocumented. I believe that it is necessary for Pocketsphinx to be recalibrated when there is a route change or interruption, but that will happen automatically when you restart the stopped recognition loop after a route change or interruption.