本文中phaser具体版本
phaser2:2.8.1
phaser3:3.17.0
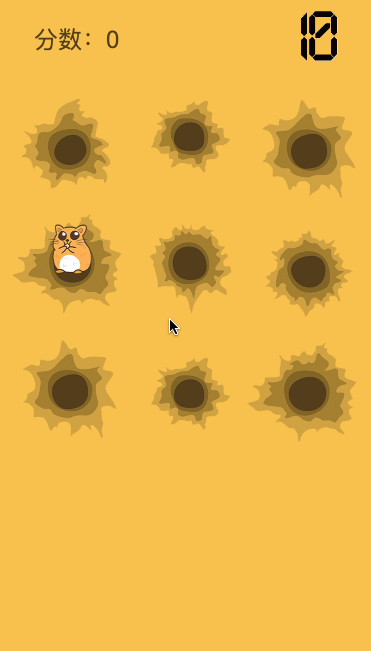
一、实现效果
二、实现细节
三、项目总结
四、参考文档
一、实现效果

源码地址(phaser2&phaser3):https://github.com/jinglecjy/phaser-dadishu/
体验地址:https://jinglecjy.github.io/phaser-dadishu/ver-phaser2/dist/
二、实现细节
这个demo其实是之前学习phaser2的时候做的,现在用来改成phaser3,刚好可以接触一下新的API变动有多大。
按照游戏实现的逻辑顺序,下面捋一捋用到的Phaser3 API,同时也与Phaser2 API进行简单对比。
第一步:初始化游戏new Phaser.Game
初始化画布参数,包括画布宽高,渲染方式,并将其插入dom结构中。phaser3中用scenes替代了phaser2中的states,为了避免与state machines概念混淆。
游戏中的一个scene是一个独立的场景,拥有自己的独立资源,包括相机系统、显示列表、更新步骤、事件处理、物理系统等等。游戏一次只能执行一个scene,一个场景通过多个钩子函数来维护,包括init、preload、create、update等。
1
2
3
4
5
6
7
8
9
10
11
12
13
14
15
16
17
18
19
20
21
22
23
24
25
26
27
28
29
30
31
32
33
34
35
36
37
38
39
40
41
42
43
44
45
|
conf = {
750,
height: 750/window.innerWidth*window.innerHeight,
type: Phaser.AUTO,
parent: 'container',
backgroundColor: '#f9c04c',
scale: {
mode: Phaser.Scale.FIT
},
scene: {
init: function(){
},
preload: function(){
},
create: function(){
},
update: function(){
},
}
}
game = new Phaser.Game(conf);
game = new Phaser.Game(750, 750/window.innerWidth*window.innerHeight, Phaser.AUTO, 'container',
{
init: function(){
},
preload: function(){
},
create: function(){
},
update: function(){
},
})
|
第二步:预加载资源
预加载资源操作一般在preload函数中执行,这一部分的API,phaser2和phaser3基本一致,不过phaser3对游戏对象结构进行了修改,phaser2中是树状结构,游戏中所有对象都来自于根对象Phaser.Game,对象也拥有自己的子对象。phaser3中将这些对象拆解出来,游戏对象Phaser.Game不包含其他对象组,且对象组不具有任何的位置或者属性。
1
2
3
4
5
6
7
8
9
10
11
12
13
14
15
16
17
18
19
20
21
22
23
24
25
26
27
28
29
30
31
32
33
34
35
36
37
38
39
40
41
42
43
44
45
46
47
48
49
|
preload: function () {
console.log("start loading ...");
this.numbersJson = require('../json/numbers.json');
this.load.image('bg', './img/holes-bg.png');
this.load.image('hamster', './img/hamster.png');
this.load.image('hammer', './img/hammer.png');
this.load.image('lightning', './img/lightning.png');
this.load.atlas('sprite_numbers', './img/numbers.png', this.numbersJson);
this.load.on('complete', loadProgress);
function (loader, finishedNum) {
console.log(`${finishedNum}个资源加载完毕,可以开始游戏了!`);
$(".cjy_panel .start_btn").click(function () {
$(".cjy_panel").hide();
customGame.scene.start('play');
})
}
}
preload: function 大专栏 phaser2->3:来个打地鼠试水 () {
console.log("start loading ...");
this.numbersJson = require('../json/numbers.json');
console.log(window.customGame)
window.customGame.scale.scaleMode = Phaser.ScaleManager.SHOW_ALL;
window.customGame.stage.backgroundColor = '#f9c04c';
window.customGame.load.image('bg', './img/holes-bg.png');
window.customGame.load.image('hamster', './img/hamster.png');
window.customGame.load.image('hammer', './img/hammer.png');
window.customGame.load.image('lightning', './img/lightning.png');
window.customGame.load.atlasJSONHash('sprite_numbers', './img/numbers.png', '', this.numbersJson);
window.customGame.load.onLoadComplete.add(loadProgress, this);
function () {
console.log('资源加载完毕,可以开始游戏啦!')
$(".cjy_panel .start_btn").click(function () {
console.log("开始游戏!");
$(".cjy_panel").hide();
customGame.state.start('play');
})
}
}
|
第三步:创建对象
创建对象操作一般在create函数中执行,这一部分的API基本一致,差别与load相似,都是由于修改了整体数据结构导致的。
1
2
3
4
5
6
7
|
this.hammer = this.add.sprite(hammerx, hammery, 'hammer').setOrigin(0, 0.8);
this.hammer = customGame.add.sprite(hammerx, hammery, 'hammer');
this.hammer.anchor.setTo(0, 0.8);
|
第四步:动画
phaser2和phaser3都提供了内置tween动画供开发者使用,相比较于phaser2,phaser3中的tween动画配置更加灵活丰富,具体完整的配置项列表可以参照官方文档。
1
2
3
4
5
6
7
8
9
10
11
12
13
14
|
this.tweens.add({
targets: [this.hammer],
angle: 45,
duration: 50,
callbackScope: this,
ease: 'Linear'
})
var rotateTween = customGame.add.tween(this.hammer);
rotateTween.to({
angle: 45
}, 50, Phaser.Easing.Cubic.In, true);
|
第五步:交互行为
phaser本身没有dom概念,所有的交互都需要依赖phaser自身的API,通过Phaser.Input统一管理所有的input事件。当交互发生时,与之交互的Phaser.Game对象将向下分发事件,phaser3可以在scene/gameObject中监听该事件,不同的位置监听事件其作用域不同,优先级也不同,优先级较高的事件处理器可阻止向低优先级事件传递(stop propagation)。
1
2
3
4
5
6
7
|
this.input.on('pointerdown', onTap, this);
function onTap(pointer,currentlyOver) { ... }
customGame.input.onTap.add(onTap, this);
function onTap(pointer, doubleTap) { ... }
|
第六步:计时器
1
2
3
4
5
6
7
8
9
10
11
|
this.time.addEvent({
loop: true,
delay: 1000,
callback: timerFn,
callbackScope: this
})
customGame.time.events.loop(Phaser.Timer.SECOND, this.timerFn, this);
customGame.time.events.start();
|
三、项目总结
一些可以改进优化的细节:
- 【前端】资源预加载与游戏过程应当在同一个scene中,之前没捋清楚逻辑,把这两个步骤拆开了
- 【交互】疯狂点击页面会出现很多个小锤子,短时间内多次点击应该只响应一次
- 【交互】打到地鼠时的反馈感加强,比如地鼠有晕眩动效/音效提示/+1效果等等
- 【玩法】地鼠出现时间越来越快
- 【玩法】主角多样化,除了地鼠还可以有炸弹/手拿礼物的地鼠/其他道具,分数不同
phaser2上手较快,API简单,官方文档示例比较丰富,值得继续探索,后续会试水一下物理引擎。phaser3是正在开发的版本,相较于phaser2 API变化较多,文档完善度不够,基本上是查源码猜API。试水过程可以感受到phaser3对API设计重新考量,比如用对象来代替原有的基本数据类型作为函数参数,可读性和灵活性更佳。另外,phaser3增强了camera的功能,新增了对Matter.js物理引擎的支持,对2D骨骼动画的支持等等,此处不进行赘述,详细的可以查看phaser官网的具体公告,或者是参考文章 全新Phaser3游戏引擎特性一览(来自凹凸实验室) 。
关于自学:个人觉得phaser API的学习方法最直观的是在控制台打印一下,尤其是对于初学者来说,对于其中的结构没有清晰的认识,直接看文档容易混乱,具体使用也可以参照官方示例。
彩虹屁结束之后,不得不说,如果是项目实际使用,建议还是使用稳定版本phaser2,简单的小游戏还是够用的。
六、参考文档
- Phaser官网:http://phaser.io/
- Phaser2 API文档:http://phaser.io/docs/2.6.2/index
- Phaser3 API文档:https://photonstorm.github.io/phaser3-docs/
- Phaser3官方示例:https://labs.phaser.io/
- 全新Phaser3游戏引擎特性一览:https://aotu.io/notes/2018/12/23/phaser3/