下载安装包
[root@java_tools MariaDB-10.4.8.stable-CentOS7.x]# ls -ll
total 50912
-rw-r--r--. 1 root root  9837920 Nov 19  2019 galera-4-26.4.2-1.rhel7.el7.centos.x86_64.rpm
-rw-r--r--. 1 root root   106112 Nov 19  2019 jemalloc-3.6.0-1.el7.x86_64.rpm
-rw-r--r--. 1 root root    22876 Nov 19  2019 jemalloc-devel-3.6.0-1.el7.x86_64.rpm
-rw-r--r--. 1 root root 12270136 Nov 19  2019 MariaDB-client-10.4.8-1.el7.centos.x86_64.rpm
-rw-r--r--. 1 root root    82532 Nov 19  2019 MariaDB-common-10.4.8-1.el7.centos.x86_64.rpm
-rw-r--r--. 1 root root  2974164 Nov 19  2019 MariaDB-compat-10.4.8-1.el7.centos.x86_64.rpm
-rw-r--r--. 1 root root 26828076 Nov 19  2019 MariaDB-server-10.4.8-1.el7.centos.x86_64.rpm
按照顺序安装环境好依赖
yum -y install rsync nmap lsof perl-DBI nc
rpm -ivh jemalloc-3.6.0-1.el7.x86_64.rpm
rpm -ivh jemalloc-devel-3.6.0-1.el7.x86_64.rpm
解决冲突的mariadb-libs
-
搜索
[root@java_tools MariaDB-10.4.8.stable-CentOS7.x]# rpm -qa | grep mariadb-libs mariadb-libs-5.5.68-1.el7.x86_64 -
删除
[root@java_tools MariaDB-10.4.8.stable-CentOS7.x]# rpm -ev --nodeps mariadb-libs-5.5.68-1.el7.x86_64
Preparing packages...
mariadb-libs-1:5.5.68-1.el7.x86_64
安装boost-devel 依赖环境
yum -y install boost-devel.x86_64导入MariaDB的key
rpm --import http://yum.mariadb.org/RPM-GPG-KEY-MariaDB安装galera环境
rpm -ivh galera-4-26.4.2-1.rhel7.el7.centos.x86_64.rpm安装libaio
wget http://mirror.centos.org/centos/7/os/x86_64/Packages/libaio-0.3.109-13.el7.x86_64.rpmrpm -ivh libaio-0.3.109-13.el7.x86_64.rpm安装MariaDB的4个核心包
rpm -ivh MariaDB-common-10.4.8-1.el7.centos.x86_64.rpm MariaDB-compat-10.4.8-1.el7.centos.x86_64.rpmrpm -ivh MariaDB-client-10.4.8-1.el7.centos.x86_64.rpm MariaDB-server-10.4.8-1.el7.centos.x86_64.rpm安装完MariaDb后,还需要配置数据库,在命令行中执行如下命令以启动MySQL服务。(MariaDB就是MySQL的分支)
service mysql start启动成功后运行如下命令进行安全配置
mysql_secure_installation1.输入当前密码,初次安装后是没有密码的,直接回车 2.询问是否使用`unix_socket`进行身份验证:n 3.为root设置密码:y 4.输入root的新密码:root 5.确认输入root的新密码:root 6.是否移除匿名用户,这个随意,建议删除:y 7.拒绝用户远程登录,这个建议开启:n 8.删除test库,可以保留:n 9.重新加载权限表:yNOTE: RUNNING ALL PARTS OF THIS SCRIPT IS RECOMMENDED FOR ALL MariaDB SERVERS IN PRODUCTION USE! PLEASE READ EACH STEP CAREFULLY! In order to log into MariaDB to secure it, we'll need the current password for the root user. If you've just installed MariaDB, and haven't set the root password yet, you should just press enter here. Enter current password for root (enter for none): OK, successfully used password, moving on... Setting the root password or using the unix_socket ensures that nobody can log into the MariaDB root user without the proper authorisation. You already have your root account protected, so you can safely answer 'n'. Switch to unix_socket authentication [Y/n] n ... skipping. You already have your root account protected, so you can safely answer 'n'. Change the root password? [Y/n] y New password: Re-enter new password: Password updated successfully! Reloading privilege tables.. ... Success! By default, a MariaDB installation has an anonymous user, allowing anyone to log into MariaDB without having to have a user account created for them. This is intended only for testing, and to make the installation go a bit smoother. You should remove them before moving into a production environment. Remove anonymous users? [Y/n] y ... Success! Normally, root should only be allowed to connect from 'localhost'. This ensures that someone cannot guess at the root password from the network. Disallow root login remotely? [Y/n] n ... skipping. By default, MariaDB comes with a database named 'test' that anyone can access. This is also intended only for testing, and should be removed before moving into a production environment. Remove test database and access to it? [Y/n] n ... skipping. Reloading the privilege tables will ensure that all changes made so far will take effect immediately. Reload privilege tables now? [Y/n] y ... Success! Cleaning up... All done! If you've completed all of the above steps, your MariaDB installation should now be secure. Thanks for using MariaDB!配置远程连接
grant all privileges on *.* to 'root'@'%' identified by '123456';flush privileges;关闭Cent OS7防火墙
- 停止firewall
systemctl stop firewalld.service-
禁止firewall开机自启
[root@java_tools MariaDB-10.4.8.stable-CentOS7.x]# systemctl disable firewalld.service Removed symlink /etc/systemd/system/multi-user.target.wants/firewalld.service. Removed symlink /etc/systemd/system/dbus-org.fedoraproject.FirewallD1.service.-
检查当前firewall状态、
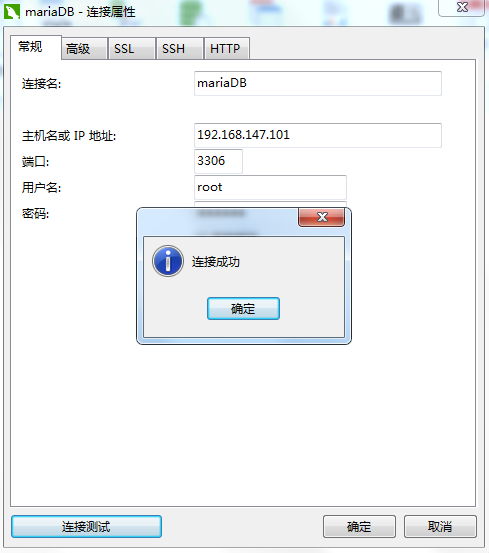
[root@java_tools MariaDB-10.4.8.stable-CentOS7.x]# firewall-cmd --state
not running
远程测试连接
-