前言
啦啦啦~各位好久不见啦~博主最近比较忙,而且最近一次实验也是刚刚结束~
好了不废话了,直接进入我们这次的内容~
在这篇博文里我们将学习Service(服务)的相关知识,学会使用 Service 进行后台工作, 学会使用 Service 与 Activity 进行通信,并在此知识基础上学会使用 MediaPlayer和简单的多线程编程、使用 Handle 更新 UI,并设计成功一个简单的音乐播放器。
是不是很高大上呢~一起来学习~
基础知识
Service作为Android四大组件之一,在每一个应用程序中都扮演着非常重要的角色。它主要用于在后台处理一些耗时的逻辑,或者去执行某些需要长期运行的任务。必要的时候我们甚至可以在程序退出的情况下,让Service在后台继续保持运行状态。
所以Service通常被称为“后台服务”,其中“后台”一词是相对于前台而言的,具体是指其本身的运行并不依赖于用户可视的UI界面,因此,从实际业务需求上来理解,Service的适用场景应该具备以下条件:
(1)并不依赖于用户可视的UI界面(当然,这一条其实也不是绝对的,如前台Service就是与Notification界面结合使用的);
(2)具有较长时间的运行特性。
1.Service AndroidManifest.xml 声明
一般而言,从Service的启动方式上,可以将Service分为Started Service和Bound Service。无论哪种具体的Service启动类型,都是通过继承Service基类自定义而来。在使用Service时,要想系统能够找到此自定义Service,无论哪种类型,都需要在AndroidManifest.xml中声明,语法格式如下:
<service android:enabled=["true" | "false"]
    android:exported=["true" | "false"]
    android:icon="drawable resource"
    android:isolatedProcess=["true" | "false"]
    android:label="string resource"
    android:name="string"
    android:permission="string"
    android:process="string" >
    . . .
</service>
其中,android:name对应Service类名,android:permission是权限声明,android:process设置具体的进程名称。需要注意的是Service能否单独使用一个进程与其启动方式有关,本后下面会给出具体说明。其他的属性此处与其他组件基本相同,不再过多描述。
注:如果自定义Service没有在AndroidManifest.xml中声明,当具体使用时,不会像Activity那样直接崩溃报错,对于显式Intent启动的Service,此时也会给出waring信息“IllegalArgumentException: Service not registered”,有时候不容易发现忘了声明而一时定位不到问题。
2.Started Service
Started Service相对比较简单,通过context.startService(Intent serviceIntent)启动Service,context.stopService(Intent serviceIntent)停止此Service。当然,在Service内部,也可以通过stopSelf(...)方式停止其本身。
1)Started Service自定义
下面代码片段显示的是一个最基本的Started Service的自定义方式:
public class MyService extends Service {

    public static final String TAG = "MyService";

    @Override
    public IBinder onBind(Intent intent) {
        return null;
    }

    @Override
    public void onCreate() {
        super.onCreate();
        Log.w(TAG, "in onCreate");
    }

    @Override
    public int onStartCommand(Intent intent, int flags, int startId) {
        Log.w(TAG, "in onStartCommand");
        Log.w(TAG, "MyService:" + this);
        String name = intent.getStringExtra("name");
        Log.w(TAG, "name:" + name);
        return START_STICKY;
    }

    @Override
    public void onDestroy() {
        super.onDestroy();
        Log.w(TAG, "in onDestroy");
    }
}
其中,onBind(...)函数是Service基类中的唯一抽象方法,子类都必须重写实现,此函数的返回值是针对Bound Service类型的Service才有用的,在Started Service类型中,此函数直接返回 null 即可。onCreate(...)、onStartCommand(...)和onDestroy()都是Started Service相应生命周期阶段的回调函数。
2) Started Service使用
public class MainActivity extends Activity {

    public static final String TAG = "MainActivity";

    private Button startServiceBtn;
    private Button stopServideBtn;
    private Button goBtn;

    private Intent serviceIntent;

    @Override
    protected void onCreate(Bundle savedInstanceState) {
        super.onCreate(savedInstanceState);
        setContentView(R.layout.activity_main);

        startServiceBtn = (Button) findViewById(R.id.start_service);
        stopServideBtn = (Button) findViewById(R.id.stop_service);
        goBtn = (Button) findViewById(R.id.go);

        startServiceBtn.setOnClickListener(new View.OnClickListener() {
            @Override
            public void onClick(View v) {
                serviceIntent = new Intent(MainActivity.this, MyService.class);
                startService(serviceIntent);
            }
        });

        stopServideBtn.setOnClickListener(new View.OnClickListener() {
            @Override
            public void onClick(View v) {
                stopService(serviceIntent);
            }
        });

        goBtn.setOnClickListener(new View.OnClickListener() {
            @Override
            public void onClick(View v) {
                Intent intent = new Intent(MainActivity.this, BActivity.class);
                startActivity(intent);
            }
        });

    }

    @Override
    protected void onDestroy() {
        super.onDestroy();
        Log.w(TAG, "in onDestroy");
    }
}
如上代码片段。
当Client调用startService(Intent serviceIntent)后,如果MyService是第一次启动,首先会执行 onCreate()回调,然后再执行onStartCommand(Intent intent, int flags, int startId),当Client再次调用startService(Intent serviceIntent),将只执行onStartCommand(Intent intent, int flags, int startId),因为此时Service已经创建了,无需执行onCreate()回调。无论多少次的startService,只需要一次stopService()即可将此Service终止,执行onDestroy()函数(其实很好理解,因为onDestroy()与onCreate()回调是相对的)。
下面重点关注下onStartCommand(Intent intent, int flags, int startId)方法。
其中参数flags默认情况下是0,对应的常量名为START_STICKY_COMPATIBILITY。startId是一个唯一的整型,用于表示此次Client执行startService(...)的请求请求标识,在多次startService(...)的情况下,呈现0,1,2....递增。另外,此函数具有一个int型的返回值,具体的可选值及含义如下:
START_NOT_STICKY:当Service因为内存不足而被系统kill后,接下来未来的某个时间内,即使系统内存足够可用,系统也不会尝试重新创建此Service。除非程序中Client明确再次调用startService(...)启动此Service。
START_STICKY:当Service因为内存不足而被系统kill后,接下来未来的某个时间内,当系统内存足够可用的情况下,系统将会尝试重新创建此Service,一旦创建成功后将回调onStartCommand(...)方法,但其中的Intent将是null,pendingintent除外。
START_REDELIVER_INTENT:与START_STICKY唯一不同的是,回调onStartCommand(...)方法时,其中的Intent将是非空,将是最后一次调用startService(...)中的intent。
START_STICKY_COMPATIBILITY:compatibility version of {@link #START_STICKY} that does not guarantee that {@link #onStartCommand} will be called again after being killed。此值一般不会使用,所以注意前面三种情形就好。
3) Started Service生命周期及进程相关
1.onCreate(Client首次startService(..)) >> onStartCommand >> onStartCommand - optional ... >> onDestroy(Client调用stopService(..))
注:onStartCommand(..)可以多次被调用,onDestroy()与onCreate()想匹配,当用户强制kill掉进程时,onDestroy()是不会执行的。
2.对于同一类型的Service,Service实例一次永远只存在一个,而不管Client是否是相同的组件,也不管Client是否处于相同的进程中。
3.Service通过startService(..)启动Service后,此时Service的生命周期与Client本身的什么周期是没有任何关系的,只有Client调用stopService(..)或Service本身调用stopSelf(..)才能停止此Service。当然,当用户强制kill掉Service进程或系统因内存不足也可能kill掉此Service。
4.Client A 通过startService(..)启动Service后,可以在其他Client(如Client B、Client C)通过调用stopService(..)结束此Service。
5.Client调用stopService(..)时,如果当前Service没有启动,也不会出现任何报错或问题,也就是说,stopService(..)无需做当前Service是否有效的判断。
6.startService(Intent serviceIntent),其中的intent既可以是显式Intent,也可以是隐式Intent,当Client与Service同处于一个App时,一般推荐使用显示Intent。当处于不同App时,只能使用隐式Intent。
当Service需要运行在单独的进程中,AndroidManifest.xml声明时需要通过android:process指明此进程名称,当此Service需要对其他App开放时,android:exported属性值需要设置为true(当然,在有intent-filter时默认值就是true)。
<service
    android:name=".MyService"
    android:exported="true"
    android:process=":MyCorn" >
    <intent-filter>
        <action android:name="com.example.androidtest.myservice" />
    </intent-filter>
</service>
4)Started Service Client与Service通信相关
当Client调用startService(Intent serviceIntent)启动Service时,Client可以将参数通过Intent直接传递给Service。Service执行过程中,如果需要将参数传递给Client,一般可以通过借助于发送广播的方式(此时,Client需要注册此广播)。
3.Bound Service
相对于Started Service,Bound Service具有更多的知识点。Bound Service的主要特性在于Service的生命周期是依附于Client的生命周期的,当Client不存在时,Bound Service将执行onDestroy,同时通过Service中的Binder对象可以较为方便进行Client-Service通信。Bound Service一般使用过程如下:
1.自定义Service继承基类Service,并重写onBind(Intent intent)方法,此方法中需要返回具体的Binder对象;
2.Client通过实现ServiceConnection接口来自定义ServiceConnection,并通过bindService (Intent service, ServiceConnection sc, int flags)方法将Service绑定到此Client上;
3.自定义的ServiceConnection中实现onServiceConnected(ComponentName name, IBinder binder)方法,获取Service端Binder实例;
4.通过获取的Binder实例进行Service端其他公共方法的调用,以完成Client-Service通信;
5.当Client在恰当的生命周期(如onDestroy等)时,此时需要解绑之前已经绑定的Service,通过调用函数unbindService(ServiceConnection sc)。
在Bound Service具体使用过程中,根据onBind(Intent intent)方法放回的Binder对象的定义方式不同,又可以将其分为以下三种方式,且每种方式具有不同的特点和适用场景:
1).Extending the Binder class
这是Bound Service中最常见的一种使用方式,也是Bound Service中最简单的一种。
局限:Clinet与Service必须同属于同一个进程,不能实现进程间通信(IPC)。否则则会出现类似于“android.os.BinderProxy cannot be cast to xxx”错误。
下面通过代码片段看下具体的使用:
public class MyBindService extends Service {

    public static final String TAG = "MyBindService";

    private MyBinder mBinder = new MyBinder();

    public class MyBinder extends Binder {
        MyBindService getService() {
            return MyBindService.this;
        }
    }

    @Override
    public void onCreate() {
        super.onCreate();
        Log.w(TAG, "in onCreate");
    }

    @Override
    public IBinder onBind(Intent intent) {
        Log.w(TAG, "in onBind");
        return mBinder;
    }

    @Override
    public boolean onUnbind(Intent intent) {
        Log.w(TAG, "in onUnbind");
        return super.onUnbind(intent);
    }

    @Override
    public void onDestroy() {
        super.onDestroy();
        Log.w(TAG, "in onDestroy");
    }
}
public class BActivity extends Activity {

    public static final String TAG = "BActivity";

    private Button bindServiceBtn;
    private Button unbindServiceBtn;

    private Button startIntentService;

    private Intent serviceIntent;

    private ServiceConnection sc = new MyServiceConnection();
    private MyBinder mBinder;
    private MyBindService mBindService;
    private boolean mBound;

    private class MyServiceConnection implements ServiceConnection {

        @Override
        public void onServiceConnected(ComponentName name, IBinder binder) {
            Log.w(TAG, "in MyServiceConnection onServiceConnected");
            mBinder = (MyBinder) binder;
            mBindService = mBinder.getService();

            mBound = true;
        }

        @Override
        public void onServiceDisconnected(ComponentName name) {
            // This is called when the connection with the service has been
            // unexpectedly disconnected -- that is, its process crashed.
            Log.w(TAG, "in MyServiceConnection onServiceDisconnected");
            mBound = false;
        }

    }

    @Override
    protected void onCreate(Bundle savedInstanceState) {
        super.onCreate(savedInstanceState);
        setContentView(R.layout.b);

        bindServiceBtn = (Button) findViewById(R.id.bind_service);
        unbindServiceBtn = (Button) findViewById(R.id.unbind_service);
        startIntentService = (Button) findViewById(R.id.start_intentservice);

        bindServiceBtn.setOnClickListener(new View.OnClickListener() {
            @Override
            public void onClick(View v) {
                Intent intent = new Intent(BActivity.this, MyBindService.class);
                bindService(intent, sc, Context.BIND_AUTO_CREATE);
            }
        });

        unbindServiceBtn.setOnClickListener(new View.OnClickListener() {
            @Override
            public void onClick(View v) {
                excuteUnbindService();
            }
        });

        startIntentService.setOnClickListener(new View.OnClickListener() {
            @Override
            public void onClick(View v) {
                Intent intent = new Intent(BActivity.this, MyIntentService.class);
                startService(intent);
            }
        });

    }

    private void excuteUnbindService() {
        if (mBound) {
            unbindService(sc);
            mBound = false;
        }
    }

    @Override
    protected void onDestroy() {
        super.onDestroy();
        Log.w(TAG, "in onDestroy");
        excuteUnbindService();
    }
}
首次点击bindServiceBtn进行bindService(..)时,依次回调顺序如下:
1 MyBindService(13457): in onCreate
2 MyBindService(13457): in onBind
3 BActivity(13457): in MyServiceConnection onServiceConnected
再次点击bindServiceBtn按钮时,发现没有任何输出,说明MyBindService没有进行任何回调。
点击unbindServiceBtn进行unbindService(..)时,回调顺序为:
1 MyBindService(13457): in onUnbind
2 MyBindService(13457): in onDestroy
注:在四大基本组件中,需要注意的的是BroadcastReceiver不能作为Bound Service的Client,因为BroadcastReceiver的生命周期很短,当执行完onReceive(..)回调时,BroadcastReceiver生命周期完结。而Bound Service又与Client本身的生命周期相关,因此,Android中不允许BroadcastReceiver去bindService(..),当有此类需求时,可以考虑通过startService(..)替代。
4.Service特性
1.Service本身都是运行在其所在进程的主线程(如果Service与Clinet同属于一个进程,则是运行于UI线程),但Service一般都是需要进行”长期“操作,所以经常写法是在自定义Service中处理”长期“操作时需要新建线程,以免阻塞UI线程或导致ANR;
2.Service一旦创建,需要停止时都需要显示调用相应的方法(Started Service需要调用stopService(..)或Service本身调用stopSelf(..), Bound Service需要调用unbindService(..)),否则对于Started Service将处于一直运行状态,对于Bound Service,当Client生命周期结束时也将因此问题。也就是说,Service执行完毕后,必须人为的去停止它。
5.IntentService
IntentService是系统提供给我们的一个已经继承自Service类的特殊类,IntentService特殊性是相对于Service本身的特性而言的:
1.默认直接实现了onBind(..)方法,直接返回null,并定义了抽象方法onHandlerIntent(..),用户自定义子类时,需要实现此方法;
2.onHandlerIntent(..)主要就是用来处于相应的”长期“任务的,并且已经自动在新的线程中,用户无语自定义新线程;
3.当”长期“任务执行完毕后(也就是onHandlerIntent(..)执行完毕后),此IntentService将自动结束,无需人为调用方法使其结束;
4.IntentService处于任务时,也是按照队列的方式一个个去处理,而非真正意义上的多线程并发方式。
下面是一个基本的继承自IntentService的自定义Service:
public class MyIntentService extends IntentService {

    public static final String TAG = "MyIntentService";

    public MyIntentService() {
        super(TAG);
    }

    public MyIntentService(String name) {
        super(name);
    }

    @Override
    protected void onHandleIntent(Intent intent) {
        Log.w(TAG, "in onHandleIntent");
        Log.w(TAG, "thread name:" + Thread.currentThread().getName());
    }

}
6.Service和Activity通信
上面我们学习了Service的基本用法,启动Service之后,就可以在onCreate()或onStartCommand()方法里去执行一些具体的逻辑了。不过这样的话Service和Activity的关系并不大,只是Activity通知了Service一下:“你可以启动了。”然后Service就去忙自己的事情了。那么有没有什么办法能让它们俩的关联更多一些呢?比如说在Activity中可以指定让Service去执行什么任务。当然可以,只需要让Activity和Service建立关联就好了。
观察MyService中的代码,你会发现一直有一个onBind()方法我们都没有使用到,这个方法其实就是用于和Activity建立关联的,修改MyService中的代码,如下所示:
public class MyService extends Service {

    public static final String TAG = "MyService";

    private MyBinder mBinder = new MyBinder();

    @Override
    public void onCreate() {
        super.onCreate();
        Log.d(TAG, "onCreate() executed");
    }

    @Override
    public int onStartCommand(Intent intent, int flags, int startId) {
        Log.d(TAG, "onStartCommand() executed");
        return super.onStartCommand(intent, flags, startId);
    }

    @Override
    public void onDestroy() {
        super.onDestroy();
        Log.d(TAG, "onDestroy() executed");
    }

    @Override
    public IBinder onBind(Intent intent) {
        return mBinder;
    }

    class MyBinder extends Binder {

        public void startDownload() {
            Log.d("TAG", "startDownload() executed");
            // 执行具体的下载任务
        }

    }

}
实验内容
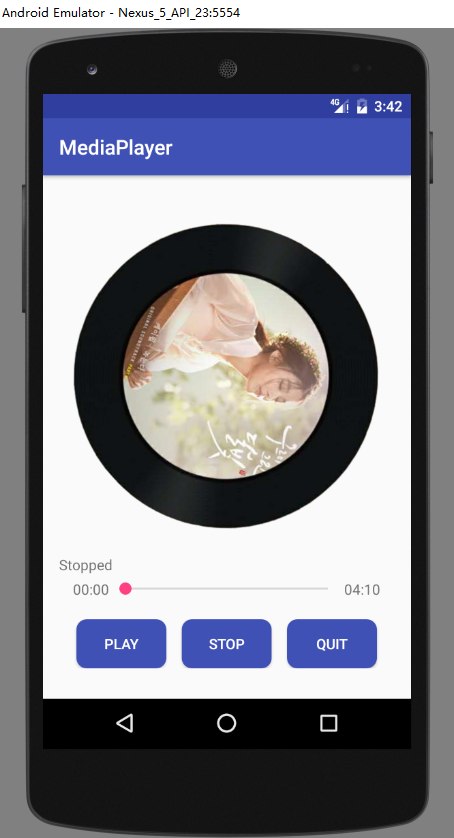
实现一个简单的播放器,要求功能有:
1. 播放、暂停,停止,退出功能;
2. 后台播放功能;
3. 进度条显示播放进度、拖动进度条改变进度功能;
4. 播放时图片旋转,显示当前播放时间功能。
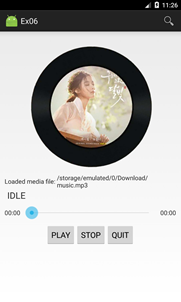

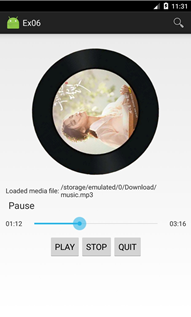

打开程序主页面 开始播放 暂停 停止
实验内容相关知识
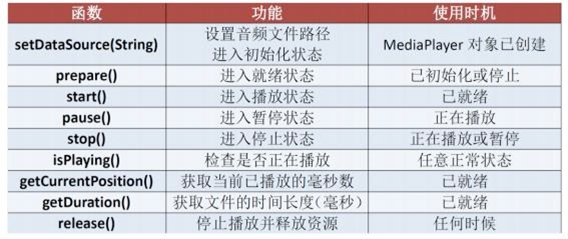
1. MediaPlayer 介绍
常用方法
2. 向虚拟机添加文件
首先打开 Android Device Monitor,如下图:
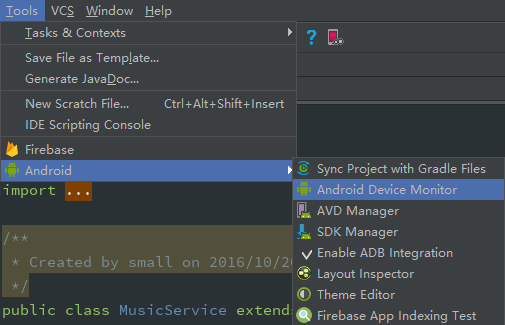
使用自己手机进行调试时,注意下把文件拷到内置 SD 卡而不是外置 SD 卡会比较方 便。要使用外置的 SD 卡时,注意下文件路径的获取。这是相关的路径获取方 法:http://blog.sina.com.cn/s/blog_5da93c8f0102vcam.html
3.使用 MediaPlayer
创建对象初始化:
注意下获取的文件路径,若是使用模拟器的如下,若是使用自己手机的内置 SD 卡则使 用:Environment.getExternalStorageDirectory() + "/data/music.mp3

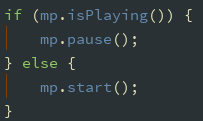
播放/暂停:
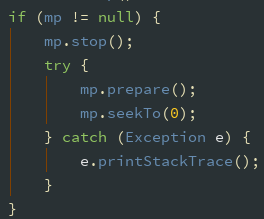
停止:
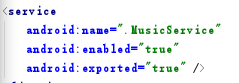
4.Service 的使用
创建 service 类,实现 MediaPlayer 的功能。 注意在 AndroidManifest.xml 文件里注册 Service:

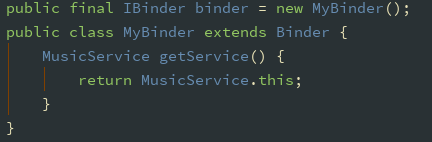
通过 Binder 来保持 Activity 和 Service 的通信(写在 service 类):
在 Activity 中调用 bindService 保持与 Service 的通信(写在 activity 类): Activity 启动时绑定 Service:

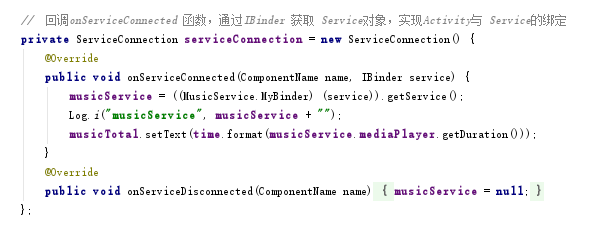
bindService 成功后回调 onServiceConnected 函数,通过 IBinder 获取 Service 对 象,实现 Activity 与 Service 的绑定:

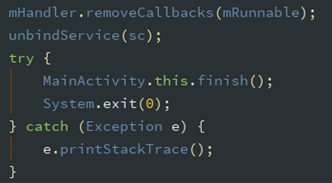
停止服务时,必须解除绑定,写入退出按钮中:
此时,在 Activity 的 onCreate 方法中执行上述与 Service 通信的方法后,即可实现 后台播放。点击退出按钮,程序会退出,音乐停止;返回桌面,音乐继续播放。
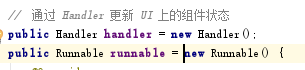
5.Handler的使用
Handler 与 UI 是同一线程,这里可以通过 Handler 更新 UI 上的组件状态,Handler 有很多方法,这里使用比较简便的 post 和 postDelayed 方法。
使用 Seekbar 显示播放进度,设置当前值与最大值:

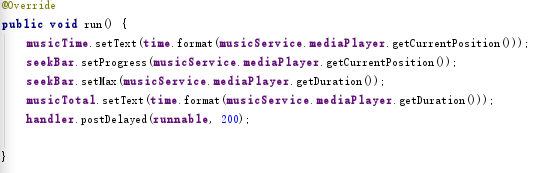
定义 Handler:run 函数中进行更新 seekbar 的进度在类中定义简单日期格式,用来显 示播放的时间,用 time.format 来格式所需要的数据,用来监听进度条的滑动变化:


实验过程
本次实验主要是实现一个音乐播放器,首先打开Android Device Monitor, 向虚拟机添加音乐文件。
创建 service 类,使用 MediaPlayer,创建对象,设置一个布尔代数变量作为我们判断音乐此时状态的tag,使用setDataSource方法调用虚拟设备中的音乐文件,并对其进行初始化:

在 AndroidManifest.xml 文件里注册 Service:
并在其中声明SD卡的读写权限:

通过 Binder 来保持 Activity 和 Service 的通信(写在 service 类):

在Activity中调用 bindService 保持与 Service 的通信:
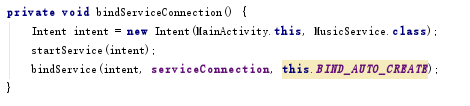
Activity 启动时绑定 Service。
bindService成功后回调onServiceConnected 函数,通过IBinder 获取 Service对象,实现Activity与 Service的绑定:
在Activity中设置按钮点击事件时我们需要调用MediaPlayer中的某些方法,这里我们先在service类中实现MediaPlayer的功能:

此时,在 Activity 的 onCreate方法中执行上述与 Service 通信的方法后,即可实现后台播放。点击退出按钮,程序会退出,音乐停止;返回桌面,音乐继续播放。
Handler 与 UI 是同一线程,这里可以通过 Handler 更新 UI 上的组件状态,通过Handler可以统一进行对UI的管理,因为Handler采用消息处理的机制。简单理解就是另一个线程发送一个编号给消息所在的线程,那么该线程的消息处理程序就会收到该消息并进行处理,而消息采用int类型,所以int能够表示多少种数字就以为着有多少消息可以给你使用(因为存在系统的消息,所以可能有一部分被系统的消息占有,而不能使用)。Handler有很多方法,这里使用比较简便的 post和postDelayed 方法。
定义 Handler:
run 函数中进行更新 seekbar 的进度,在类中定义简单日期格式,用来显示播放的时间,用 time.format 来格式所需要的数据,用来监听进度条的滑动变化(使用 Seekbar 显示播放进度,设置当前值与最大值,具体事件在onCreate方法中实现):
接下来,我们需要完成各个按钮的点击事件。在点击事件中,为了完成图片旋转以及其实时更新,我们使用animator属性.我们首先实例化了一个ObjectAnimator,然后设置所需的参数:imageView:需要更改的View,动画类型,动画范围,并在对应的点击事件中引用animator中的一些事件,实现动画的点击动作:

在点击事件中,主要是实现按钮文本的变换以及调用service中定义好的MediaPlayer事件,并实现动画的变换:

这里需要注意的是,在btnPlayOrPause.setOnClickListener中,为了正确实现动画事件,我们需要设置相应的tag,由tag的变换来控制事件的调用:

而且停止服务时,必须解除绑定,写入btnQuit按钮中:

最后,在onCreate函数中,我们将定义的各个函数一一实现,即可完成实验的功能。
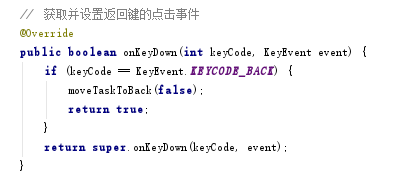
除此之外,为了保证返回后台(按了返回键后)仍能继续播放,并且打开应用后Activity中的内容要与音乐当前的状态对应,我们还需要获取并设置返回键的点击事件:
完成实验~
注意事项
在设置mediaPlayer时出现了android mediaPlayer error (-38,0)的报错。
在查询了一些资料后,解决了这个问题:
android mediaPlayer error (-38,0)出现这个错误发现在mediaPlayer.reset()后调用了mediaPlayer.getDuration()在没有给mediaPlayer对象设置数据源之前,是不能使用getDuration等这些方法的
这时,需要检查一下在设置MediaPlayer的数据源时,使用的是那种方式:
1.在初始化MediaPlayer时,通过create方法设置数据源。则不能写MediaPlayer.prepare()方法,这时,会报错。
2.如果是使用MediaPlayer构造函数初始化MediaPlayer,然后通过setDataSource方法设置数据源时,就需要在start()之前,使用MediaPlayer.prepare()方法,对数据源进行一次编译。能够避免出现(-38,0)这种错误。
实验截图


源码下载
源码下载点击这里~
注
1、本实验实验环境:
操作系统 Windows 10
实验软件 Android Studio 2.2.1
虚拟设备:Nexus_5X
API:23
2、贴代码的时候由于插入代码框的大小问题,代码格式不太严整,望见谅~