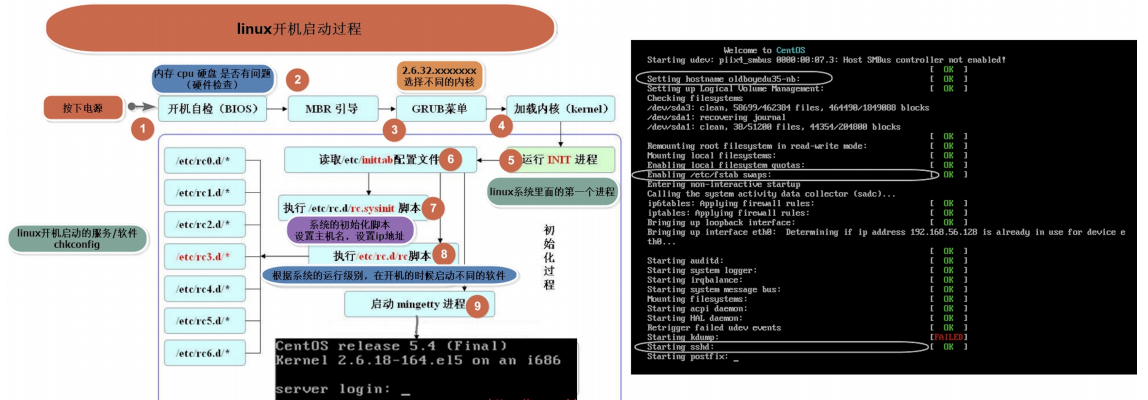
开机启动流程
CentOS6
1.内核引导
加电自检,检查bios的配置,检测硬件,开机
2.运行init
- 0:关机
- 1:单用户模式
- 2:多用户模式(没有文件系统和网络)
- 3:多用户模式(命令行,默认模式)
- 4:没有使用的模式
- 5:多用户模式(图形化界面)
- 6:重启
3.系统初始化
4.建立终端
5.用户登录
## 关机命令
init 0
halt
shutdown -h now
shutdown -h 20:20
shutdown -h +10
poweroff

## 重启命令
init 6
reboot
shutdown -r now
shutdonw -r 20:20
shutdown -r +10
CentOS7开机启动流程
1.BIOS(开机自检)
2.MBR ( Master Boot Record 主引导记录)
3.GRUB2 Bootloader(引导菜单)
4.Kernel(内核引导)
5.Systemd (不再使用init,改成了systemd)
6.Runlevel-Target (运行级别)
运行级别:
init 0.target -> poweroff.target		# 关机
init 1.target -> rescue.target			# 单用户模式
init 2.target -> multi-user.target		# 多用户模式(没有文件系统和网络)
init 3.target -> multi-user.target		# 多用户模式(命令行)
init 4.target -> multi-user.target		# 多用户模式(还是没有被使用)
init 5.target -> graphical.target		# 图形化模式
init 6.target -> reboot.target			# 重启
# 获取当前默认的运行级别
[root@qls ~]# systemctl get-default
multi-user.target

# 修改运行级别
[root@qls ~]# systemctl set-default poweroff

## 使用两条命令修改默认运行级别
[root@qls ~]# rm -f /etc/systemd/system/default.target
[root@qls ~]# ln -s /usr/lib/systemd/system/poweroff.target /etc/systemd/system/default.target


## 相关目录
[root@qls ~]# ll /etc/systemd/system   (默认的运行级别)
[root@qls ~]# ll /usr/lib/systemd/system (运行级别和服务启动脚本)
CentOS7进入单用户模式


在linux16 行末,加上:enforcing=0 init=/bin/bash 修改完之后,按Ctrl + X
## 修改默认启动方式
bash-4.2# mount -o rw,remount /
bash-4.2# systectl set-default(不能用)
bash-4.2# rm -f /etc/systemd/system/default.target
bash-4.2# ln -s /usr/lib/systemd/system/multi-user.target /etc/systemd/system/default.target
bash-4.2# exec /sbin/init

## 修改密码
bash-4.2# mount -o rw,remount /
bash-4.2# echo 123|passwd --stdin root
bash-4.2# exec /sbin/init
方法2:


switch_root:/# mount -o rw,remount /sysroot
switch_root:/# chroot /sysroot
sh-4.2# systemctl set-default multi-user.target
sh-4.2# exit
switch_root:/# reboot
nginx相关命令文档
查看系统当前运行级别
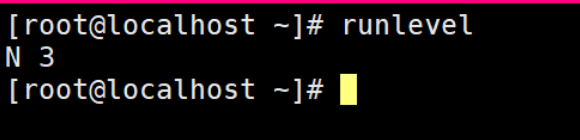
N代表上次运行级别3是本次运行级别。

查看nginx是否开机自启,disabled是关闭,enabled是开启,可以看到现在是在关闭开机自启的状态,如果想添加到开机自启可以输入命令systemctl enable nginx,如下图所示

启动nginx并查看nginx状态
[root@localhost ~]# systemctl start nginx
[root@localhost ~]# systemctl status nginx
● nginx.service - The nginx HTTP and reverse proxy server
   Loaded: loaded (/usr/lib/systemd/system/nginx.service; disabled; vendor preset: disabled)
   Active: active (running) since Sat 2020-04-25 04:32:39 CST; 17min ago
 Main PID: 7201 (nginx)
   CGroup: /system.slice/nginx.service
           ├─7201 nginx: master process /app/nginx/sbin/nginx
           └─7202 nginx: worker process
可以看到running代表服务是启动的,或者看到有绿色的标志就代表服务实在开启状态
这时可以查看下nginx的端口
[root@localhost ~]# netstat -lntup|grep nginx
tcp        0      0 0.0.0.0:90              0.0.0.0:*               LISTEN      7201/nginx: master
可以看到nginx的端口是90,默认是使用80端口,因为上次我改了一下nginx的配置文件把端口改成了90
[root@localhost ~]# netstat -lntup|grep 90
tcp        0      0 0.0.0.0:90              0.0.0.0:*               LISTEN      7201/nginx: master
我们把配置文件改成80,首先找到nginx的配置文件我的在/app/nginx里面
cd /app/nginx/conf/
vim nginx.conf
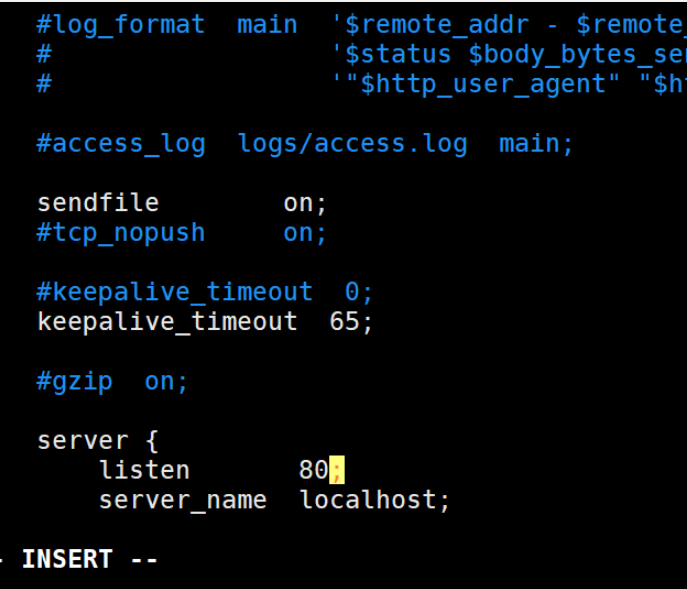
然后我们可以不停止服务,重新加载nginx
[root@localhost nginx]# systemctl reload nginx
[root@localhost nginx]# netstat -lntup|grep nginx
tcp        0      0 0.0.0.0:80              0.0.0.0:*               LISTEN      7201/nginx: master
[root@localhost nginx]#
Systemctl reload nginx 是不停止服务重新加载配置文件,企业常用手法,确保用户体验,这是可以看到端口改成了80
查看下服务是否运行
[root@localhost ~]# systemctl is-active nginx
active
可以看到这个状态服务是在运行中的
我们可以把服务禁止运行
[root@localhost ~]# systemctl mask nginx
Created symlink from /etc/systemd/system/nginx.service to /dev/null.
再看下服务
[root@localhost ~]# systemctl is-active nginx
unknown
变成了这种状态
这时候给服务取消禁止
[root@localhost ~]# systemctl unmask nginx 取消禁止
[root@localhost ~]# systemctl restart nginx 重启服务
[root@localhost ~]# systemctl is-active nginx
active 查看服务运行状态
[root@localhost ~]# systemctl stop nginx 关闭服务
[root@localhost ~]# netstat -lutup|grep nginx 查看端口
[root@localhost ~]# ps -ef |grep nginx 查看服务进程
root       7466   7165  0 05:16 pts/0    00:00:00 grep --color=auto nginx
[root@localhost ~]#
[root@localhost ~]# systemctl is-enabled nginx
disabled
指定查看nginx是否开机自启