一、服务端
1、目录结构

2、创建maven工程[Packaging:war]

3、引入依赖
 1 <dependencies>
 2     <!-- CXF(这里不需要引入cxf-rt-transports-http-jetty,使用tomcat启动) -->
 3     <dependency>
 4         <groupId>org.apache.cxf</groupId>
 5       <artifactId>cxf-rt-frontend-jaxws</artifactId>
 6       <version>3.0.1</version>
 7     </dependency>
 8     <!-- 日志 -->
 9     <dependency>
10         <groupId>org.slf4j</groupId>
11         <artifactId>slf4j-log4j12</artifactId>
12         <version>1.7.12</version>
13     </dependency>
14     <!-- Spring开发 -->
15     <dependency>
16         <groupId>org.springframework</groupId>
17       <artifactId>spring-context</artifactId>
18       <version>4.1.7.RELEASE</version>
19     </dependency>
20     <dependency>
21         <groupId>org.springframework</groupId>
22         <artifactId>spring-web</artifactId>
23         <version>4.1.7.RELEASE</version>
24     </dependency>
25     <!-- 基于spring测试开发 -->
26     <!-- Spring与Junit整合 -->
27     <dependency>
28         <groupId>org.springframework</groupId>
29       <artifactId>spring-test</artifactId>
30       <version>4.1.7.RELEASE</version>
31     </dependency>
32     <dependency>
33         <groupId>junit</groupId>
34       <artifactId>junit</artifactId>
35       <version>4.11</version>
36     </dependency>
37 </dependencies>
4、配置web.xml
 1 <?xml version="1.0" encoding="UTF-8"?>
 2 <web-app xmlns:xsi="http://www.w3.org/2001/XMLSchema-instance"
 3     xmlns="http://java.sun.com/xml/ns/javaee"
 4     xsi:schemaLocation="http://java.sun.com/xml/ns/javaee http://java.sun.com/xml/ns/javaee/web-app_2_5.xsd"
 5     id="WebApp_ID" version="2.5">
 6     <welcome-file-list>
 7         <welcome-file>index.html</welcome-file>
 8     </welcome-file-list>
 9     <!-- 引入spring配置文件 -->
10     <context-param>
11         <param-name>contextConfigLocation</param-name>
12         <param-value>classpath:applicationContext.xml</param-value>
13     </context-param>
14     <!-- spring核心监听器 -->
15     <listener>
16         <listener-class>org.springframework.web.context.ContextLoaderListener</listener-class>
17     </listener>
18     <!-- 配置cxf基于web访问 -->
19     <servlet>
20         <servlet-name>CXFService</servlet-name>
21         <servlet-class>org.apache.cxf.transport.servlet.CXFServlet</servlet-class>
22         <load-on-startup>1</load-on-startup>
23     </servlet>
24     <servlet-mapping>
25         <servlet-name>CXFService</servlet-name>
26         <url-pattern>/services/*</url-pattern>
27     </servlet-mapping>
28 </web-app>
5、搭建服务
5.1、导入javaBean

5.1.1、domain
参考CXF-JAX-WS开发(一)入门案例,2.4.1、导入实体bean目录下的实体类Car.java和User.java
5.1.2、service
参考CXF-JAX-WS开发(一)入门案例,2.4.2、构建服务bean目录下的类IUserService.java和UserServiceImpl.java
5.2、创建spring配置文件applicationContext.xml
5.2.1、目录

5.2.2、配置
 1 <?xml version="1.0" encoding="UTF-8"?>
 2 <beans xmlns="http://www.springframework.org/schema/beans"
 3     xmlns:xsi="http://www.w3.org/2001/XMLSchema-instance" xmlns:jaxws="http://cxf.apache.org/jaxws"
 4     xsi:schemaLocation="
 5     http://www.springframework.org/schema/beans http://www.springframework.org/schema/beans/spring-beans.xsd
 6     http://cxf.apache.org/jaxws http://cxf.apache.org/schemas/jaxws.xsd">
 7     <jaxws:server id="userService" address="/userService"
 8         serviceClass="org.spring_cxf_ws.service.IUserService"><!-- serviceClass指定一个接口 -->
 9         <jaxws:serviceBean>
10             <bean class="org.spring_cxf_ws.service.UserServiceImpl" />
11         </jaxws:serviceBean>
12         <!-- 日志配置start -->
13         <!-- 输入消息拦截器 -->
14         <jaxws:inInterceptors>
15             <bean class="org.apache.cxf.interceptor.LoggingInInterceptor" />
16         </jaxws:inInterceptors>
17         <!-- 输出消息拦截器 -->
18         <jaxws:outInterceptors>
19             <bean class="org.apache.cxf.interceptor.LoggingOutInterceptor" />
20         </jaxws:outInterceptors>
21         <!-- 日志配置end -->
22     </jaxws:server>
23 </beans>
5.3、在pom.xml中配置tomcat插件
 1 <build>
 2     <plugins>
 3         <!-- 配置tomcat端口号为: 9800 -->
 4     <plugin>
 5         <groupId>org.codehaus.mojo</groupId>
 6         <artifactId>tomcat-maven-plugin</artifactId>
 7         <version>1.1</version>
 8         <configuration>
 9             <port>9800</port>
10         </configuration>
11     </plugin>
12     </plugins>
13 </build>
5.4、配置jre环境1.5以上[使注解@WebService和@WebMethod生效]
参考CXF-JAX-WS开发(一)入门案例,2.4.3、配置jre环境1.5以上[使注解@WebService和@WebMethod生效]
5.5、测试服务发布是否成功
启动spring_cxf_ws,执行tomcat:run。访问:http://localhost:9800/spring_cxf_ws/services/userService?wsdl
| 名称 | 含义 |
|
9800 |
端口号 |
| spring_cxf_ws | 项目名称 |
|
services |
web.xml中配置的servlet的url |
|
userService |
applicationContext.xml中配置的address |

二、搭建客户端
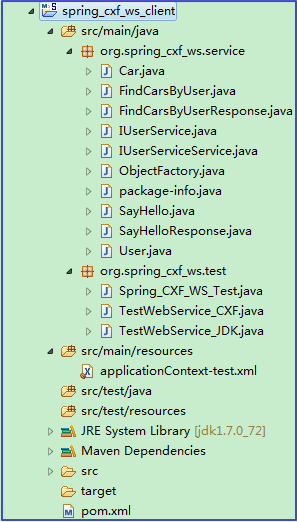
1、客户端目录结构
2、JDK的wsimport命令生成本地调用WebService服务的代码
wsimport -s . http://localhost:9800/spring_cxf_ws/services/userService?wsdl

3、创建客户端maven project[Packaing:jar]

4、引入依赖
5、复制调用WebService服务的代码到客户端工程

三、测试
1、目录结构

2、测试方案
2.1、方式一、jdk
 1 package org.spring_cxf_ws.service;
 2
 3 import java.util.List;
 4
 5 /**
 6  * 基于JDK提供的wsimport命令解析WSDL文档生成本地代码 使用本地代码生成一个代理对象,通过代理对象可以发送HTTP请求
 7  * 请求webservice服务
 8  *
 9  */
10 public class TestWebService_JDK {
11     public static void main(String[] args) {
12         // 方式一、jdk
13         IUserServiceService userService = new IUserServiceService();
14         IUserService proxy = userService.getIUserServicePort();
15         System.out.println(proxy.sayHello("张无忌"));
16         User user = new User();
17         user.setUsername("xiaoming");
18         List<Car> list = proxy.findCarsByUser(user);
19         for (Car car : list) {
20             System.out.println(car.getId() + ":" + car.getCarName() + ":" + car.getPrice());
21         }
22     }
23 }
2.2、方式二、cxf
 1 package org.spring_cxf_ws.test;
 2
 3
 4 import java.util.List;
 5
 6 import org.apache.cxf.jaxws.JaxWsProxyFactoryBean;
 7 import org.spring_cxf_ws.service.Car;
 8 import org.spring_cxf_ws.service.IUserService;
 9 import org.spring_cxf_ws.service.User;
10
11 /**
12  * 基于JDK提供的wsimport命令解析WSDL文档生成本地代码 使用本地代码生成一个代理对象,通过代理对象可以发送HTTP请求
13  * 请求webservice服务
14  *
15  */
16 public class TestWebService_CXF {
17     public static void main(String[] args) {
18         // 方式二、cxf
19         JaxWsProxyFactoryBean jaxWsProxyFactoryBean = new JaxWsProxyFactoryBean();
20         jaxWsProxyFactoryBean.setServiceClass(IUserService.class);
21         jaxWsProxyFactoryBean.setAddress("http://localhost:9800/spring_cxf_ws/services/userService?wsdl");
22         // 创建调用远程服务的代理对象
23         IUserService proxy = (IUserService) jaxWsProxyFactoryBean.create();
24         // 调用远程服务上的sayHello方法
25         System.out.println(proxy.sayHello("张无忌"));
26         // 调用远程服务上的findCarsByUser方法
27         User user = new User();
28         user.setUsername("xiaoming");
29         List<Car> list = proxy.findCarsByUser(user);
30         for (Car car : list) {
31             System.out.println(car.getId() + ":" + car.getCarName() + ":" + car.getPrice());
32         }
33     }
34 }
2.3、方式三、spring+cxf
2.3.1、配置applicationContext-test.xml
①所在目录

②配置
 1 <?xml version="1.0" encoding="UTF-8"?>
 2 <beans xmlns="http://www.springframework.org/schema/beans"
 3     xmlns:xsi="http://www.w3.org/2001/XMLSchema-instance" xmlns:jaxws="http://cxf.apache.org/jaxws"
 4     xsi:schemaLocation="
 5     http://www.springframework.org/schema/beans http://www.springframework.org/schema/beans/spring-beans.xsd
 6     http://cxf.apache.org/jaxws http://cxf.apache.org/schemas/jaxws.xsd">
 7     <!--
 8         id:唯一标识
 9         serviceClass:服务接口的路径
10         address:服务地址
11      -->
12     <jaxws:client id="userServiceClient" serviceClass="org.spring_cxf_ws.service.IUserService"
13         address="http://localhost:9800/spring_cxf_ws/services/userService?wsdl" >
14     </jaxws:client>
15 </beans>
2.3.2、测试类
 1 package org.spring_cxf_ws.test;
 2
 3 import org.junit.Test;
 4 import org.junit.runner.RunWith;
 5 import org.spring_cxf_ws.service.IUserService;
 6 import org.spring_cxf_ws.service.User;
 7 import org.springframework.beans.factory.annotation.Autowired;
 8 import org.springframework.beans.factory.annotation.Qualifier;
 9 import org.springframework.test.context.ContextConfiguration;
10 import org.springframework.test.context.junit4.SpringJUnit4ClassRunner;
11
12 @RunWith(SpringJUnit4ClassRunner.class)
13 @ContextConfiguration(locations = "classpath:applicationContext-test.xml")
14 public class Spring_CXF_WS_Test {
15     @Autowired
16     @Qualifier("userServiceClient")
17     private IUserService userService;
18
19     @Test
20     public void testService() {
21         // 方式三、spring+cxf
22         System.out.println(userService.sayHello("张无忌"));
23         User user = new User();
24         user.setUsername("xiaoming");
25         System.out.println(userService.findCarsByUser(user));
26     }
27 }