Github地址: https://github.com/Belval/TextRecognitionDataGenerator
官方文档:https://textrecognitiondatagenerator.readthedocs.io/en/latest/index.html
官方文档解读
TextRecognitionDataGenerator’s documentation
Since the name is quite long, all subsequent refrences will be under the acronym TRDG.
If you are new to the project, start with the tutorial section!
由于名称很长,因此所有后续引用均以缩写TRDG命名。如果您不熟悉该项目,请从教程部分开始!
>Installation 安装
Official package
TRDG has a pip package with a matching name. TRDG有一个具有匹配名称的pip包。
pip install trdg
Once that is installed, the trdg binary should be in your PATH. 安装完成后,trdg二进制文件应位于您的PATH中。
From source
If you want to add a new language The easiest way to use the tool is by cloning the official repo.
如果要添加新语言,则使用此工具最简单的方法是克隆官方存储库。
git clone https://github.com/Belval/TextRecognitionDataGenerator
Then you need to install the dependencies. It is recommended to use a virtual environment for those.
然后,您需要安装依赖项。建议为这些使用虚拟环境。
pip3 install -r requirements.txt
If you want to use the handwritten text generation feature, you need to install the -hwdependencies.
如果要使用手写文本生成功能,则需要安装-hwdependencies。
pip3 install -r requirements-hw.txt
Once that is done, you can move to the tutorial for tips and tricks on how to use TRDG!
完成后,您可以转到本教程,以获取有关如何使用TRDG的提示和技巧!
>Overview
-
Most useful arguments
-
-
-i, --input_file
Use it when the provided dictionaries do not fit your usecase. Each line will become an image, if your
-cparameter is high enough.当提供的词典不适合您的用例时,请使用它。如果-c参数足够高,则每一行都将成为图像。 -
-c, --count
Self-explanatory parameter, but one you will probably want to change. The default value is 1000.
不言自明的参数,但是您可能需要更改它。默认值为1000。
-
-l, --language
如果要使用特定脚本生成数据,此参数特别重要。它将更改要使用的词典(-l fr等效于-idicts / fr.txt),但最重要的是,它将默认字体更改为采用支持该语言脚本的字体。通过中文字典而未更改语言将导致生成无效图像。
This argument is especially important if you want to generate data using a specific script. It changes the dictionary to be used (
-l fris equivalent to-idicts/fr.txt), but most importantly it changes the default fonts to take one that supports the language’s script. Passing a chinese dictionary without changing the language will cause invalid images to be generated. -
-t, --thread_count
另一个不言自明的参数,但是非常重要,因为当今大多数计算机都带有多核CPU。将此设置为-t 8可使TRDG创建8个进程来生成数据。
Another self-explanatory parameter, yet very important as most computers these days ship with a multi-core CPU. Setting this to
-t 8makes TRDG create 8 processes to generate the data. -
-f, --format
默认情况下,所有生成的图像将高32像素(如果使用-或1,则为宽)。现在对于您来说可能太小了。 -f可以制作更大的图像。
By default, all generated images will be 32 pixels high (or wide if you use
-or 1). Now that might be too small for you.-fallows you to make bigger images.
Getting help
As with most CLI tools, TRDG’s help is accessible through the
-hargument.If you need more information on a specific argument, find its definition in the reference. If even that does not do, feel free to open an issue on the official repository.
与大多数CLI工具一样,可通过-h参数访问TRDG的帮助。
如果需要有关特定参数的更多信息,请在参考中找到其定义。如果仍不能解决问题,请随时在官方存储库上打开问题。
>Tutorial
TextRecognitionDataGenerator comes with an (hopefully) easy to use CLI. The tutorial is actually multiple tutorials, combined in a single page. Feel free to skip sections that are not relevant to your use case.
TextRecognitionDataGenerator是(希望)易于使用的CLI。该教程实际上是多个教程,合并在一个页面中。随意跳过与您的用例无关的部分。
Just generating data只是生成数据
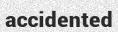
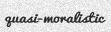
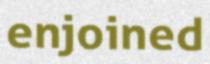
Fun fact, you don’t need to use any command line arguments if you want English data generated using multiple fonts. Indeed, simply running
python3 run.pywill create 1000 English, single word images in theout/directory such as these:有趣的是,如果要使用多种字体生成英文数据,则无需使用任何命令行参数。实际上,仅运行python3 run.py即可在out /目录中创建1000个英文单词图像,如下所示:


Now maybe 1000 is too many or too few for your usecase. You can add the
-cargument to set how many examples will be generated.现在,对于您的用例而言,也许1000太多或太少。您可以添加-c参数来设置将生成多少个示例。
python3 run.py -c 10As expected, you will find 10 examples in the
out/directory.与预期的一样,您将在out /目录中找到10个示例。
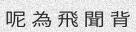
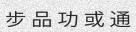
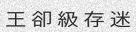
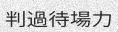
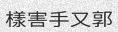
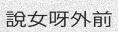
Generating Chinese data生成中文数据
This is a common usecase, and one that is easy with TRDG.
这是一个常见的用例,而对于TRDG来说很容易。
python3 run.py -c 10 -l cnThis will generate 10 samples using the Chinese dictionary that can be found in in
dicts/cn.txt:这将使用dicts / cn.txt中的中文字典生成10个样本:


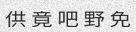
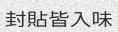
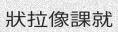
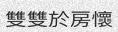
Since the concept of word in Chinese is a bit trickier, the dictionary is made of single characters (make your own!). Let’s do this again with
-w 5to get something prettier.由于中文单词的概念有些棘手,因此该词典由单个字符组成(自己动手!)。让我们再次使用-w 5进行操作,以获得更漂亮的效果。
python3 run.py -c 10 -l cn -w 5

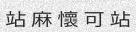


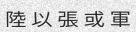
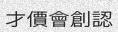
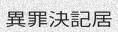
Now that looks better, but what’s up with the spacing between the characters? We would rather have no spaces. Add
-sw 0.现在看起来更好了,但是字符之间的间距又如何呢?我们宁愿没有空格。加-sw 0。
python3 run.py -c 10 -l cn -w 5 -sw 0
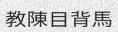
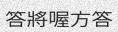
Asian scripts can be written top to bottom, you might want to add the
-or 1argument to get vertical text.亚洲脚本可以自上而下编写,您可能想要添加-or 1参数以获得垂直文本。
python3 run.py -c 10 -l cn -w 5 -sw 0 -or 1


You can do much and more with TRDG, if you run into a missing feature, simply open an issue.
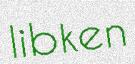
Text distorsions文字变形
For those familiar with the process of training a machine learning model, you often have to deal with overfitting, which is when the model gets too good at predicting the samples in the training data and stops generalizing to unseen examples. One trick to prevent this is by adding the distorsion to the data.
对于那些熟悉训练机器学习模型的过程的人来说,您经常不得不应对过度拟合,这就是模型过于擅长预测训练数据中的样本并停止泛化为看不见的示例时。防止这种情况的一种技巧是将失真添加到数据中。
While TRDG does not dwelve too deeply in augmentations, as many better and more complete libraries already take care of it, some operations are available for convenience through the
-dargument which as 3 possible values:尽管TRDG在扩充方面并没有太过深入,但是已经有许多更好,更完整的库来处理它,但通过-d参数可以方便地使用一些操作,该操作有3种可能的值:
- 0: None
- 1: Sine wave正弦波
- 2: Cosine wave余弦波
- 3: Random随机
python3 run.py -c 5 -w 5 -d 1


python3 run.py -c 5 -w 5 -d 3


A more advanced use case更高级的用例
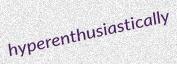
Text in the real world is not always black, and most importantly, text in the real world is almost never straight. What if we want to emulate that?
现实世界中的文本并不总是黑色的,最重要的是,现实世界中的文本几乎从来都不是黑色的。如果我们想效仿该怎么办?
python3 run.py -c 10 -k 15 -rk -bl 0.5 -rbl -tc '#000000,#888888'
Which can be translated to: generate 10 examples with a skewing angle between -15 and 15 with an added gaussian blur between 0 and 0.1. Finally, the text color should be picked randomly between black and gray (including all the colors inbetween).
可以将其转换为:生成10个示例,这些示例的倾斜角度在-15和15之间,并且高斯模糊在0和0.1之间。最后,应在黑色和灰色之间随机选择文本颜色(包括中间的所有颜色)。
Sure enough, the output is much more colourful!
果然,输出的色彩更加丰富!


The default resolution might be too small to your taste (and I agree). By default the output is 32 pixels high because it’s the height used by most text recognition papers. Now you can change that with
-f 64.默认分辨率可能太小而无法满足您的要求(我同意)。默认情况下,输出为32像素高,因为它是大多数文本识别纸使用的高度。现在,您可以使用-f 64进行更改。
python3 run.py -c 10 -k 15 -rk -bl 0.5 -rbl -tc '#000000,#888888' -f 64


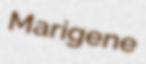
Manipulating margins操纵边距
TRDG allows you to control margins around the text using two parameters,
--margins,--fit. The first one controls margins, in pretty much the same way the CSS propertymargindoes.TRDG允许您使用--margins和--fit这两个参数来控制文本的边距。第一个控制边距,几乎与CSS属性边距一样。
This is the result with no fit and the default (5, 5, 5, 5) margins:
这是没有拟合和默认(5、5、5、5)边距的结果:
python3 run.py -c 1-i texts/test.txt
Now we can add
--fitto apply a tight crop around the rendered text. This changes the size by removing the added space for accents:现在,我们可以添加--fit以在渲染的文本周围应用紧密裁剪。这会通过删除重音符号增加的空间来更改大小:
python3 run.py -c 1 -itexts/test.txt --fit
Margins are applied the generated text, so even with
0,0,0,0, if you don’t use--fityou will get an apparence of margins:边距将应用生成的文本,因此即使使用0,0,0,0,如果您不使用--fit,也将得到一个边距外观:
python3 run.py -c 1 -i texts/test.txt --margins 0,0,0,0

Now if you add
--fit, you get an absolutely no margins:现在,如果添加--fit,您将获得绝对的空白:
python3 run.py -c 1 -itexts/test.txt --margins 0,0,0,0 --fit

Margin values are comma separated
top,left,bottom,right, so--margins10,0,10,0will return vertical margins with tight cropping vertically.
And finally, with all margins:最后,保留所有空白:
python3 run.py -c 1 -i texts/test.txt --margins10,10,10,10 --fit

>Module
TRDG is also a module that can be included in your favorite training pipeline. The easiest way to use it, is to import a generator.
TRDG还是可以包含在您最喜欢的培训管道中的模块。使用它的最简单方法是导入生成器。
from trdg.generators import GeneratorFromStrings

generator = GeneratorFromStrings(['Test1', 'Test2', 'Test3'])

for img in generator:
    # Do something with the pillow image here.
The basic one is
GeneratorFromStringswhich, as its name indicates, will take a list of strings, and generate an image and label pair.最基本的是GeneratorFromStrings,正如其名称所示,它将获取字符串列表,并生成图像和标签对。
If you want to avoid having to maintain dictionaries, you can use
GeneratorFromDictswhich will use the bundled ones,GeneratorFromRandomwhich generates random strings, andGeneratorFromWikipediawhich picks random article from Wikipedia as its source for strings.如果要避免维护字典,可以使用GeneratorFromDicts(将使用捆绑的字典),GeneratorFromRandom(生成随机字符串)和GeneratorFromWikipedia(从Wikipedia中选择随机文章)作为字符串来源。
Here are examples for each of those, respectively:
以下分别是每个示例的示例:
from trdg.generators import (
    GeneratorFromDicts,
    GeneratorFromRandom,
    GeneratorFromWikipedia,
)

generator_from_dicts = GeneratorFromDicts()
generator_from_random = GeneratorFromRandom()
generator_from_wikipedia = GeneratorFromWikipedia()

for img, lbl in generator_from_dicts:
    # Do something with the pillow image here.
The generators will not raise StopIteration, they will keep generating images until you break out of the loop. Set a non-negative value for
countif that’s an issue生成器不会提高StopIteration,它们会一直生成图像,直到您脱离循环为止。如果有问题,请为计数设置非负值
-
边距将应用生成的文本,因此即使使用0,0,0,0,如果您不使用--fit,也将得到一个边距外观: