1. 版本控制系统概述
1.1 什么是版本控制系统(version control system,简称vcs)
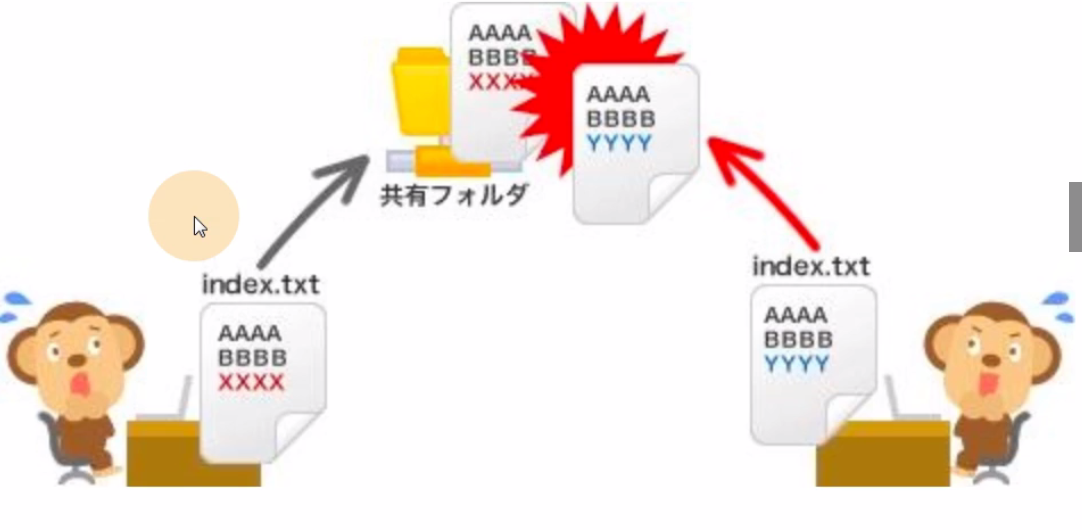
将每一次文件的变化,集中在一个系统中,并且记录每一次的版本,以便后续查阅特定文件版本的历史记录,系统。

如:
产品要求开发A功能,之后项目又需要修改为B功能,开发完之后又要改C功能,最后又要用回A功能。
没有版本控制系统之前,这些要求操作起来,都非常的麻烦。
1.2 版本控制系统解决的问题
(1)追溯文件历史变更
(2)代码集中统一管理
1.3 常见版控制系统工具
(1)集中版本控制系统代表:svn
只有一个中央数据仓库,如果中央数据仓库故障,所有的使用者都无法使用svn,因为每次进行版本控制工作都需要与远程服务器建立通信,否则无法工作。

(2)分布式版本控制系统代表:git
分布式版本控制系统会将远程代码仓库完整镜像下来后(就当成复制把),进行本地离线版本控制。
每一次提交都不依赖远程服务器,待有网络或需要时再与远程仓库进行版本同步。
2. Git基本使用
2.1 git安装前的注意事项
(1)关闭防火墙
(2)时间同步
(3)epel源
2.2 git安装
# 安装
[root@gitlab ~]# yum -y install git

# 查看版本
[root@gitlab ~]# git --version
git version 1.8.3.1
2.3 配置用户,及用户邮箱(我是谁,我的邮箱是啥)
使用前必做
# 配置用户和邮箱
[root@gitlab ~]# git config --global user.name "xts"
[root@gitlab ~]# git config --global user.email "1184964356@qq.com"
[root@gitlab ~]# git config --global color.ui true
[root@gitlab ~]# cat .gitconfig
[user]
	name = xts
	email = 1184964356@qq.com
[color]
	ui = true

[root@gitlab ~/demo]# git config --list
user.name=xts
user.email=1184964356@qq.com
color.ui=true
core.repositoryformatversion=0
core.filemode=true
core.bare=false
core.logallrefupdates=true
3. Git基本命令使用
git命令就是用于将文件改动,切换到不同的空间来记录。
3.1 git提交目录文件到本地仓库
# 首先创建git版本库,这个目录里面的所有文件都可以被git管理起来,每个文件的修改、删除,git都能跟踪,以便未来的追踪历史和还原。

## 创建git工作目录
### 创建本地仓库(自定义)
[root@gitlab ~]# mkdir demo
[root@gitlab ~]# cd demo

#### 初始化仓库
[root@gitlab ~/demo]# git init      # 初始化该目录为git的仓库
Initialized empty Git repository in /root/demo/.git/

## 创建测试文件
[root@gitlab ~/demo]# touch file{1..3}
[root@gitlab ~/demo]# ls
file1  file2  file3
[root@gitlab ~/demo]# git status
# On branch master     # 位于分支master(没有提交到暂存区前,都是位于工作区)
#
# Initial commit       # 初始提交
#
# Untracked files:     # 下面是没有跟踪的文件
#   (use "git add <file>..." to include in what will be committed) # 使用“git add <file>…… ” 以包含要提交的内容
#
#	file1
#	file2
#	file3
nothing added to commit but untracked files present (use "git add" to track)  # 提交为空,但是存在尚未跟踪的文件(使用git add建立跟踪)

# 提交文件到暂存区
## 提交一个文件
[root@gitlab ~/demo]# git add file1
[root@gitlab ~/demo]# git status
# On branch master
#
# Initial commit
#
# Changes to be committed:
#   (use "git rm --cached <file>..." to unstage)
#
#	new file:   file1
#
# Untracked files:
#   (use "git add <file>..." to include in what will be committed)
#
#	file2
#	file3

## 提交所有文件到暂存区
[root@gitlab ~/demo]# git add .
[root@gitlab ~/demo]# git status
# On branch master
#
# Initial commit
#
# Changes to be committed:
#   (use "git rm --cached <file>..." to unstage)
#
#	new file:   file1
#	new file:   file2
#	new file:   file3
#

# 提交暂存区的文件到本地仓库
[root@gitlab ~/demo]# git commit -m "file1-file3"   # -m是添加描述
[master (root-commit) 8695ba5] file1-file3         # 8695ba5为commit号
 3 files changed, 0 insertions(+), 0 deletions(-)
 create mode 100644 file1
 create mode 100644 file2
 create mode 100644 file3
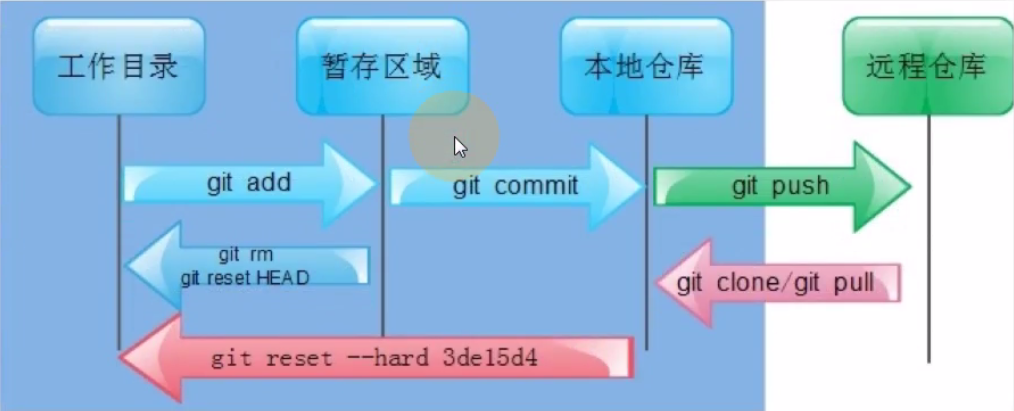
工作区、暂存区、本地仓库总结
工作区也就是刚开始创建的仓库目录所在位置,创建完的文件要提交的暂存区,命令为"git add file"或"git add ."
然后把暂存区的文件提交到本地仓库,命令为"git commit -m ''"
3.2 比对本地工作目录(工作区)、暂存区、本地仓库文件内容间的差异
# 给工作区文件增加内容
[root@gitlab ~/demo]# echo "xts.com" > file1
[root@gitlab ~/demo]# cat file1
xts.com

# 对比本地目录(工作区)file1与暂存区file1文件内容
[root@gitlab ~/demo]# git diff file1
diff --git a/file1 b/file1
index e69de29..a40bbbe 100644
--- a/file1        # 表示变动前的版本
+++ b/file1        # 表示变动后的版本
@@ -0,0 +1 @@
+xts.com           # 表示+了一行内容

## 提交工作区文件到暂存区
[root@gitlab ~/demo]# git add .
[root@gitlab ~/demo]# git diff file1
[root@gitlab ~/demo]#                # 因为工作区文件与暂存区文件内容已经一致, 所以没有内容输出

# 对比暂存区文件与本地仓库文件内容
[root@gitlab ~/demo]# git diff --cached file1
diff --git a/file1 b/file1
index e69de29..a40bbbe 100644
--- a/file1
+++ b/file1
@@ -0,0 +1 @@
+xts.com

## 提交暂存区文件到本地仓库
[root@gitlab ~/demo]# git commit -m "xts.com"
[master eeb3953] xts.com
 1 file changed, 1 insertion(+)
[root@gitlab ~/demo]# git diff --cached file1
[root@gitlab ~/demo]#                # 因为暂存区文件与本地仓库文件内容已经一致, 所以没有内容输出
不同区域间文件比对、提交总结
(1)工作区与暂存区文件对比与提交
git diff file  # 文件对比
git add .      # 文件提交

(2)暂存区与本地仓库文件对比与提交
git commit -m "描述"      # 文件对比
git diff --cached file    # 文件提交
3.3 如何理解git commit提交操作
这里可以用虚拟机的快照来进行介绍。
简单来说,就是每次commit,就相当于对文件做了次快照。

# 那么我们如何知道一个文件commit了多少次,每次commit的内容是什么呢?如下:
## 查看历史的commit操作
[root@gitlab ~/demo]# git log
commit eeb39538b9495c42c9655da6d738df352958a7e8   # 第二次的提交
Author: xts <1184964356@qq.com>                   # 用户,邮箱
Date:   Sat Jun 20 10:27:23 2020 +0800            # 提交的时间

    xts.com                                       # 提交时写的描述信息

commit 8695ba525f372405fb5fd1224a1207e4d3af0d7e   # 第一次的提交
Author: xts <1184964356@qq.com>                   # 用户,邮箱
Date:   Sat Jun 20 10:12:24 2020 +0800            # 提交的时间

    file1-file3                                   # 提交时写的描述信息

## 简单的显示commit信息
[root@gitlab ~/demo]# git log --oneline
eeb3953 xts.com
8695ba5 file1-file3

## 其他操作
[root@gitlab ~/demo]# git log -1
commit eeb39538b9495c42c9655da6d738df352958a7e8
Author: xts <1184964356@qq.com>
Date:   Sat Jun 20 10:27:23 2020 +0800

    xts.com
[root@gitlab ~/demo]# git log -2
commit eeb39538b9495c42c9655da6d738df352958a7e8
Author: xts <1184964356@qq.com>
Date:   Sat Jun 20 10:27:23 2020 +0800

    xts.com

commit 8695ba525f372405fb5fd1224a1207e4d3af0d7e
Author: xts <1184964356@qq.com>
Date:   Sat Jun 20 10:12:24 2020 +0800

    file1-file3
3.4 git回退
(1)本地工作目录(工作区)修改文件内容错误的回退
# 文件初始内容
[root@gitlab ~/demo]# cat file1
xts.com

# 修改后的文件内容
[root@gitlab ~/demo]# echo "xietangsheng.com.cn" > file1
[root@gitlab ~/demo]# cat file1
xietangsheng.com.cn

## 这个时候,我发现我修改的内容,并不是真正想要的,那么如何回退呢?拿暂存区的文件覆盖掉工作区现有的文件就行了,因为暂存区的文件,是工作区文件没有更改之前提交的。操作如下:
# 回退文件
[root@gitlab ~/demo]# git status
# On branch master
# Changes not staged for commit:
#   (use "git add <file>..." to update what will be committed)
#   (use "git checkout -- <file>..." to discard changes in working directory)  # 这里提示了,要如何回退
#
#	modified:   file1
#
no changes added to commit (use "git add" and/or "git commit -a")
[root@gitlab ~/demo]# git checkout file1      # 回退,用暂存区的文件覆盖工作区的文件
[root@gitlab ~/demo]# cat file1
xts.com                                       # 回退后的内容
(2)本地工作目录(工作区)提交到暂存区后的回退
# 修改文件,模拟错误
[root@gitlab ~/demo]# echo 'aaa.bbb.com' > file1
[root@gitlab ~/demo]# git add .

# 撤出暂存区,也就是那本地仓库内容,覆盖暂存区内容
[root@gitlab ~/demo]# git status
# On branch master
# Changes to be committed:
#   (use "git reset HEAD <file>..." to unstage)    # 提示要使用的命令是这个
#
#	modified:   file1
#
[root@gitlab ~/demo]# git reset HEAD file1         # 本地仓库内容覆盖暂存区内容
Unstaged changes after reset:
M	file1
[root@gitlab ~/demo]# cat file1
aaa.bbb.com                                # 但是这个时候工作区的内容,还没有改变,因为上面的操作只是把暂存区的内容改变了

# 暂存区内容覆盖工作区内容

[root@gitlab ~/demo]# git checkout file1
[root@gitlab ~/demo]# cat file1
xts.com                               # 文件内容已经回退到更改前了
(3)多次提交内容到本地仓库后的回退
# 文件初始内容
[root@gitlab ~/demo]# cat file1
xts.com

# 第一次编辑文件容,并提交到本地仓库
[root@gitlab ~/demo]# cat > file1 << EOF
1
2
3
EOF
[root@gitlab ~/demo]# cat file1
1
2
3

[root@gitlab ~/demo]# git add .
[root@gitlab ~/demo]# git commit -m "第一次提交"
[master 537efdf] 第一次提交
 1 file changed, 3 insertions(+), 1 deletion(-)

# 第二次编辑文件容,并提交到本地仓库
[root@gitlab ~/demo]# cat > file1 << EOF
> 1
> 2
> 3
> 4
> 5
> 6
> EOF
[root@gitlab ~/demo]# cat file1
1
2
3
4
5
6

[root@gitlab ~/demo]# git add .
[root@gitlab ~/demo]# git commit -m "第二次提交"
[master ad8c3f4] 第二次提交
 1 file changed, 3 insertions(+)

# 回退到文件初始内容状态
## 查看日志
[root@gitlab ~/demo]# git log
commit ad8c3f4de70200864527c3ee4d4c0e16154b4537
Author: xts <1184964356@qq.com>
Date:   Sat Jun 20 11:25:09 2020 +0800

    第二次提交

commit 537efdff2a36c19403a4c32ee2c005117861bd1f
Author: xts <1184964356@qq.com>
Date:   Sat Jun 20 11:24:00 2020 +0800

    第一次提交

commit eeb39538b9495c42c9655da6d738df352958a7e8            # 回退到这,记住这个ID
Author: xts <1184964356@qq.com>
Date:   Sat Jun 20 10:27:23 2020 +0800

    xts.com                                                # 回退到的内容

commit 8695ba525f372405fb5fd1224a1207e4d3af0d7e
Author: xts <1184964356@qq.com>
Date:   Sat Jun 20 10:12:24 2020 +0800

    file1-file3

[root@gitlab ~/demo]# git reset --hard eeb39538b9495c42c9655da6d738df352958a7e8   # 具体回退命令
HEAD is now at eeb3953 xts.com
[root@gitlab ~/demo]# cat file1
xts.com                              # 内容变回来了,但是,再次使用git log会发现,日志里面的历史也跟着回退了

[root@gitlab ~/demo]# git log
commit eeb39538b9495c42c9655da6d738df352958a7e8
Author: xts <1184964356@qq.com>
Date:   Sat Jun 20 10:27:23 2020 +0800

    xts.com

commit 8695ba525f372405fb5fd1224a1207e4d3af0d7e
Author: xts <1184964356@qq.com>
Date:   Sat Jun 20 10:12:24 2020 +0800

    file1-file3

# 在回退到第一次增加的文件内容
[root@gitlab ~/demo]# git reflog
eeb3953 HEAD@{0}: reset: moving to eeb39538b9495c42c9655da6d738df352958a7e8
ad8c3f4 HEAD@{1}: commit: 第二次提交
537efdf HEAD@{2}: commit: 第一次提交
eeb3953 HEAD@{3}: commit: xts.com
8695ba5 HEAD@{4}: commit (initial): file1-file3
[root@gitlab ~/demo]# git reset --hard 537efdf
HEAD is now at 537efdf 第一次提交
[root@gitlab ~/demo]# cat file1
1
2
3
多次提交后的代码回退总结
git reflog  # 查看所有分支历史提交记录
git reset --hard $commint_id  # 回退
4. Git分支管理
4.1 什么是分支
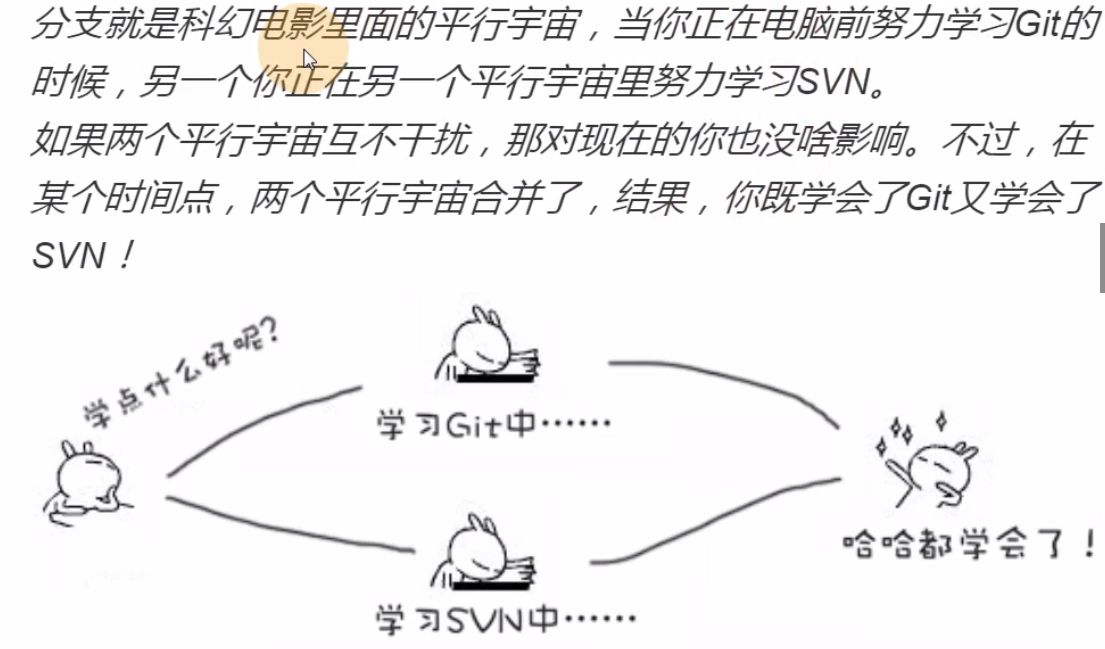
4.2 分支在实际软件开发中的作用

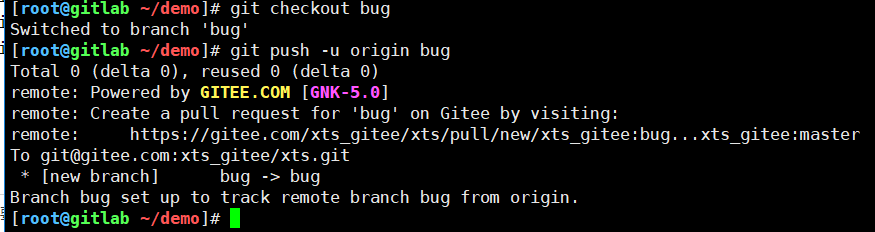
4.3 git分支基本操作
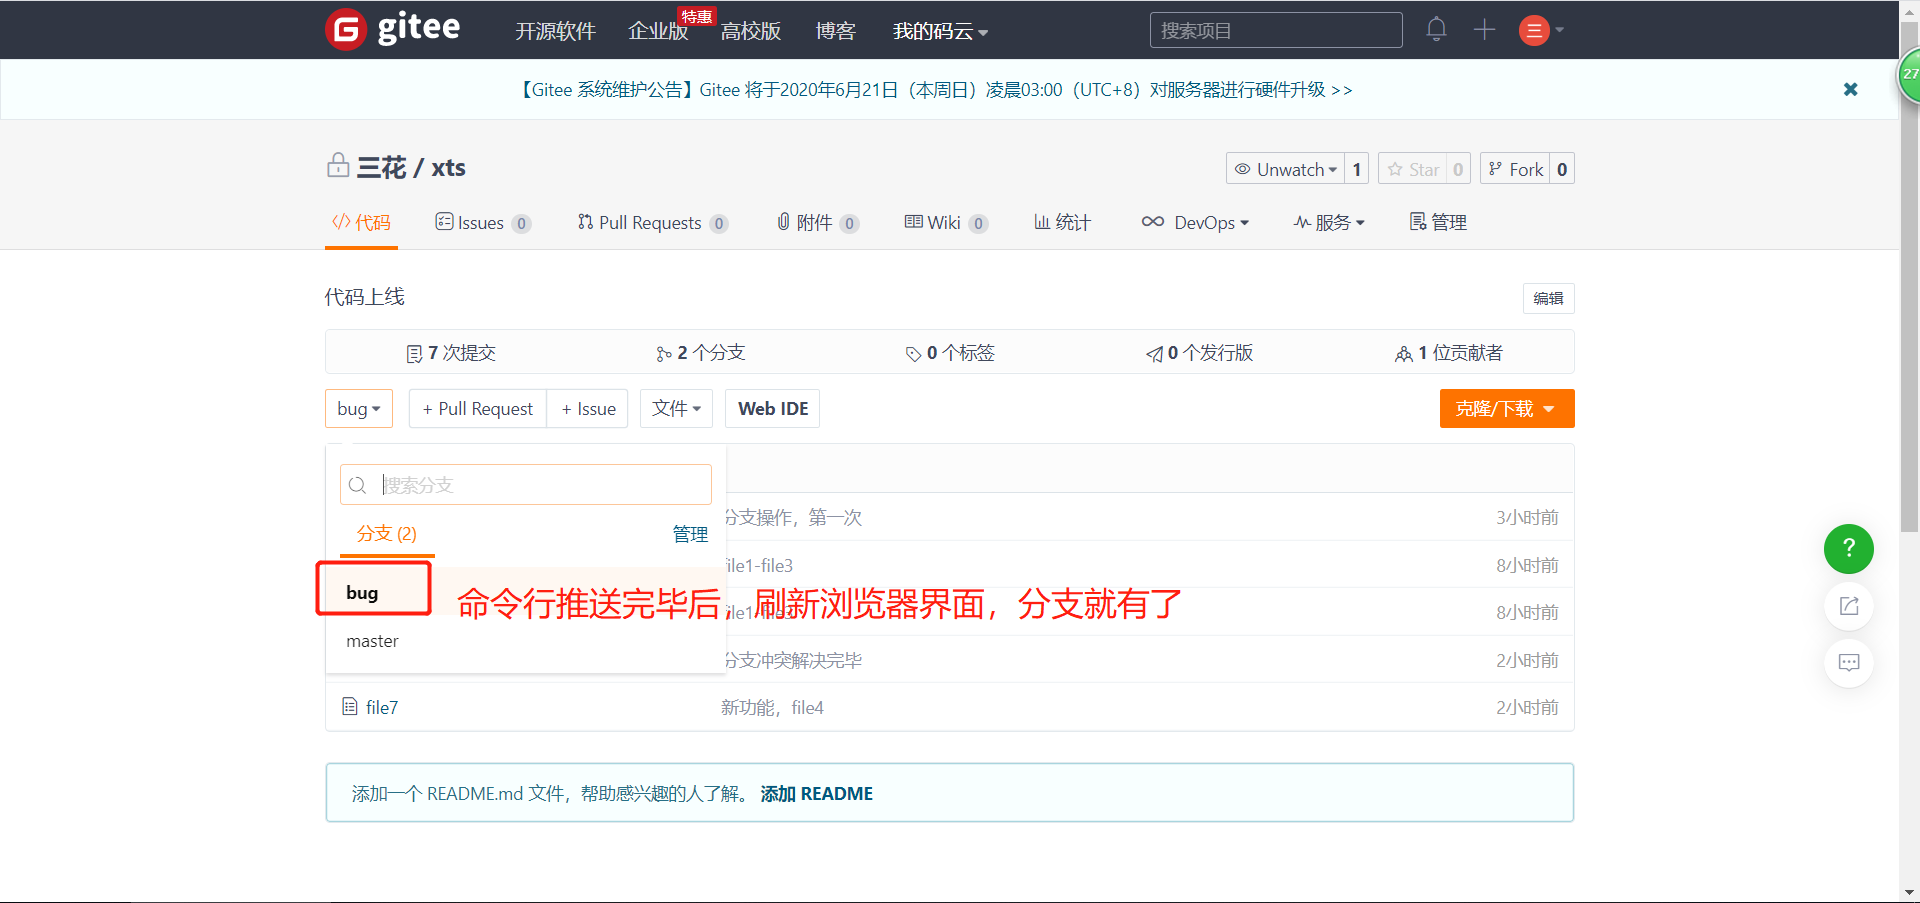
# 创建分支
[root@gitlab ~/demo]# git branch bug

#查看分支
[root@gitlab ~/demo]# git branch
  bug
* master

# 切换分支
[root@gitlab ~/demo]# git checkout bug
Switched to branch 'bug'
[root@gitlab ~/demo]# git branch
* bug
  master
[root@gitlab ~/demo]# ls
file1  file2  file3

# 修改file1文件内容并提交到本地仓库
[root@gitlab ~/demo]# cat file1
1
2
3
4
5
6
7
[root@gitlab ~/demo]# git add .
[root@gitlab ~/demo]# git commit -m "分支操作,第一次"
[bug 7442502] 分支操作,第一次
 1 file changed, 4 insertions(+)

# 在bug分支上合并master主分支(将master上的内容,拿到bug上面)
[root@gitlab ~/demo]# git branch
* bug                                   # 当前所在分支
  master
[root@gitlab ~/demo]# git merge master
Already up-to-date.                     # 已经是最新的,因为master没有做过改变。每次合并前都必须做这个操作,确保master是最新的没有改变的。

# 如果是生产环境,bug上面合并master后,就要测试了

# 切到master主分支,把bug分支的内容合并过来
[root@gitlab ~/demo]# git checkout master
Switched to branch 'master'
[root@gitlab ~/demo]# git branch
  bug
* master

[root@gitlab ~/demo]# git merge bug        # 合并
Updating 537efdf..7442502
Fast-forward
 file1 | 4 ++++
 1 file changed, 4 insertions(+)        # 1个文件改变,增加了4行

# 生产环境的话 ,完了就部署了
分支操作总结
git branch bug   # 创建分支,分支为bug
git branch       # 查看分支
git checkout bug # 切换分支
git merge bug    # 合并分支
4.4 分支合并时,出现冲突如何解决
分支冲突指的是,两个人同时修改同一个文件的同一行
模拟冲突
# 在bug分支开发新功能file4,并提交
[root@gitlab ~/demo]# git branch
  bug
* master
[root@gitlab ~/demo]# git checkout bug
Switched to branch 'bug'
[root@gitlab ~/demo]# git branch
* bug
  master
[root@gitlab ~/demo]# echo "AAA BBB XXX" > file4
[root@gitlab ~/demo]# git add .
[root@gitlab ~/demo]# git commit -m "新功能,file4"
[bug 7b99482] 新功能,file4
 2 files changed, 2 insertions(+)
 create mode 100644 file4
 create mode 100644 file

# 切换到master分支,创建fiel4
[root@gitlab ~/demo]# git checkout master
Switched to branch 'master'
[root@gitlab ~/demo]# git branch
  bug
* maste
[root@gitlab ~/demo]# echo "ccc ddd eee" > file4
[root@gitlab ~/demo]# git add .
[root@gitlab ~/demo]# git commit -m "新增功能,file4"
[master 3fecf75] 新增功能,file4
 1 file changed, 1 insertion(+)
 create mode 100644 file4

# 切换到bug分支,然后合并master分支
[root@gitlab ~/demo]# git checkout bug
Switched to branch 'bug'
[root@gitlab ~/demo]# git merge master
Auto-merging file4                        # 自动合并file4
CONFLICT (add/add): Merge conflict in file4   # 冲突(添加/添加):合并冲突于file4
Automatic merge failed; fix conflicts and then commit the result.  # 自动合并失败,修正冲突然后提交修正结果

# 查看file4文件
[root@gitlab ~/demo]# cat file4
<<<<<<< HEAD
AAA BBB XXX        # 这里是当前分支file4文件内容(bug分支)
=======
ccc ddd eee        # 这里是master分支file4文件内容
>>>>>>> master
[root@gitlab ~/demo]# git branch
* bug
  master

# 解决办法一:上述内容都想要,但是存在的顺序不想影响
[root@gitlab ~/demo]# cat file4        # 修改后的内容
AAA BBB XXX
ccc ddd eee
[root@gitlab ~/demo]# git add .
[root@gitlab ~/demo]# git commit -m "分支冲突解决完毕"
[bug f947a54] 分支冲突解决完毕

#切换到master分支,再合并
[root@gitlab ~/demo]# cat file4  # 合并前内容
ccc ddd eee
[root@gitlab ~/demo]# git checkout master
Switched to branch 'master'
[root@gitlab ~/demo]# git merge bug
Updating 3fecf75..f947a54
Fast-forward
 file4 | 1 +
 1 files changed, 1 insertions(+)
[root@gitlab ~/demo]# cat file4  # 合并后内容
AAA BBB XXX
ccc ddd eee
冲突解决思路总结
先在分支上把冲突解决了后,与master合并下,然后在切换到master与该分支进行合并
5. Git标签管理
5.1 git标签有什么用

5.2 为什么要使用git标签
比commit_id更容易查找。
标签就相当于commit_id。也可以理解为自己的姓名代表了自己的身份证号。
5.3 git标签基本使用
[root@gitlab ~/demo]# git status
# On branch master
nothing to commit, working directory clean

# 对当前最新的commit_id添加标签
[root@gitlab ~/demo]# git tag -a "v1.1" -m "首次发布"

# 查看标签
[root@gitlab ~/demo]# git tag
v1.1

[root@gitlab ~/demo]# git show v1.1    # 从下面的输出可以看出,v1.1和commit f947a5是关联在一起的
tag v1.1
Tagger: xts <1184964356@qq.com>
Date:   Sat Jun 20 17:03:54 2020 +0800

首次发布

commit f947a54d88c2159e05e596505c2926a4b24cccb3
Merge: 7b99482 3fecf75
Author: xts <1184964356@qq.com>
Date:   Sat Jun 20 16:33:49 2020 +0800

    分支冲突解决完毕

diff --cc file4
index 62b229e,b97bc91..955d15b
--- a/file4
+++ b/file4
@@@ -1,1 -1,1 +1,2 @@@
 +AAA BBB XXX
+ ccc ddd eee

# 指定commit_id添加标签
[root@gitlab ~/demo]# git reflog
f947a54 HEAD@{0}: merge bug: Fast-forward
3fecf75 HEAD@{1}: reset: moving to 3fecf756865605820229e4c21ec9d2a6e1609c63
f947a54 HEAD@{2}: merge bug: Fast-forward
3fecf75 HEAD@{3}: checkout: moving from bug to master
f947a54 HEAD@{4}: commit (merge): 分支冲突解决完毕
7b99482 HEAD@{5}: checkout: moving from master to bug
3fecf75 HEAD@{6}: commit: 新增功能,file4
7442502 HEAD@{7}: checkout: moving from bug to master
7b99482 HEAD@{8}: commit: 新功能,file4
7442502 HEAD@{9}: checkout: moving from master to bug
7442502 HEAD@{10}: merge bug: Fast-forward
537efdf HEAD@{11}: checkout: moving from bug to master
7442502 HEAD@{12}: commit: 分支操作,第一次
537efdf HEAD@{13}: checkout: moving from master to bug
537efdf HEAD@{14}: reset: moving to 537efdf
eeb3953 HEAD@{15}: reset: moving to eeb39538b9495c42c9655da6d738df352958a7e8
ad8c3f4 HEAD@{16}: commit: 第二次提交
537efdf HEAD@{17}: commit: 第一次提交
eeb3953 HEAD@{18}: commit: xts.com
8695ba5 HEAD@{19}: commit (initial): file1-file3

# 这里就给“commit: 第一次提交”添加一个标签
[root@gitlab ~/demo]# git tag -a v0.2 537efdf -m "第一次提交"

# 查看标签
[root@gitlab ~/demo]# git show v0.2
tag v0.2
Tagger: xts <1184964356@qq.com>
Date:   Sat Jun 20 17:13:19 2020 +0800

第一次提交

commit 537efdff2a36c19403a4c32ee2c005117861bd1f
Author: xts <1184964356@qq.com>
Date:   Sat Jun 20 11:24:00 2020 +0800

    第一次提交

diff --git a/file1 b/file1
index a40bbbe..01e79c3 100644
--- a/file1
+++ b/file1
@@ -1 +1,3 @@
-xts.com
+1
+2
+3

# 删除标签
[root@gitlab ~/demo]# git tag -d v0.2
Deleted tag 'v0.2' (was a4f8e3d)
[root@gitlab ~/demo]# git tag
v1.1
git标签管理总结
git tag -a "v1.1" -m "首次发布"  # 对当前最新的commit_id添加标签
git show v1.1                   # 查看标签对应的commit_id
git tag                         # 查看所有标签
it tag -a v0.2 537efdf -m "第一次提交"  # 对指定的commit_id添加标签
git tag -d v0.2                 #删除标签
6. Git远程仓库
6.1 远程仓库类型
(1)github
(2)gitlab
(3)gitee       # 本次使用的仓库,首次使用需要注册,gitee.com
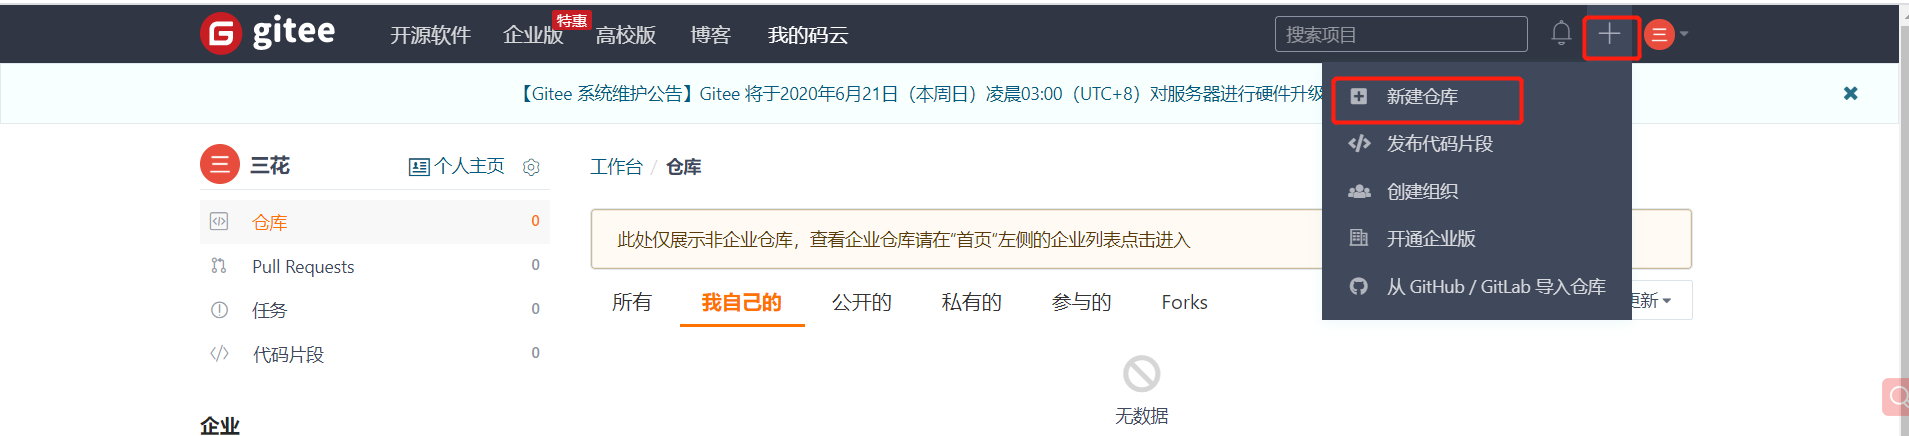
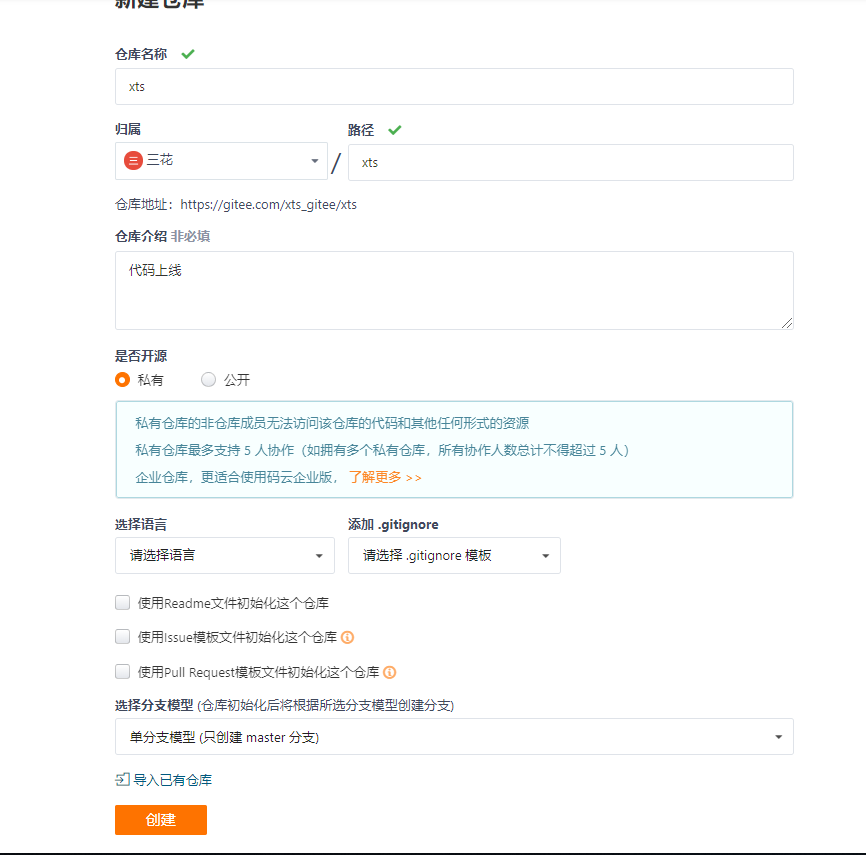
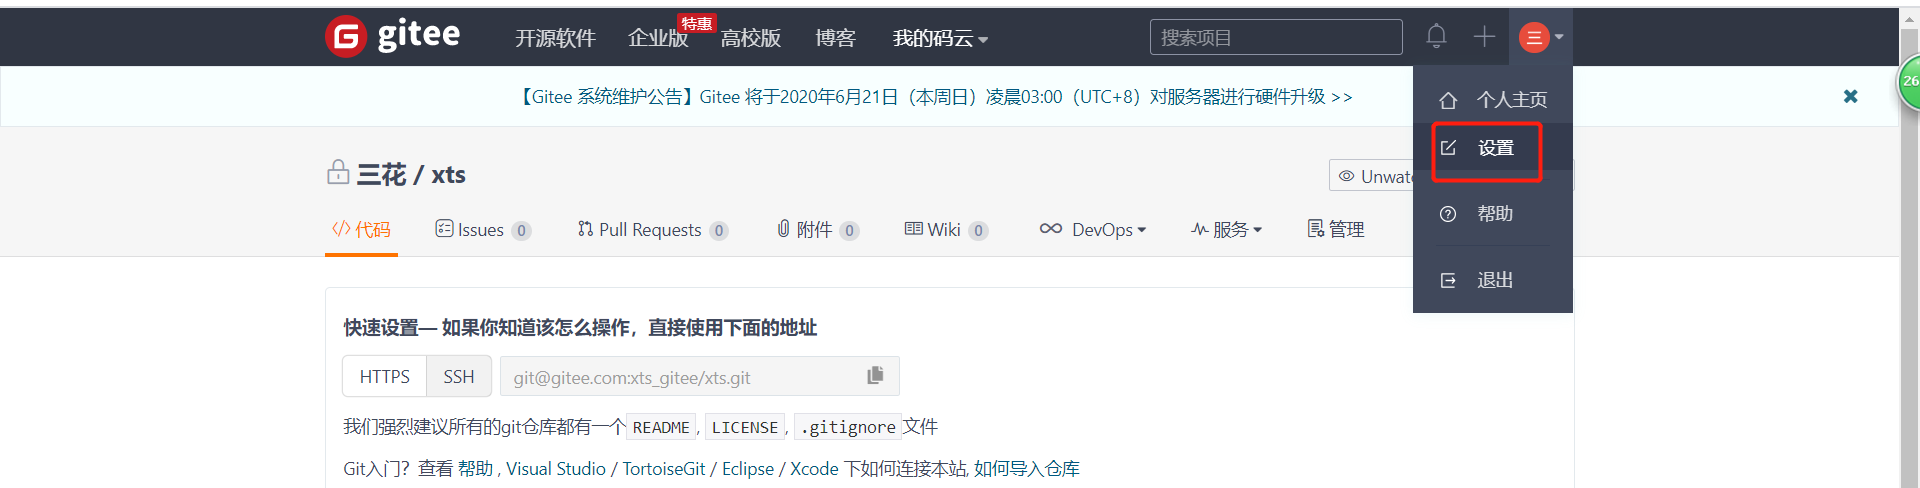
6.2 gitee新建仓库与基本设置


6.3 git拉取代码
# 克隆项目
[root@gitlab ~/demo]# cd /opt/
[root@gitlab /opt]# ls
[root@gitlab /opt]# git clone git@gitee.com:xts_gitee/xts.git
Cloning into 'xts'...
remote: Enumerating objects: 21, done.
remote: Counting objects: 100% (21/21), done.
remote: Compressing objects: 100% (14/14), done.
remote: Total 21 (delta 3), reused 0 (delta 0), pack-reused 0
Receiving objects: 100% (21/21), done.
Resolving deltas: 100% (3/3), done.
[root@gitlab /opt]# ls
xts
[root@gitlab /opt]# cd xts/
[root@gitlab /opt/xts]# ls
file1  file2  file3  file4  file7
更改拉取下来的代码文件,再推送到远程仓库
# 原本的内容
[root@gitlab /opt/xts]# cat file1
1
2
3
4
5
6
7

# 修改后的内容
[root@gitlab /opt/xts]# sed -i 's#$#.com#g' file1
[root@gitlab /opt/xts]# cat file1
1.com
2.com
3.com
4.com
5.com
6.com
7.com

# 同步代码,并推送到gitee
[root@gitlab /opt/xts]# git add .
[root@gitlab /opt/xts]# git branch
* master
[root@gitlab /opt/xts]# git commit -m "master-拉取后修改,并第一次提交"
[master cbff9db] master-拉取后修改,并第一次提交
 1 file changed, 7 insertions(+), 7 deletions(-)
[root@gitlab /opt/xts]# git push origin master
Counting objects: 5, done.
Delta compression using up to 4 threads.
Compressing objects: 100% (2/2), done.
Writing objects: 100% (3/3), 332 bytes | 0 bytes/s, done.
Total 3 (delta 1), reused 0 (delta 0)
remote: Powered by GITEE.COM [GNK-5.0]
To git@gitee.com:xts_gitee/xts.git
   f947a54..cbff9db  master -> master
# 更新本地仓库代码(拉取远程仓库代码)
[root@gitlab /opt/xts]# git pull origin master
From gitee.com:xts_gitee/xts
 * branch            master     -> FETCH_HEAD
Already up-to-date.
[root@gitlab /opt/xts]# cat file1
1.com
2.com
3.com
4.com
5.com
6.com
7.com
7. gitlab仓库(ce社区版)
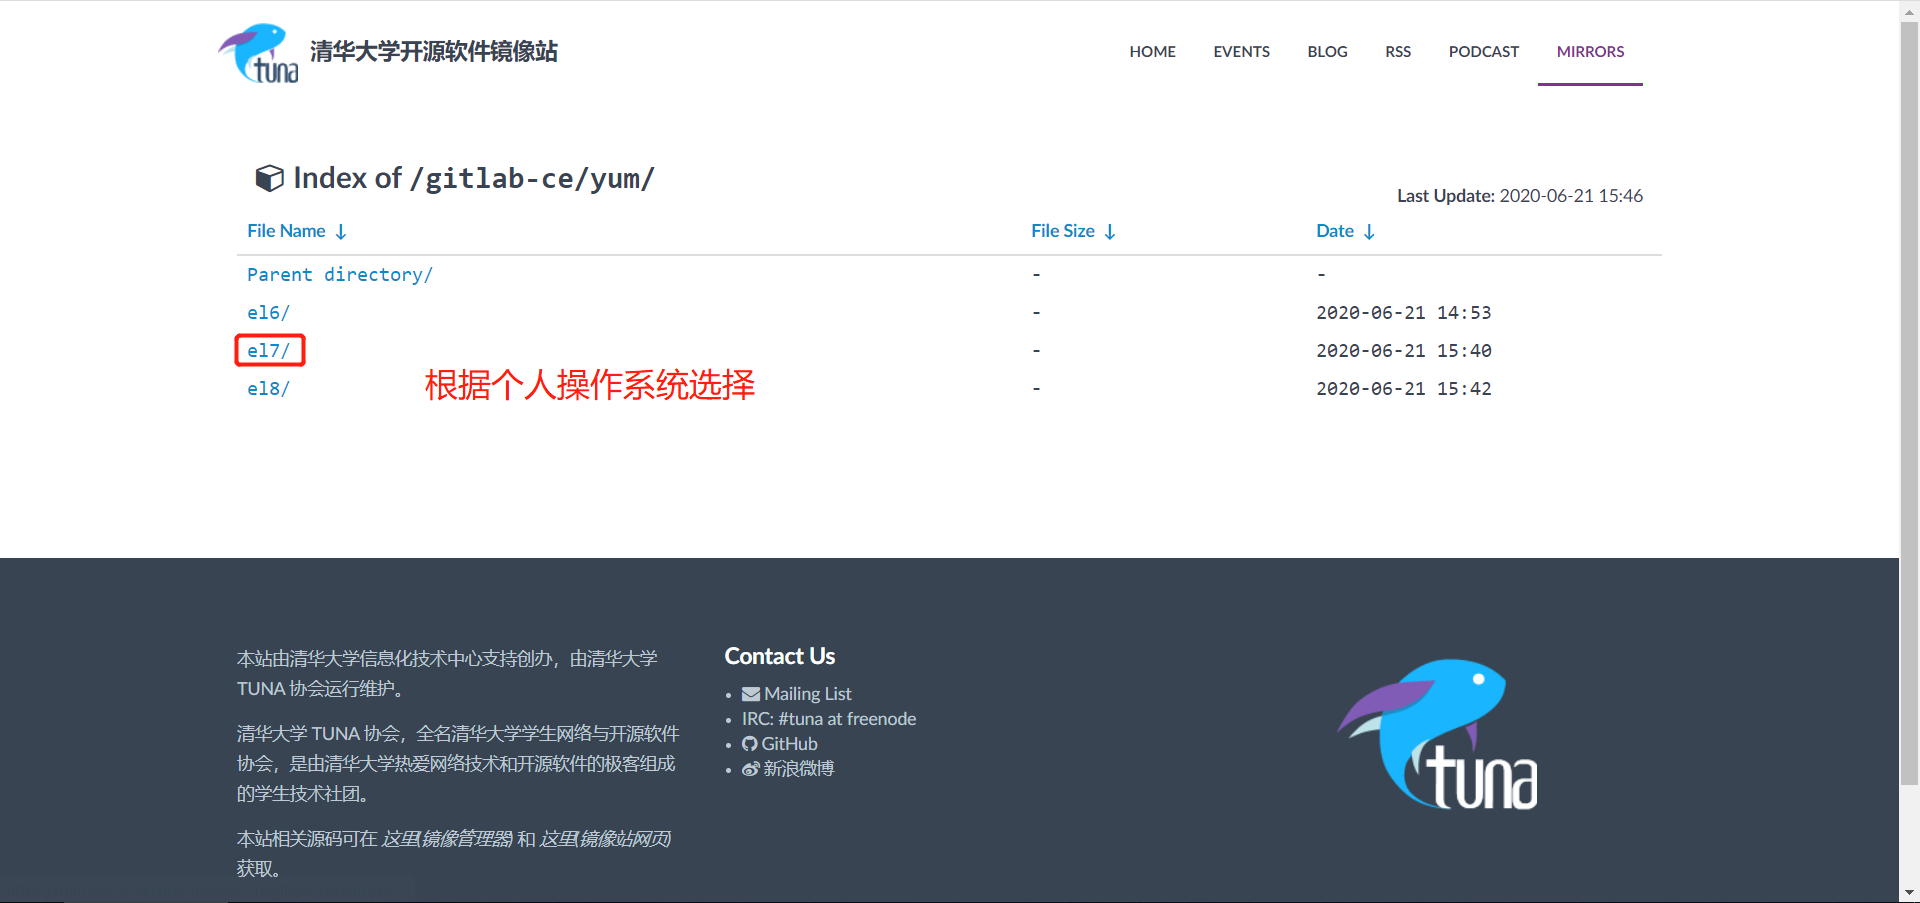
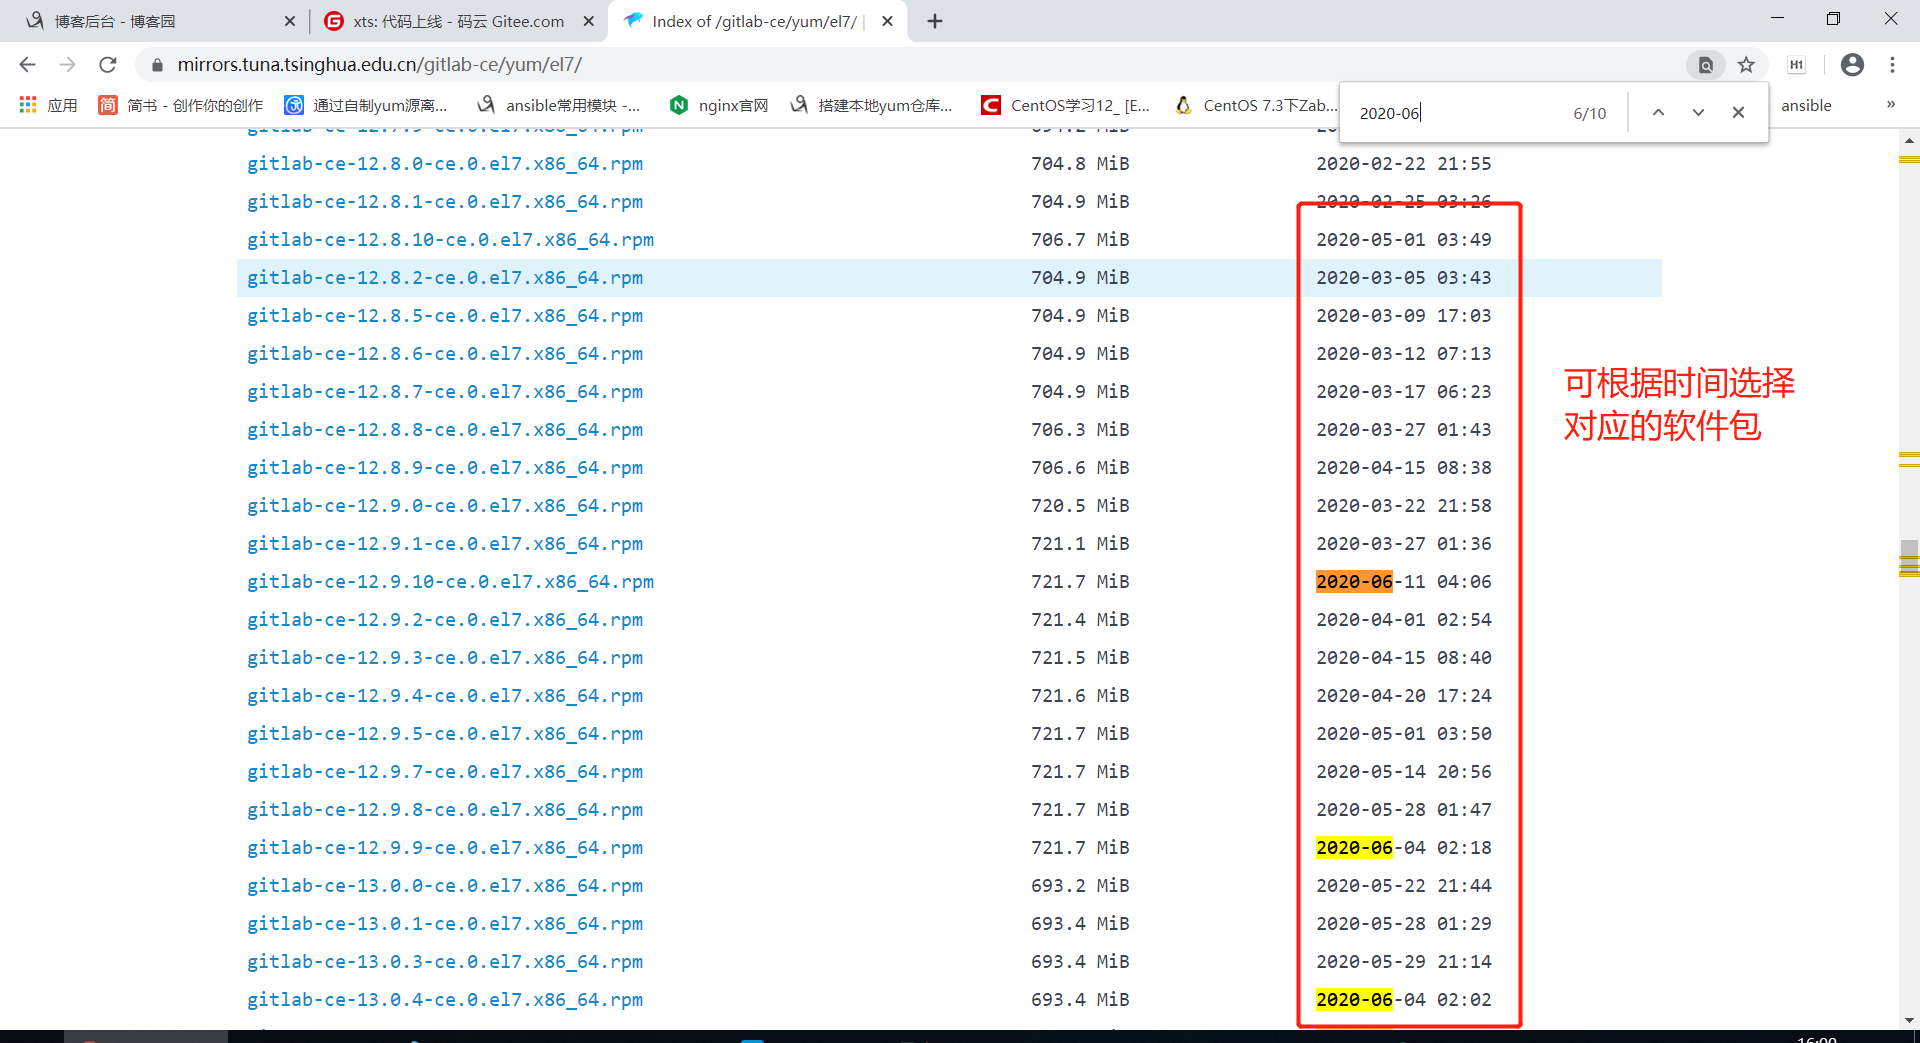
7.1 安装包获取
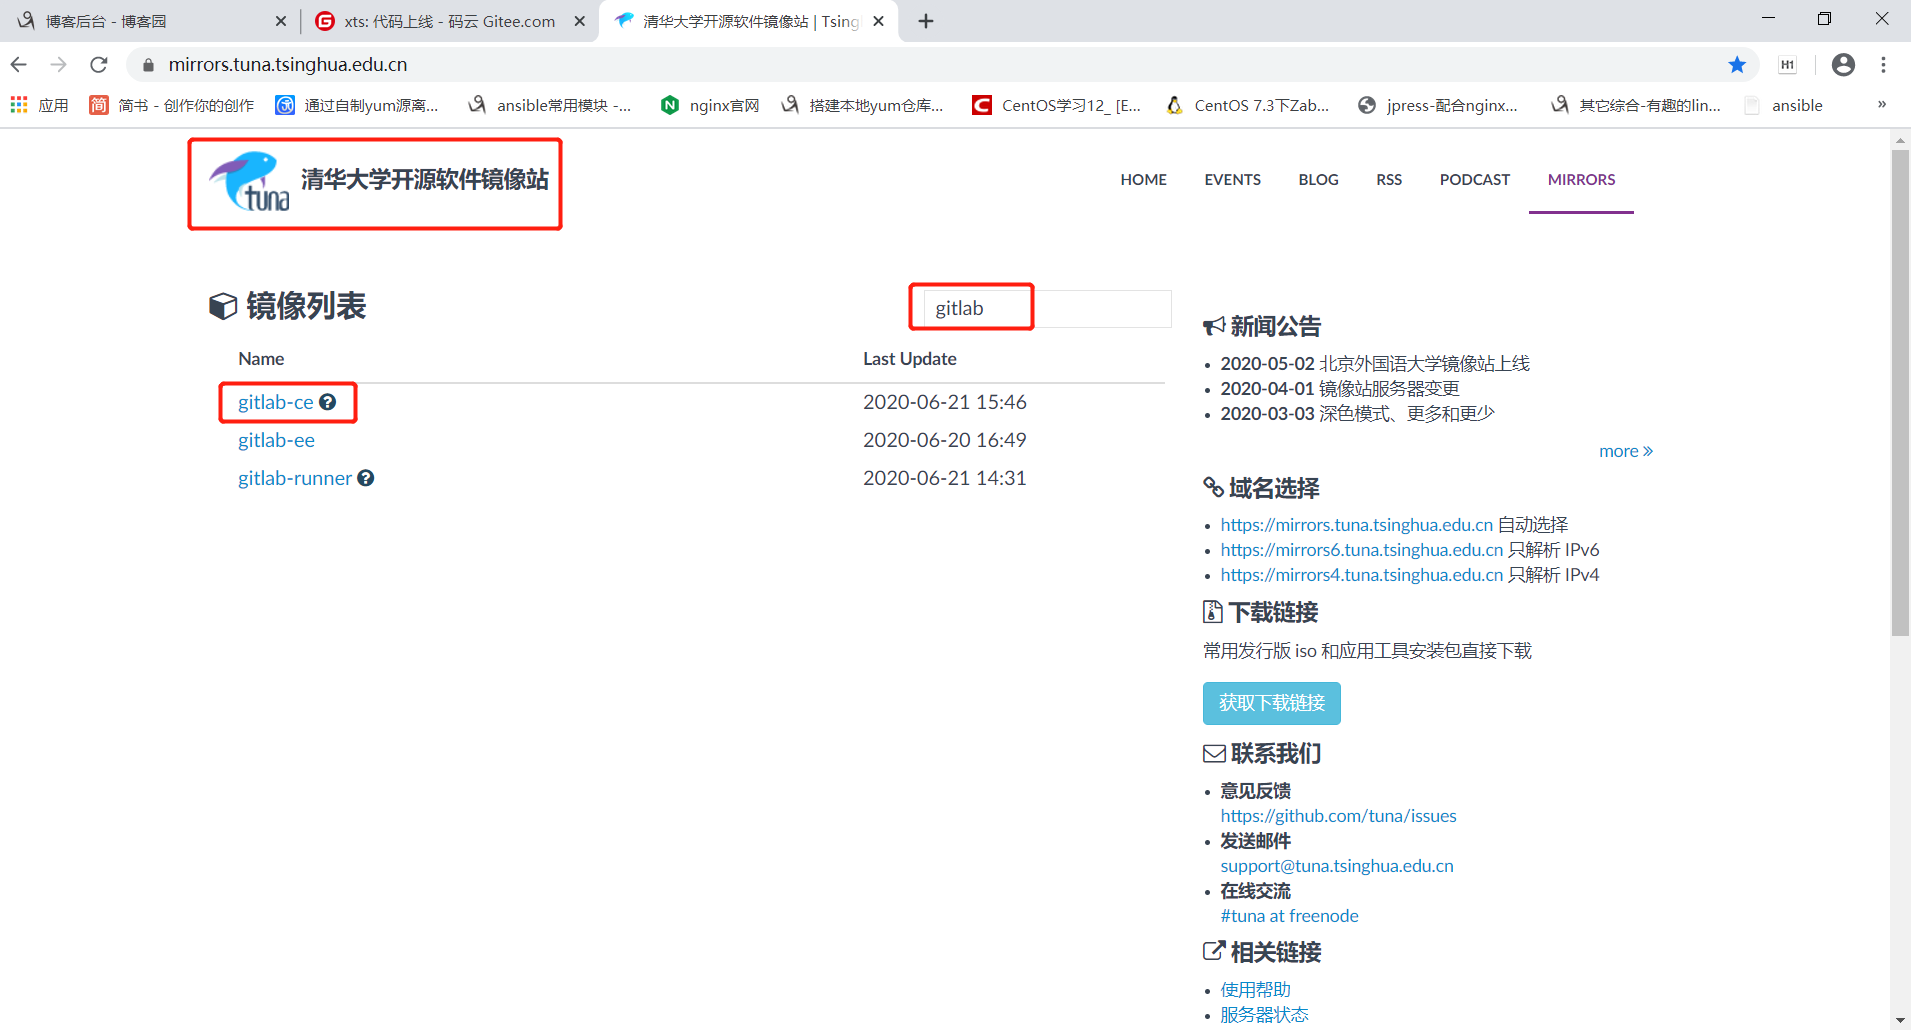

7.2 安装gitlab
注意,如果需要升级,如10.x.x升到12.x.x,请先升级到11.x.x,然后再升12.x.x,不要跨版本升级
# 安装gitlab所需依赖
[root@gitlab ~]# yum -y install curl policycoreutils-python openssh-server postfix
# 启动postfix
[root@gitlab ~]# systemctl enable postfix
[root@gitlab ~]# systemctl start postfix
# 安装gitlab
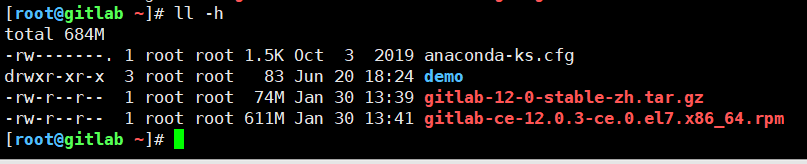
[root@gitlab ~]# yum localinstall gitlab-ce-12.0.3-ce.0.el7.x86_64.rpm
7.3 配置gitlab
7.3.1 备份配置文件
# 备份配置文件
[root@gitlab ~]# cp /etc/gitlab/{gitlab.rb,gitlab.rb_bak}
[root@gitlab ~]# cd /etc/gitlab/
[root@gitlab /etc/gitlab]# ls
gitlab.rb  gitlab.rb_bak
7.3.2 修改配置并文件
(1)修改gitlab访问的url
# 13行改成如下
external_url 'http://gitlab.xts.com'  # 这个域名,就是等下访问这个gitlab的域名,可自定义
(2)关闭一些没用的程序
## 第1385行 # prometheus['enable'] = true 改成如下:
prometheus['enable'] = false

## 1553行# prometheus_monitoring['enable'] = true 改成如下:
prometheus_monitoring['enable'] = false
(3)配置邮箱
# 编辑gitlab.rb,修改如下配置
        gitlab_rails['gitlab_email_enabled'] = true
	gitlab_rails['gitlab_email_from'] = "57891887@qq.com"  # 发件邮箱
	gitlab_rails['gitlab_email_display_name'] = 'OldXu-GitLab' # 发件人显示名称

	gitlab_rails['smtp_enable'] = true
	gitlab_rails['smtp_address'] = "smtp.qq.com"
	gitlab_rails['smtp_port'] = 465
	gitlab_rails['smtp_user_name'] = "57891887@qq.com" #发件人邮箱账户
	gitlab_rails['smtp_password'] = "nvguuktrefkmbce"  #发件人邮箱客户端授权码
	gitlab_rails['smtp_domain'] = "qq.com"
	gitlab_rails['smtp_authentication'] = "login"
	gitlab_rails['smtp_enable_starttls_auto'] = true
	gitlab_rails['smtp_tls'] = true
7.3.3 初始化gitlab
[root@gitlab ~]# gitlab-ctl reconfigure

# 查看启动状态(初始化完成,就启动了)
[root@gitlab ~]#  gitlab-ctl status
run: gitaly: (pid 25731) 14s; run: log: (pid 25267) 102s
run: gitlab-workhorse: (pid 25755) 13s; run: log: (pid 25595) 44s
run: logrotate: (pid 25632) 33s; run: log: (pid 25642) 32s
run: nginx: (pid 25608) 39s; run: log: (pid 25622) 38s
run: postgresql: (pid 25383) 94s; run: log: (pid 25432) 91s
run: redis: (pid 25218) 111s; run: log: (pid 25228) 110s
run: sidekiq: (pid 25564) 52s; run: log: (pid 25573) 48s
run: unicorn: (pid 25533) 58s; run: log: (pid 25561) 55s
7.3.4 浏览器访问gitlab,并调整gitlab基本配置
注意:访问前一定要在hosts文件中添加对应的解析
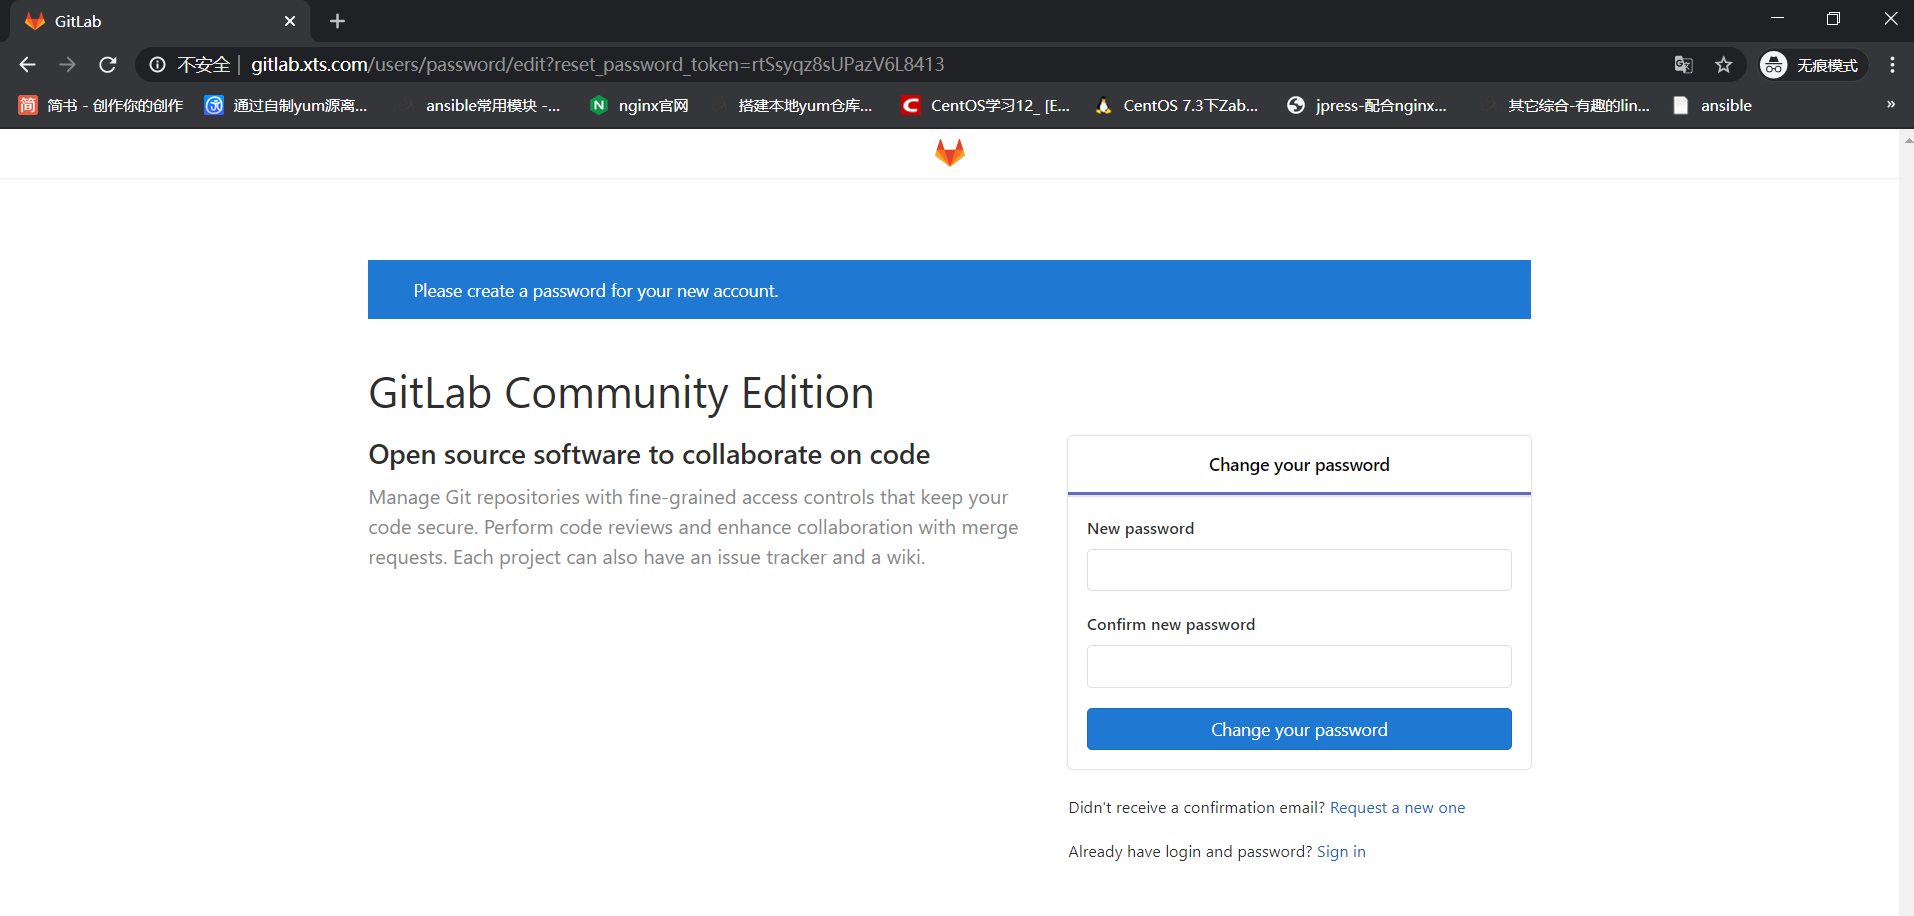
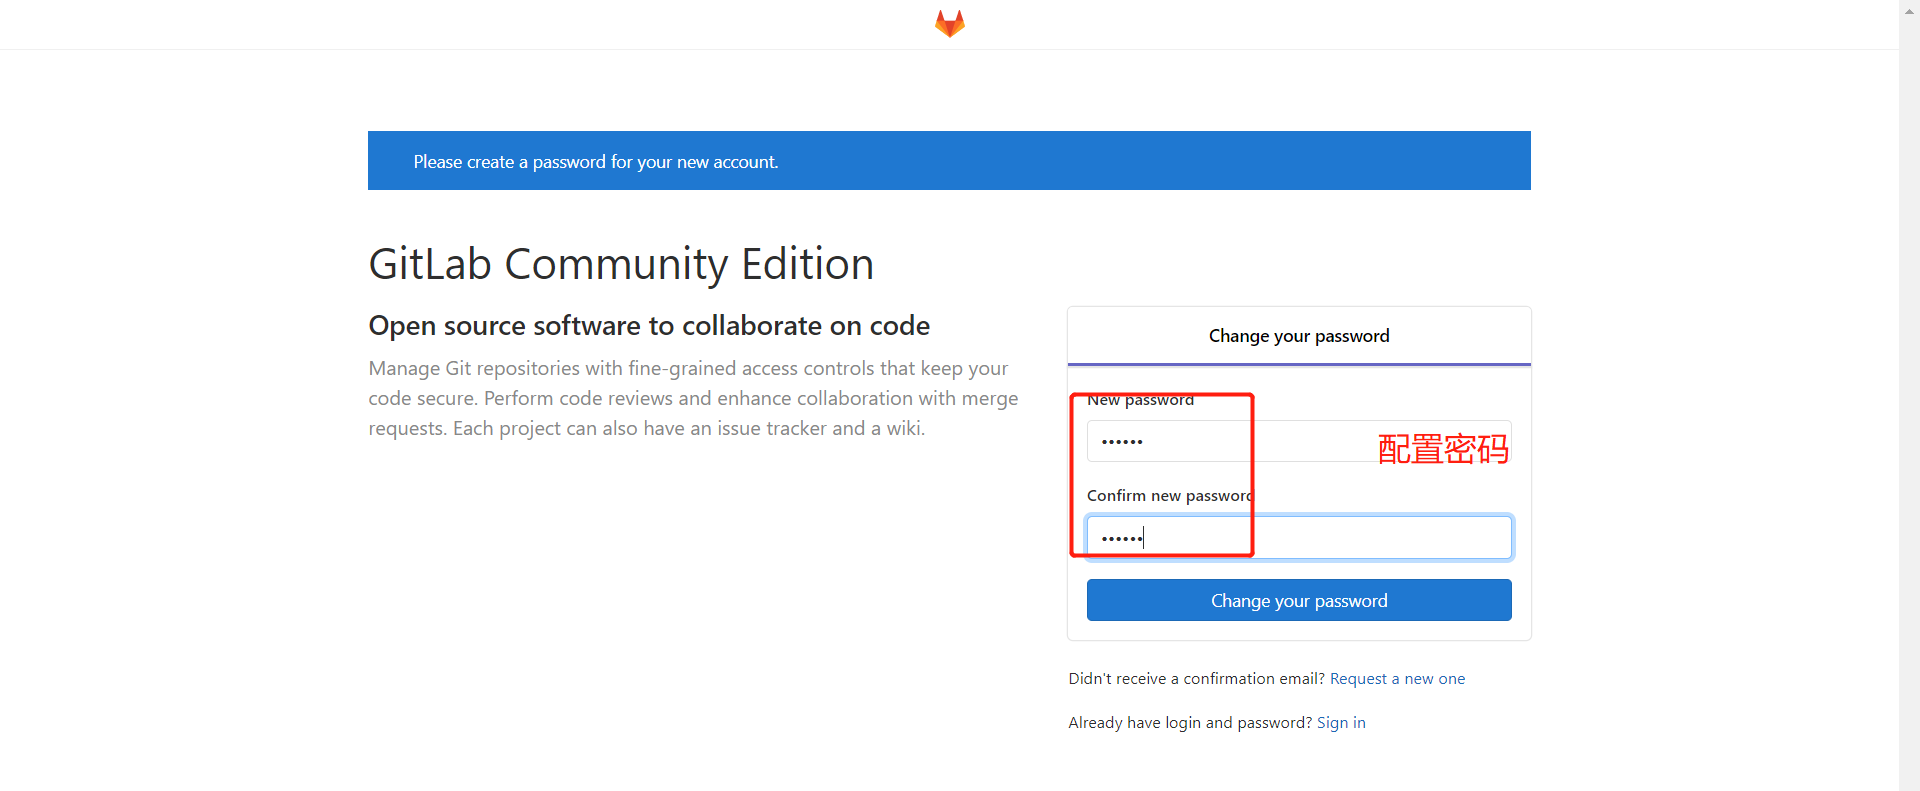
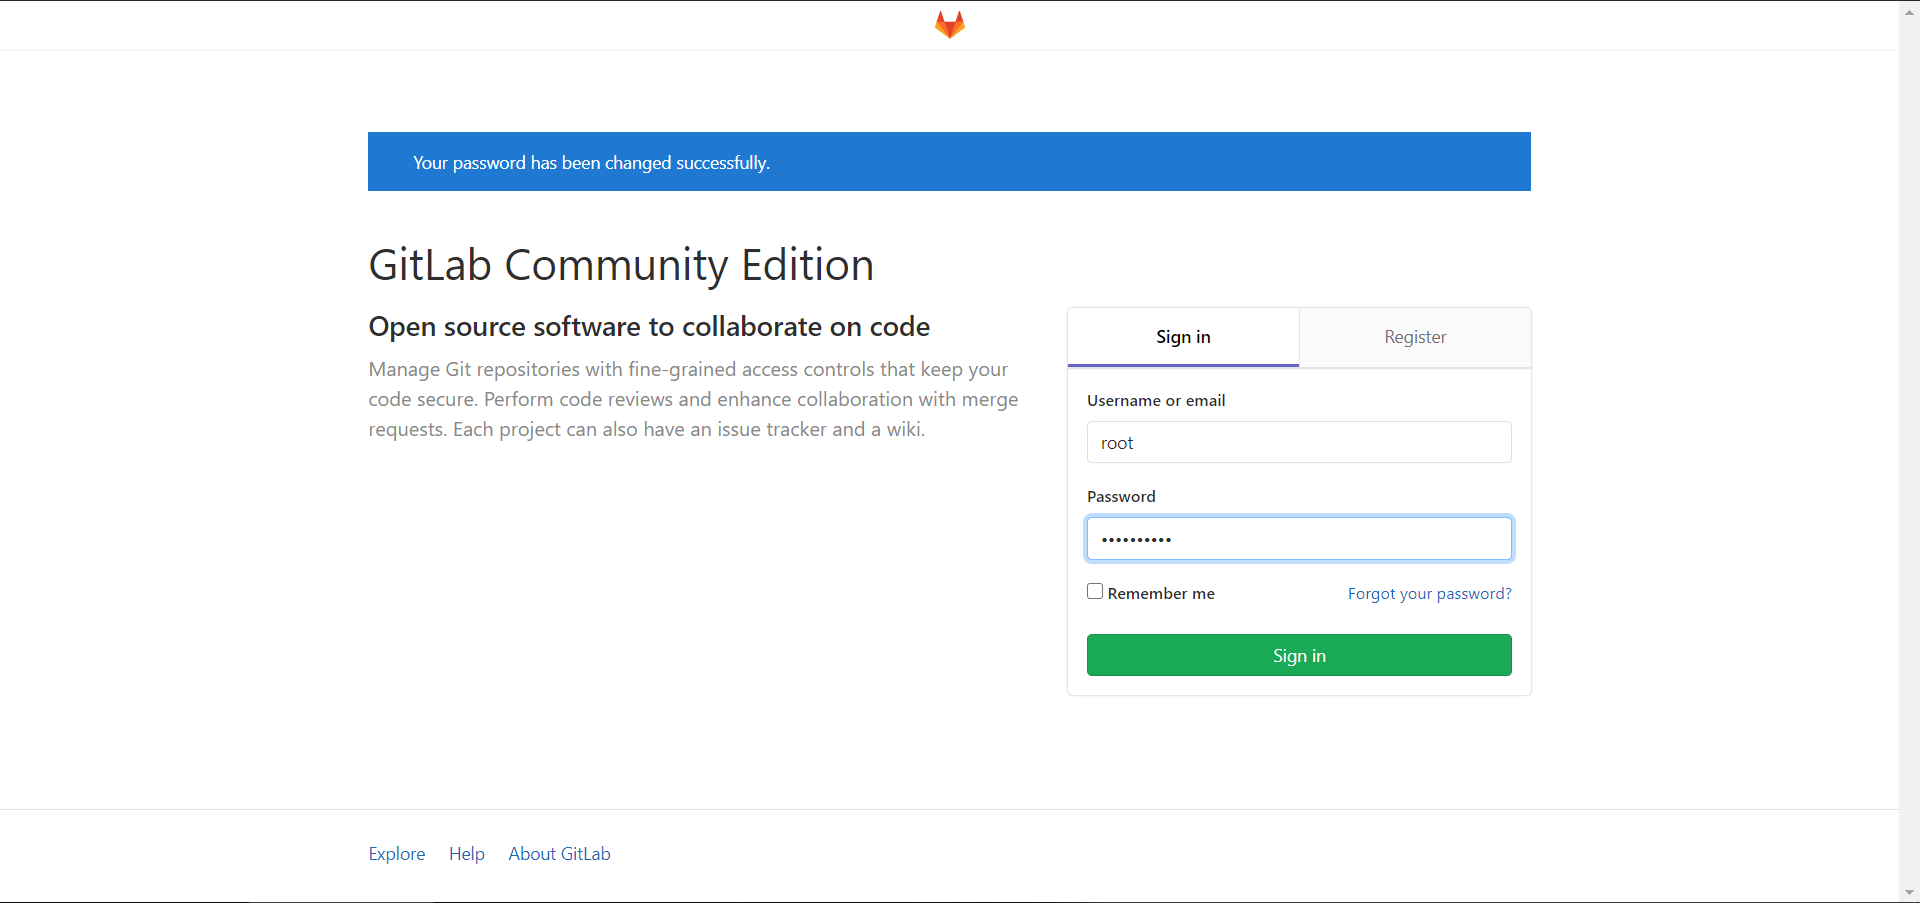
设置root密码
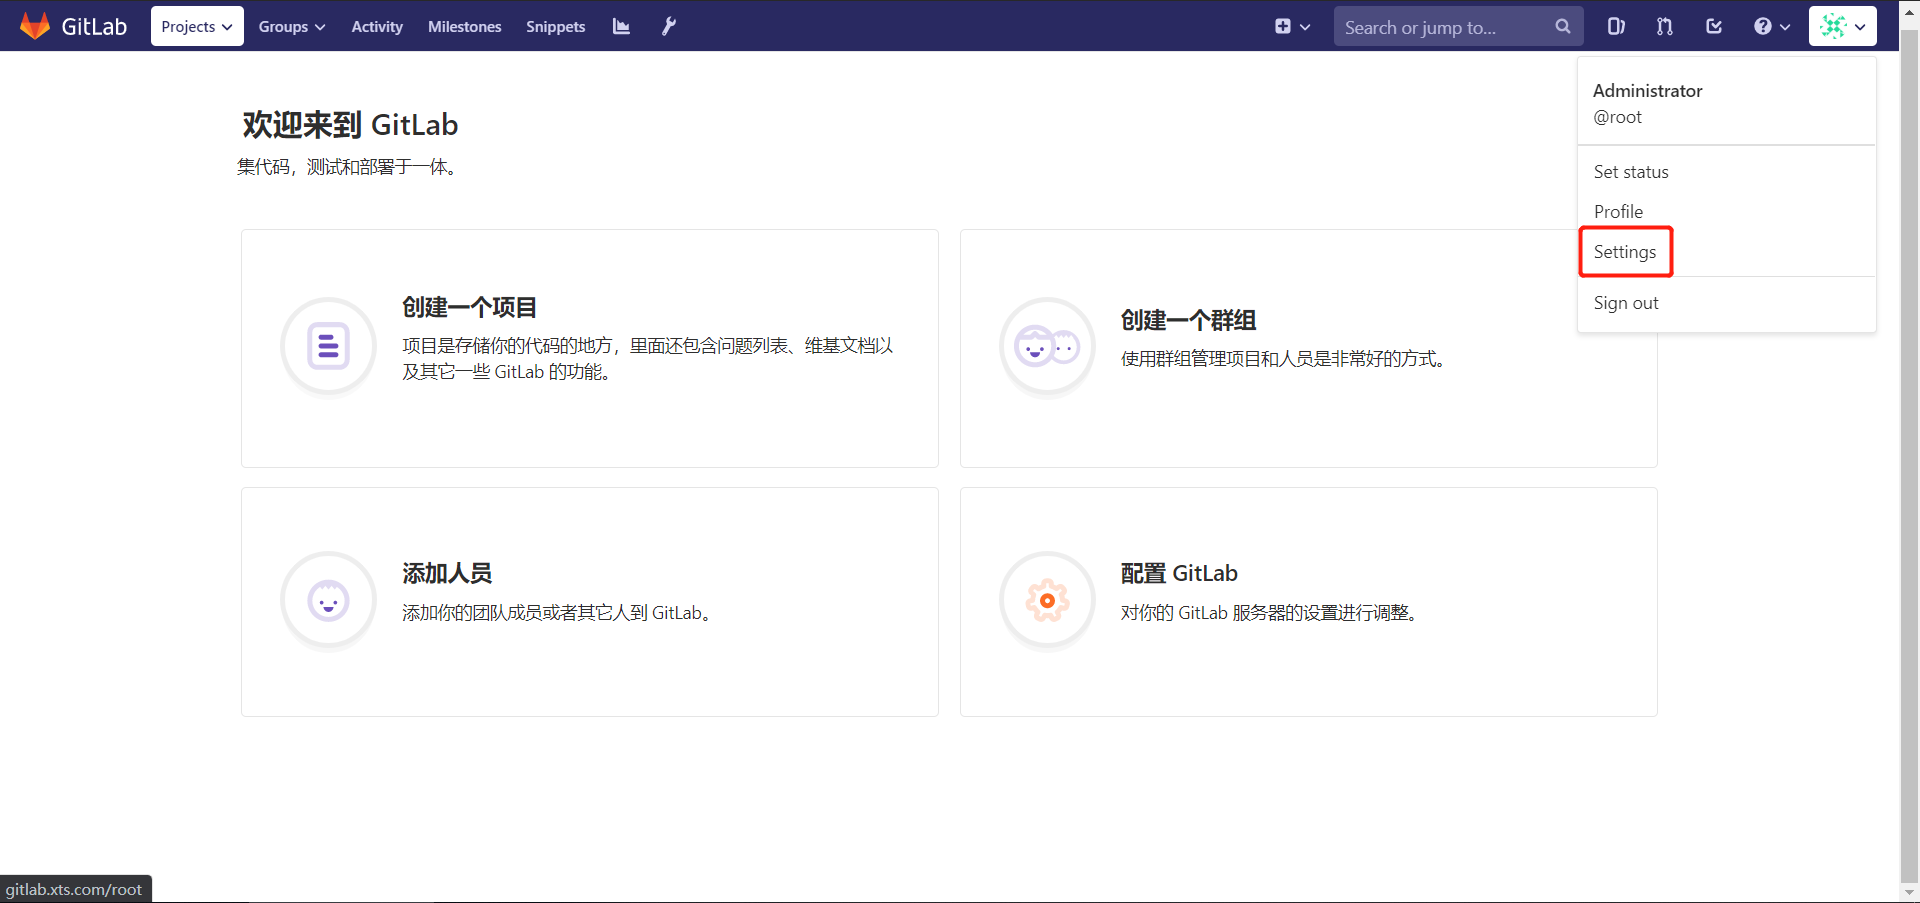
登录gitlab
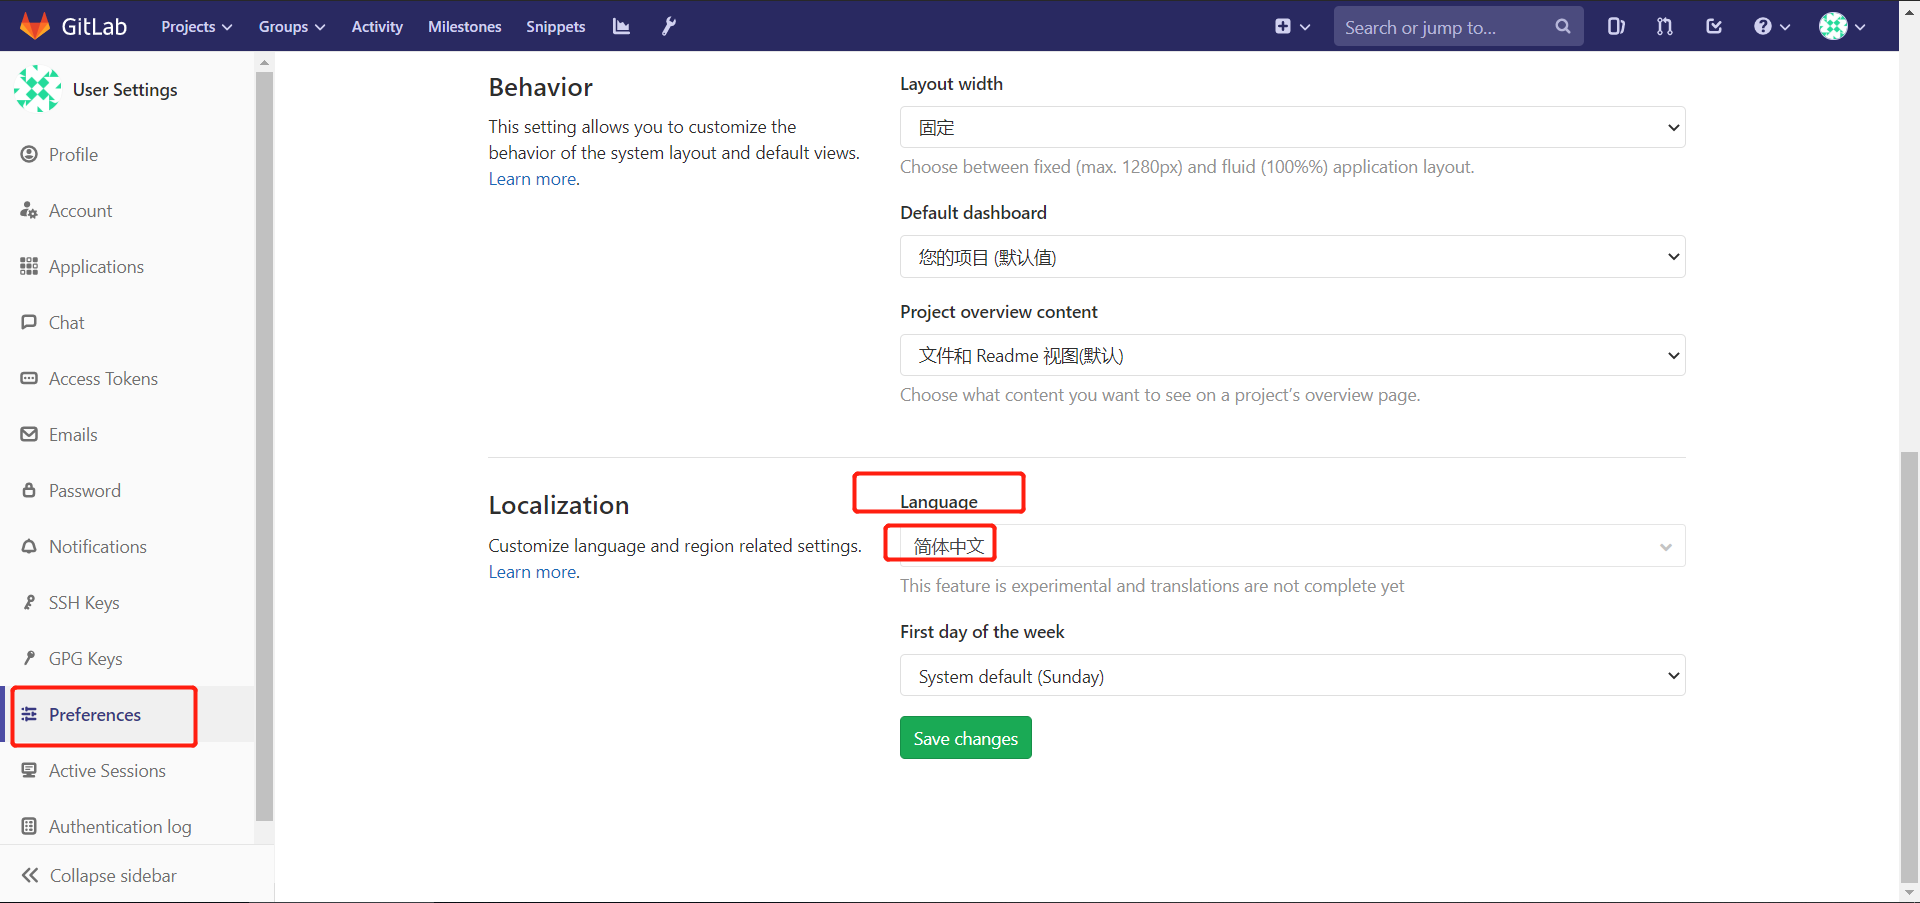
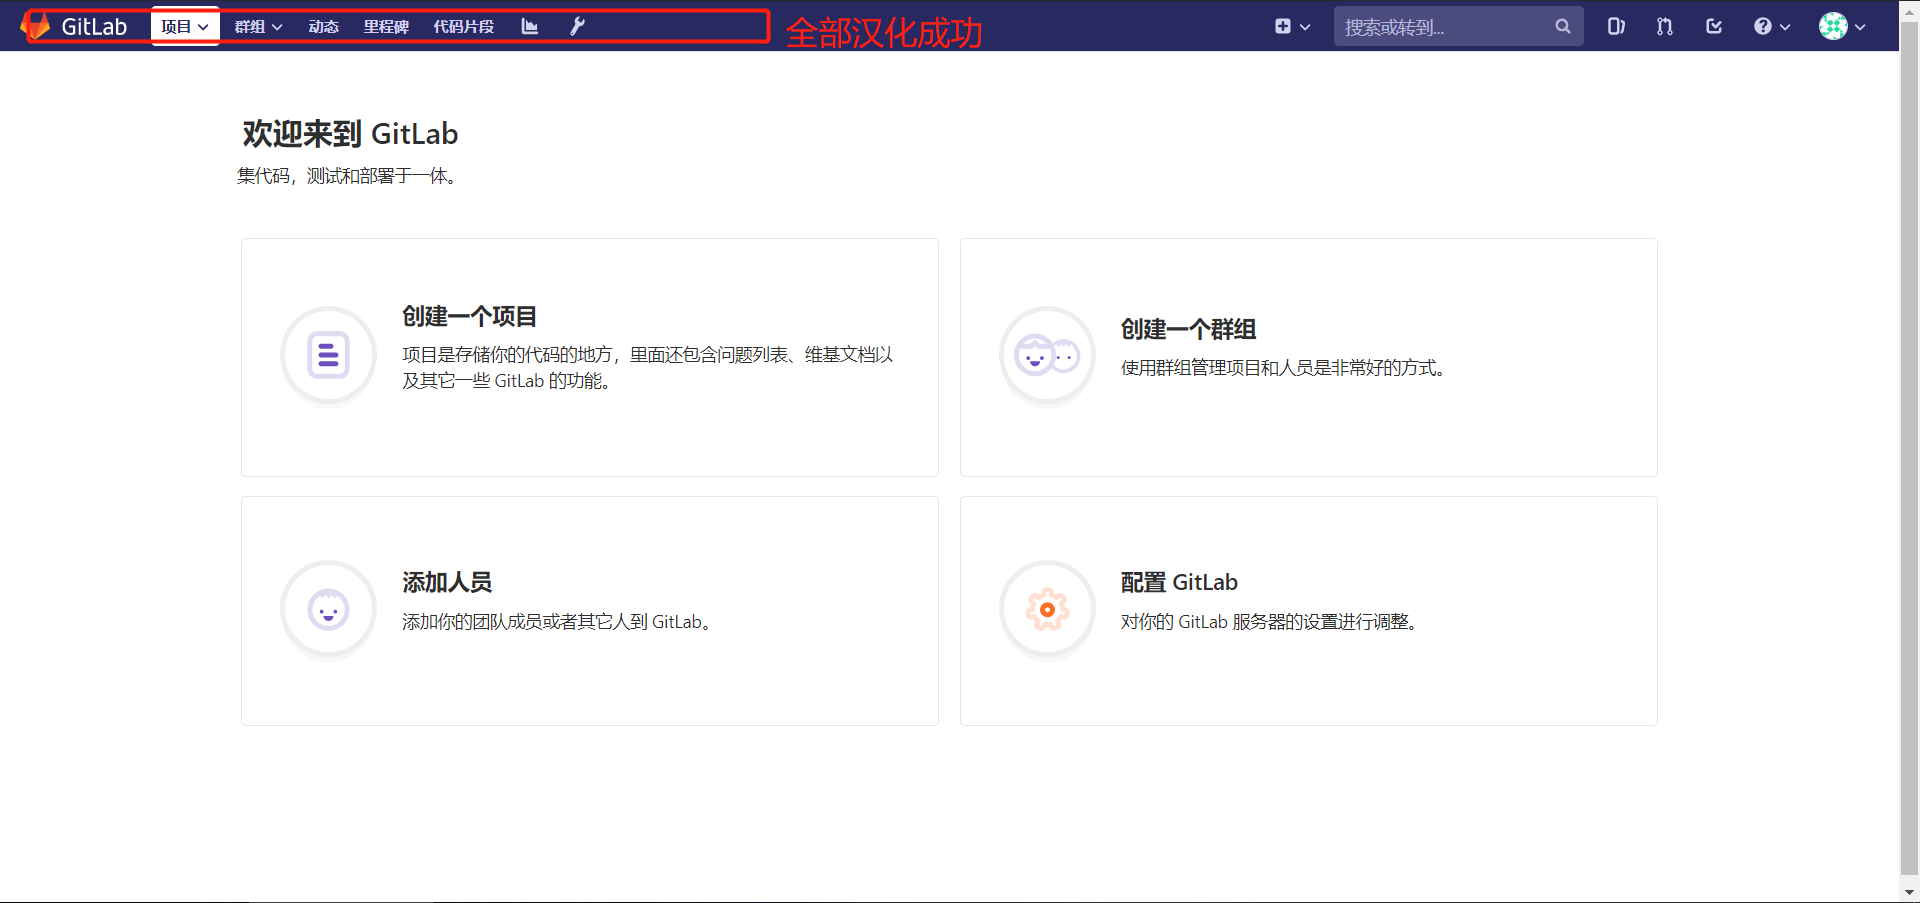
汉化gitlab(gitlab自带中文,并不完整)
# 停止gitlab
[root@gitlab ~]# gitlab-ctl stop
ok: down: gitaly: 0s, normally up
ok: down: gitlab-workhorse: 1s, normally up
ok: down: logrotate: 0s, normally up
ok: down: nginx: 0s, normally up
ok: down: postgresql: 1s, normally up
ok: down: redis: 0s, normally up
ok: down: sidekiq: 1s, normally up
ok: down: unicorn: 0s, normally up
# 替换语言包
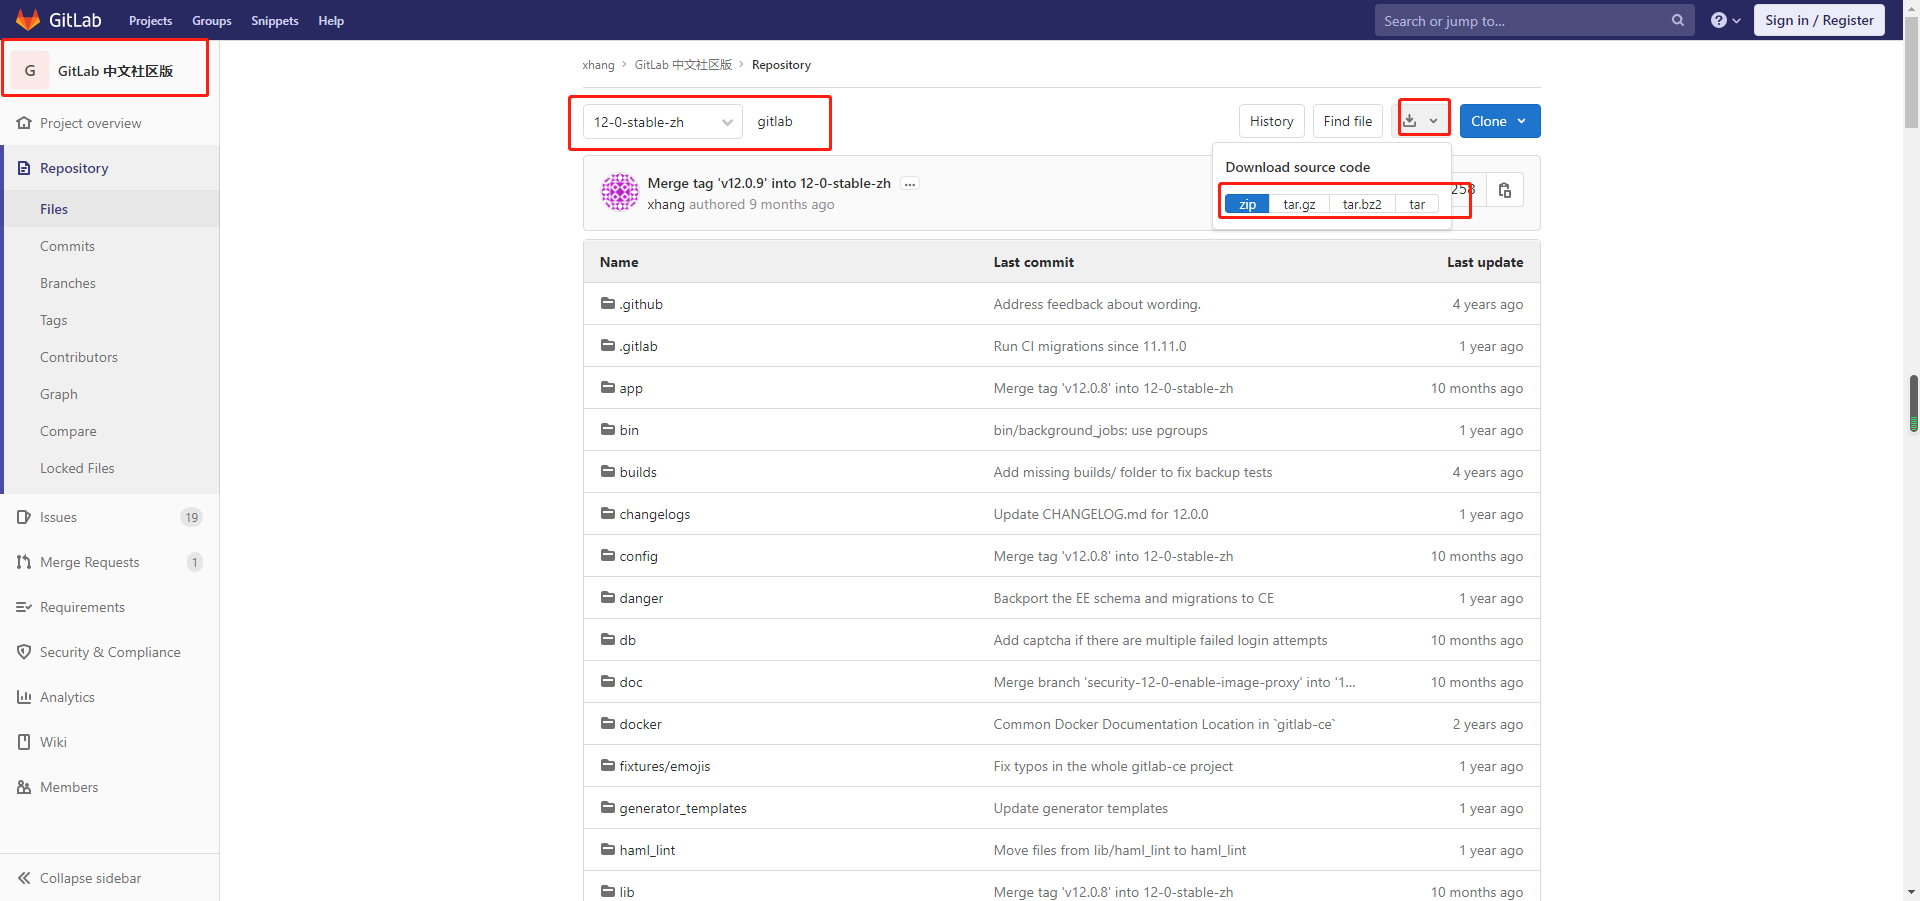
[root@gitlab ~]# tar xf gitlab-12-0-stable-zh.tar.gz
[root@gitlab ~]# cp -r gitlab-12-0-stable-zh/* /opt/gitlab/embedded/service/gitlab-rails/ # 下面的两个错误输出可以忽略
cp: cannot overwrite non-directory ‘/opt/gitlab/embedded/service/gitlab-rails/log’ with directory ‘gitlab-12-0-stable-zh/log’
cp: cannot overwrite non-directory ‘/opt/gitlab/embedded/service/gitlab-rails/tmp’ with directory ‘gitlab-12-0-stable-zh/tmp’
# 重新加载gitlab
[root@gitlab ~]# gitlab-ctl reconfigure
# 启动gitlab
[root@gitlab ~]# gitlab-ctl start # 启动过程要等待大约1分钟,不然访问网站会504
ok: run: gitaly: (pid 27829) 0s
ok: run: gitlab-workhorse: (pid 27855) 0s
ok: run: logrotate: (pid 27869) 1s
ok: run: nginx: (pid 27875) 0s
ok: run: postgresql: (pid 27883) 1s
ok: run: redis: (pid 27947) 0s
ok: run: sidekiq: (pid 27972) 1s
ok: run: unicorn: (pid 27978) 0s
# 启动过程中可以使用如下命令观察启动情况
[root@gitlab ~]# gitlab-ctl tail
gitlab剩余汉化
settings》Preferences》Language》简体中文
8. Gitlab中用户、群组、项目之间的关系
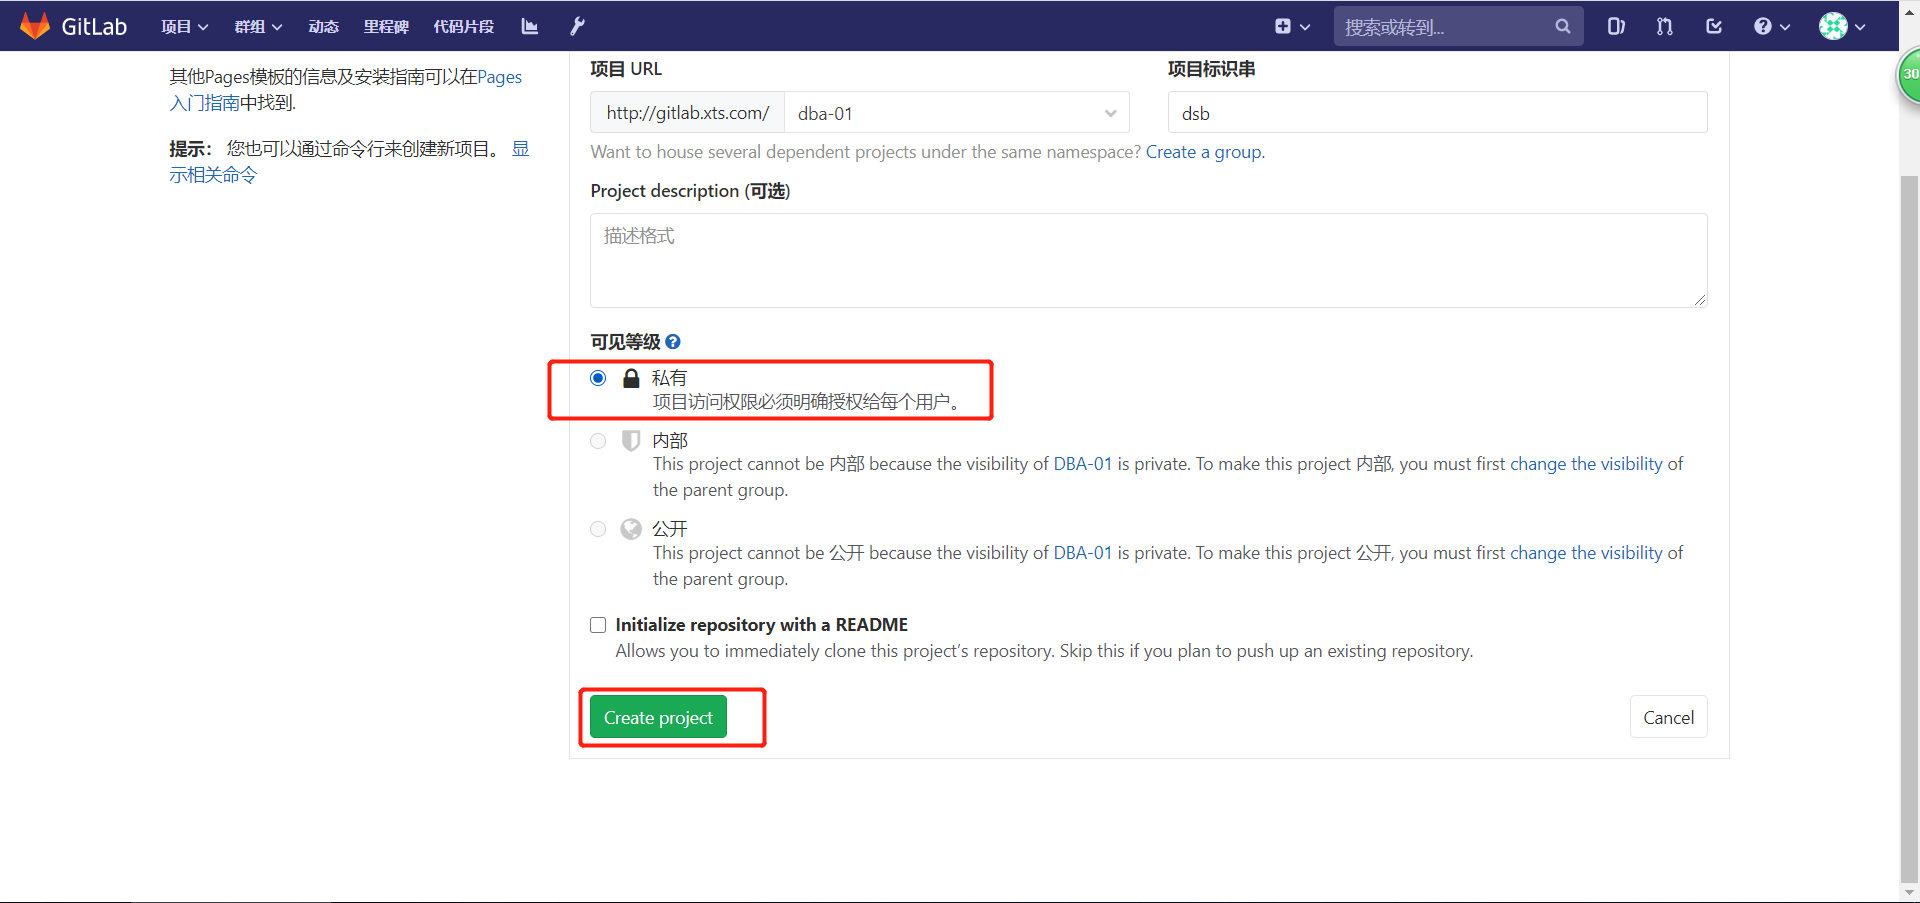
gitlab中,项目权限分为:私有、内部、公开。
用户想要查看某个私有项目下面的内容,必须先隶属于某个组,并且这个组还得拥有这个私有项目的权限,才可以让这个群组中的用户查看该私有项目中的内容。

# 一般的创建流程入下
(1)创建组
(2)基于组,创建项目
(3)创建用户,并将用户加入组中
(4)至于用户到底有什么权限,根据现场实际情况而定。
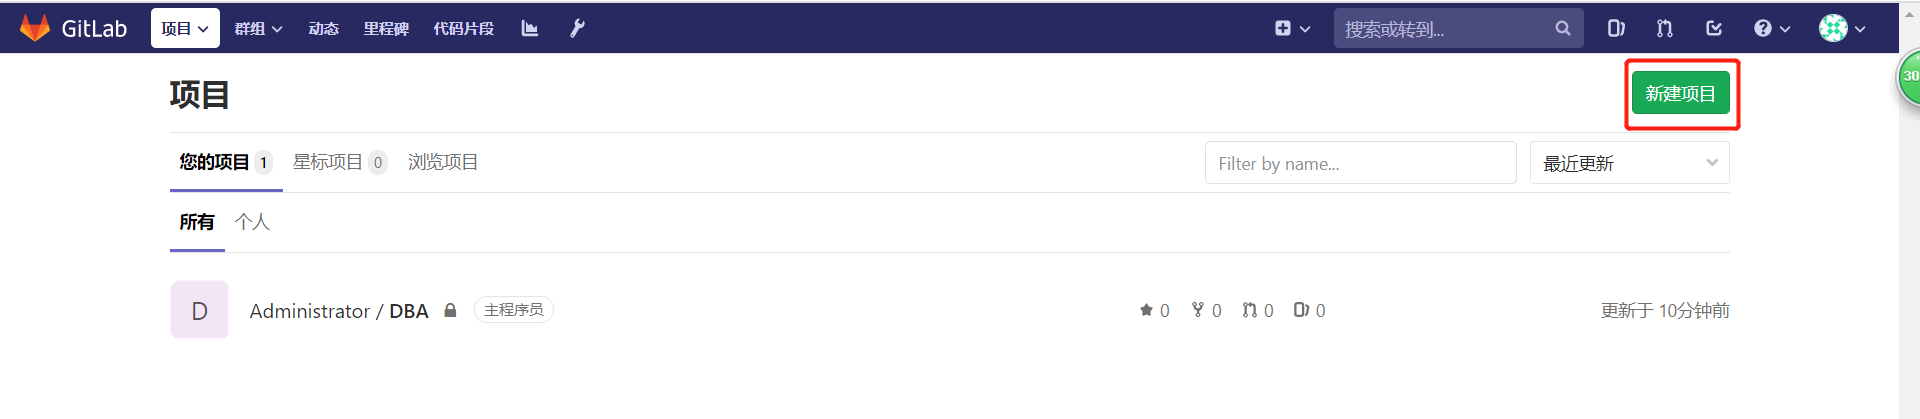
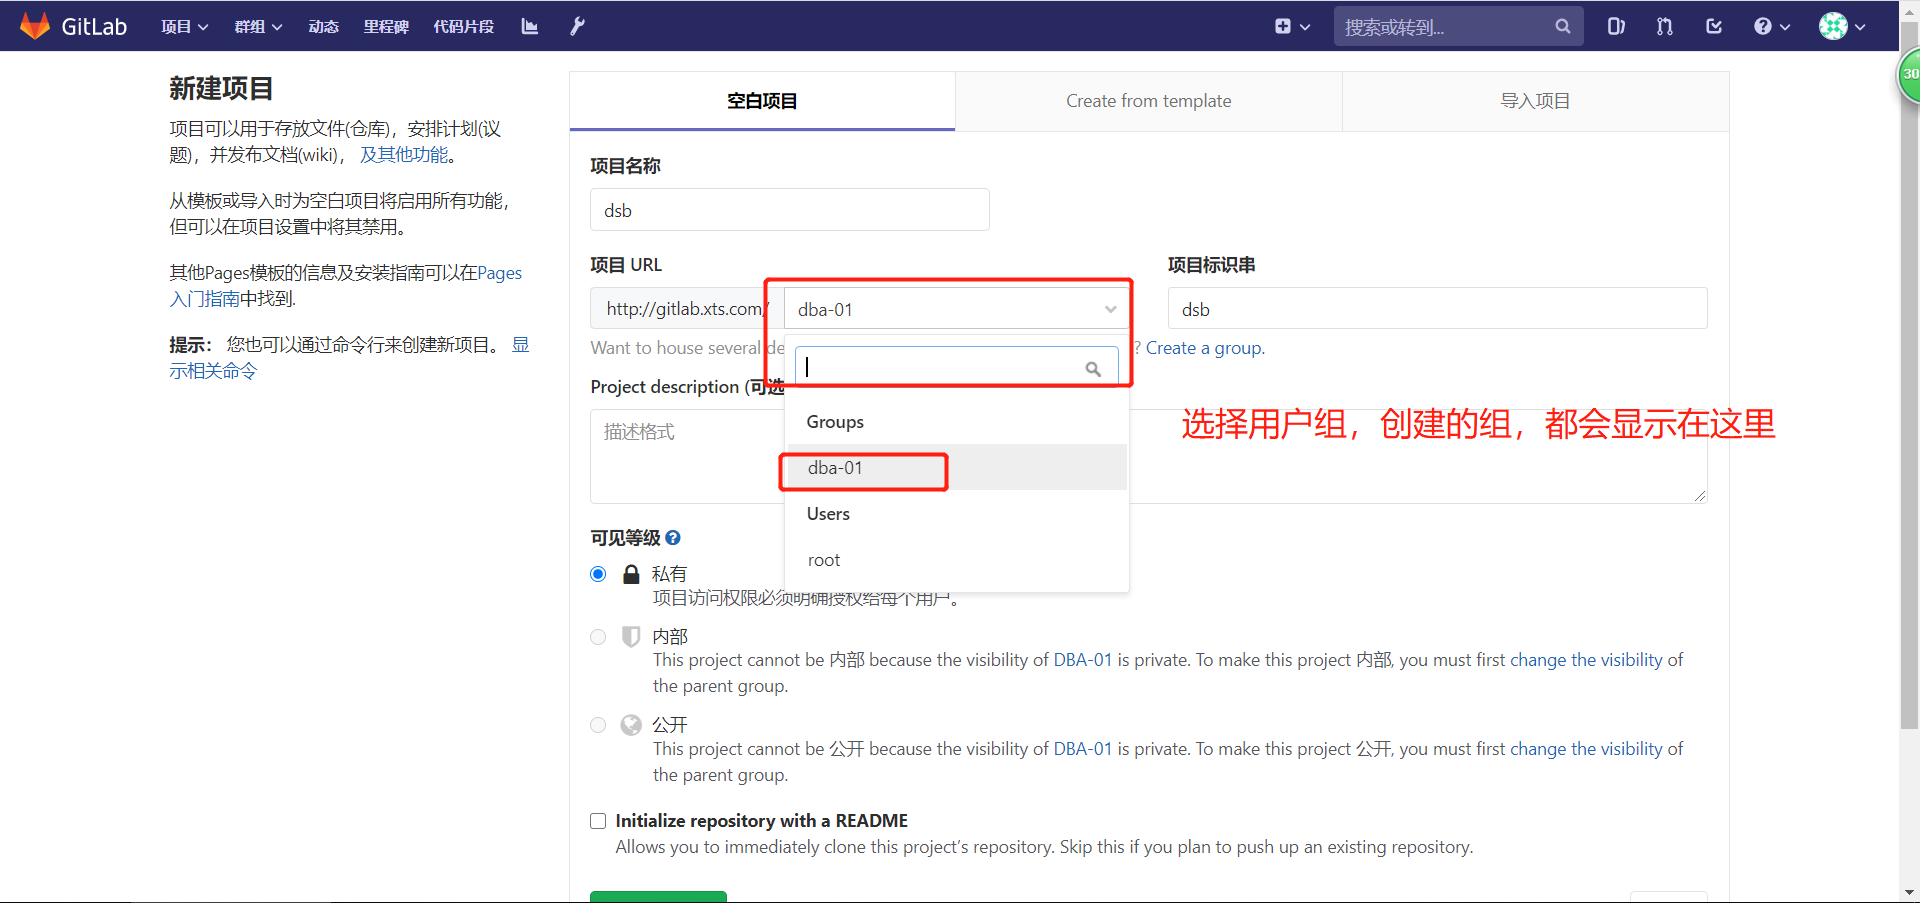
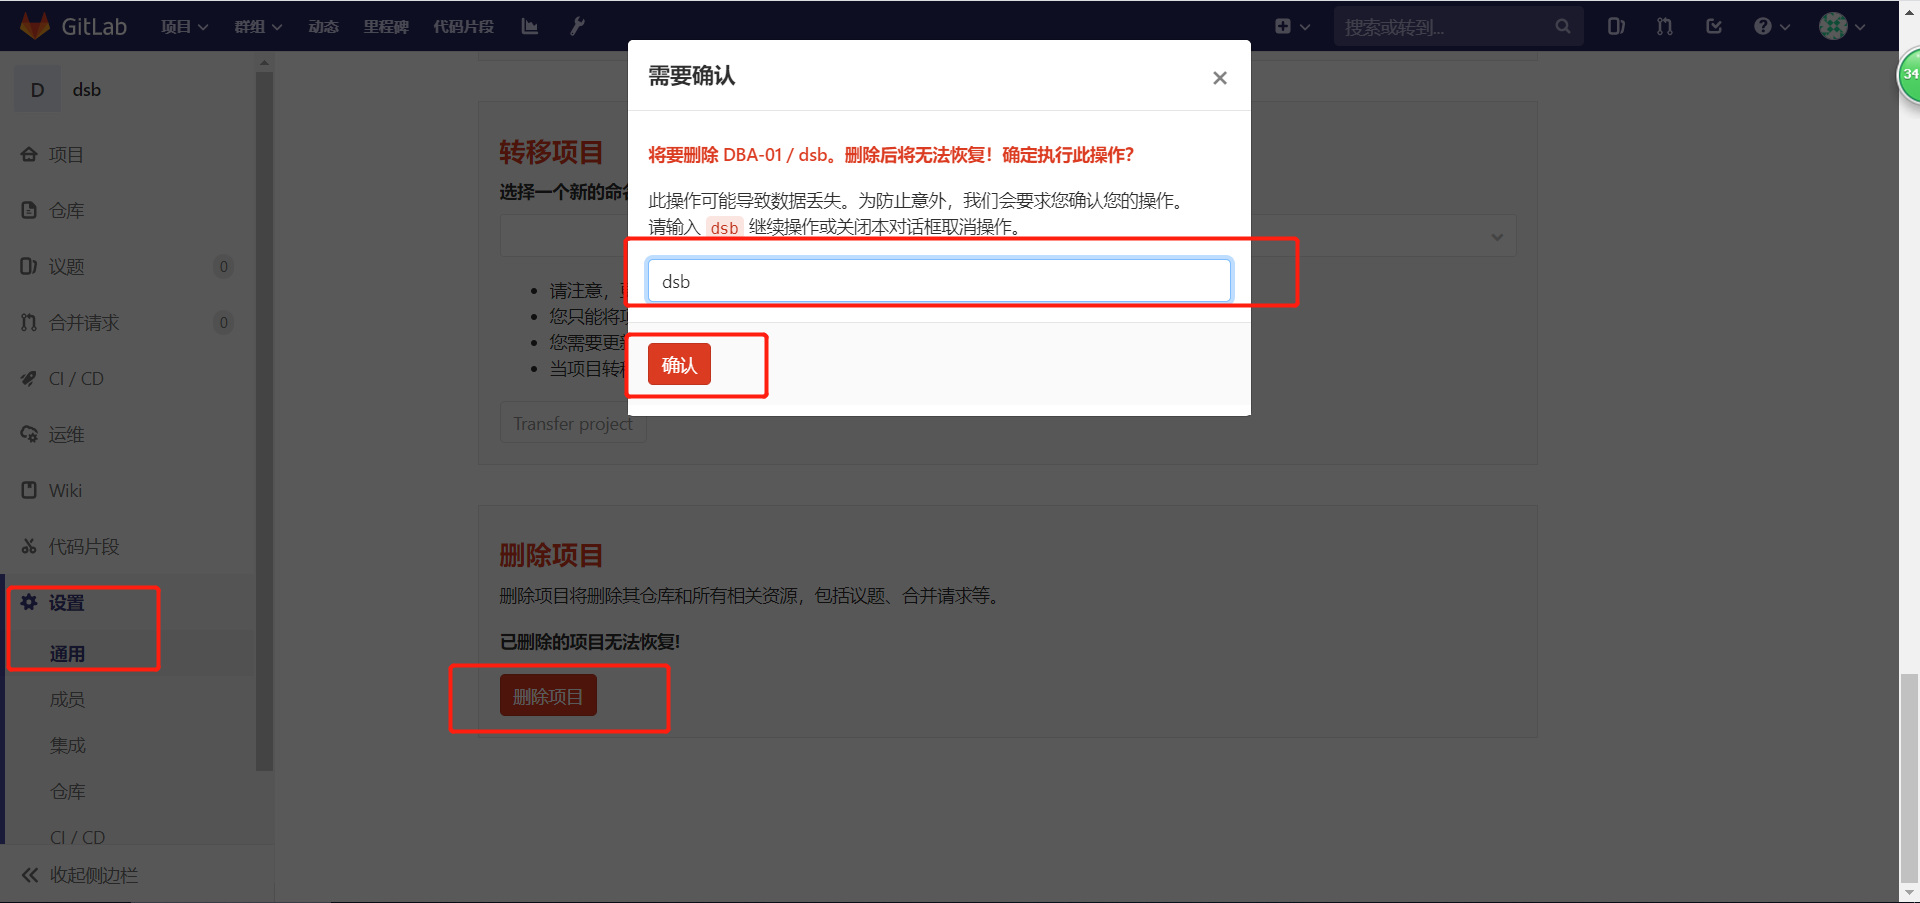
8.1 创建项目
这里为了方便学习,直接使用root,但是实际工作中并不能
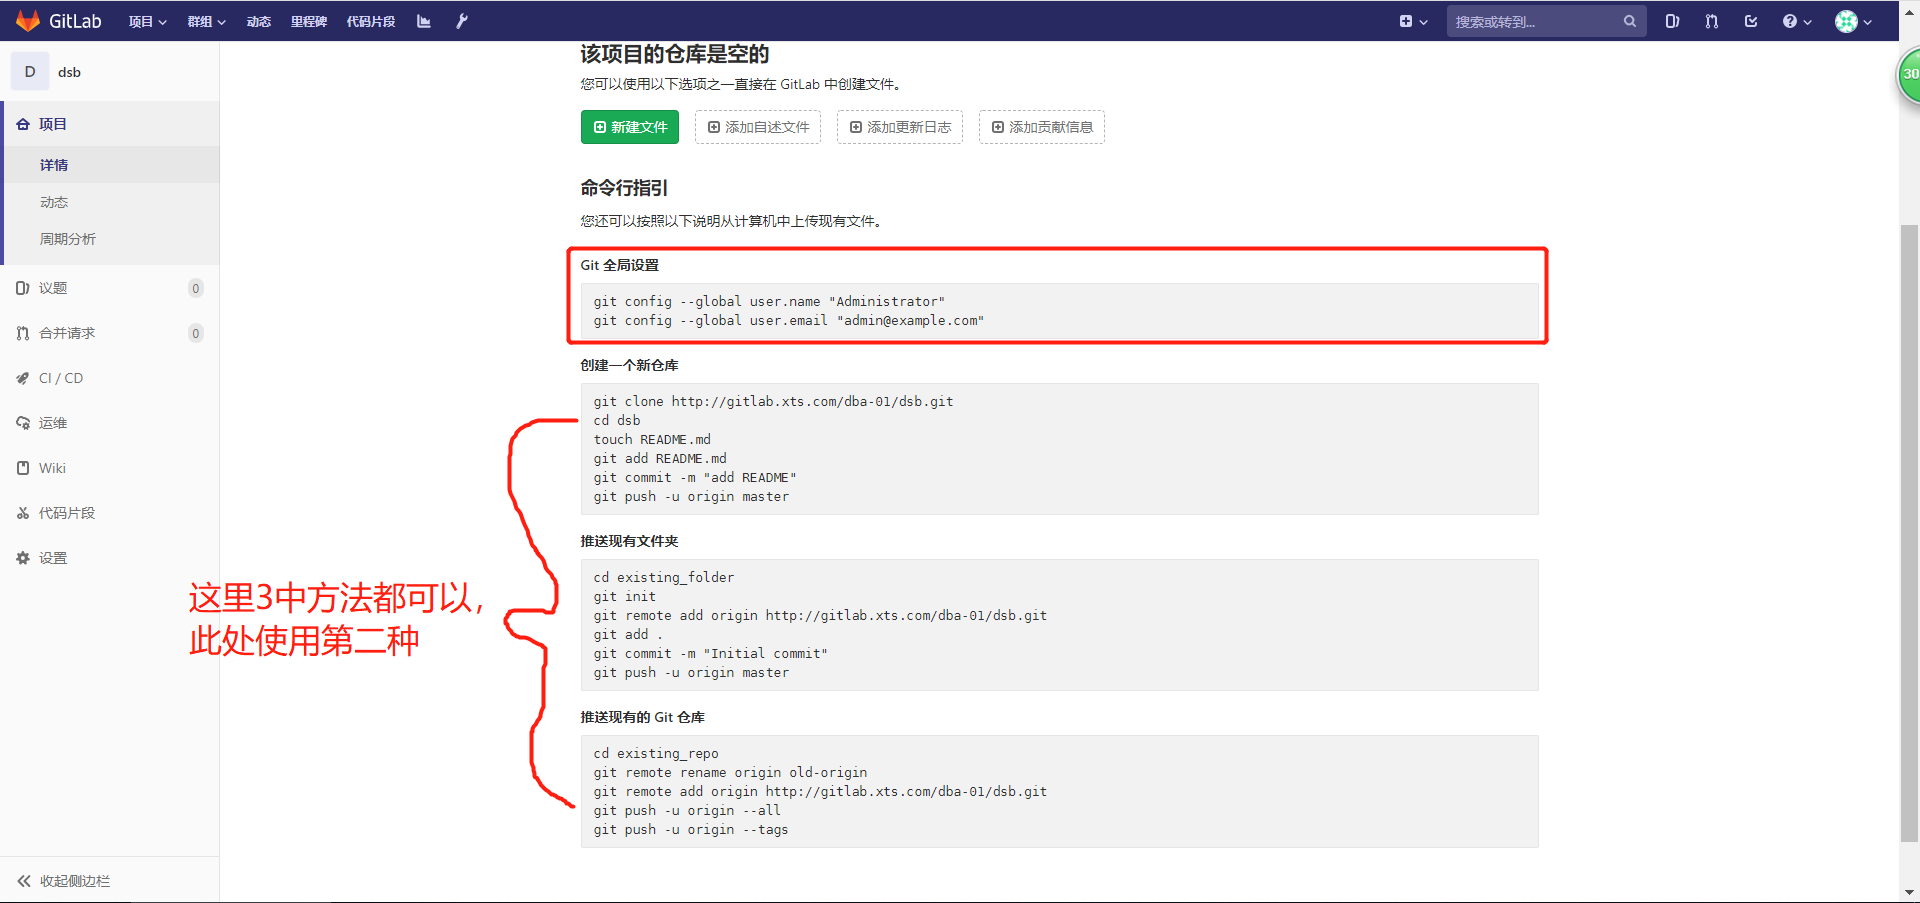
8.2 把服务器上的代码文件推送到此新项目中
# 移除原来设置的gitee远程仓库
[root@gitlab ~]# cd demo/
[root@gitlab ~/demo]# git remote -v # 查看配置的远程仓库
origin git@gitee.com:xts_gitee/xts.git (fetch)
origin git@gitee.com:xts_gitee/xts.git (push)
[root@gitlab ~/demo]# git remote remove origin # 移除现有的远程仓库
[root@gitlab ~/demo]# git remote -v
# 添加新的gitlab远程仓库
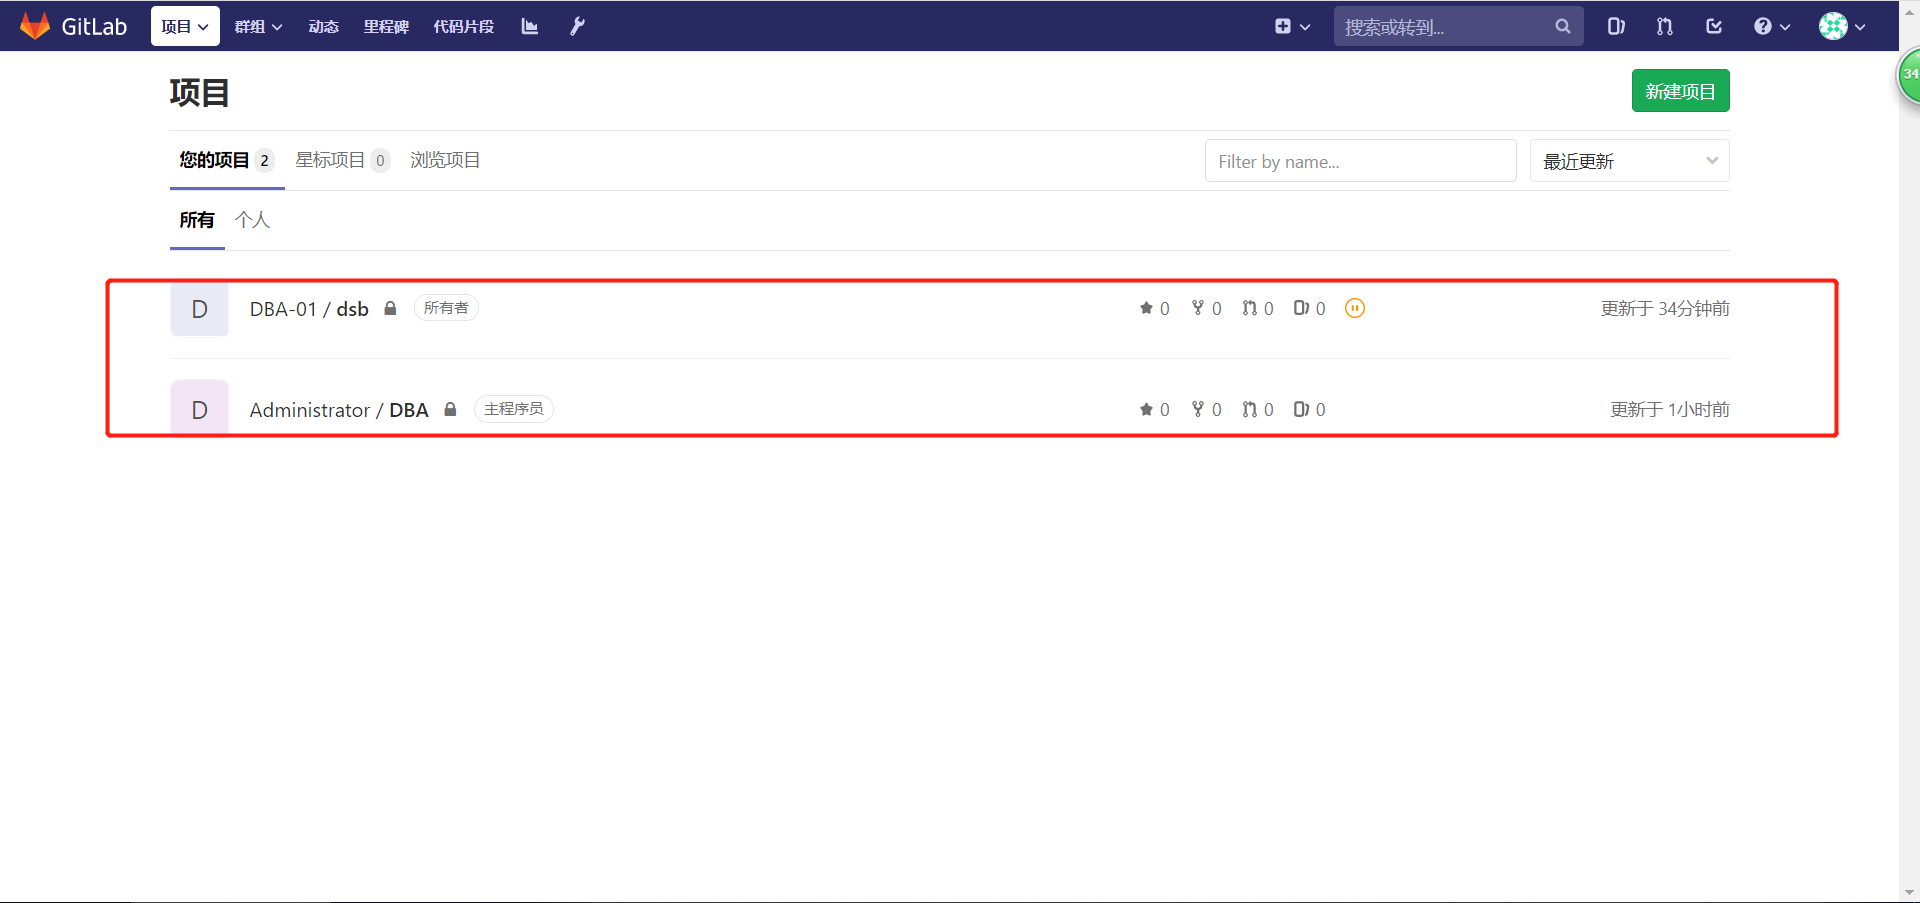
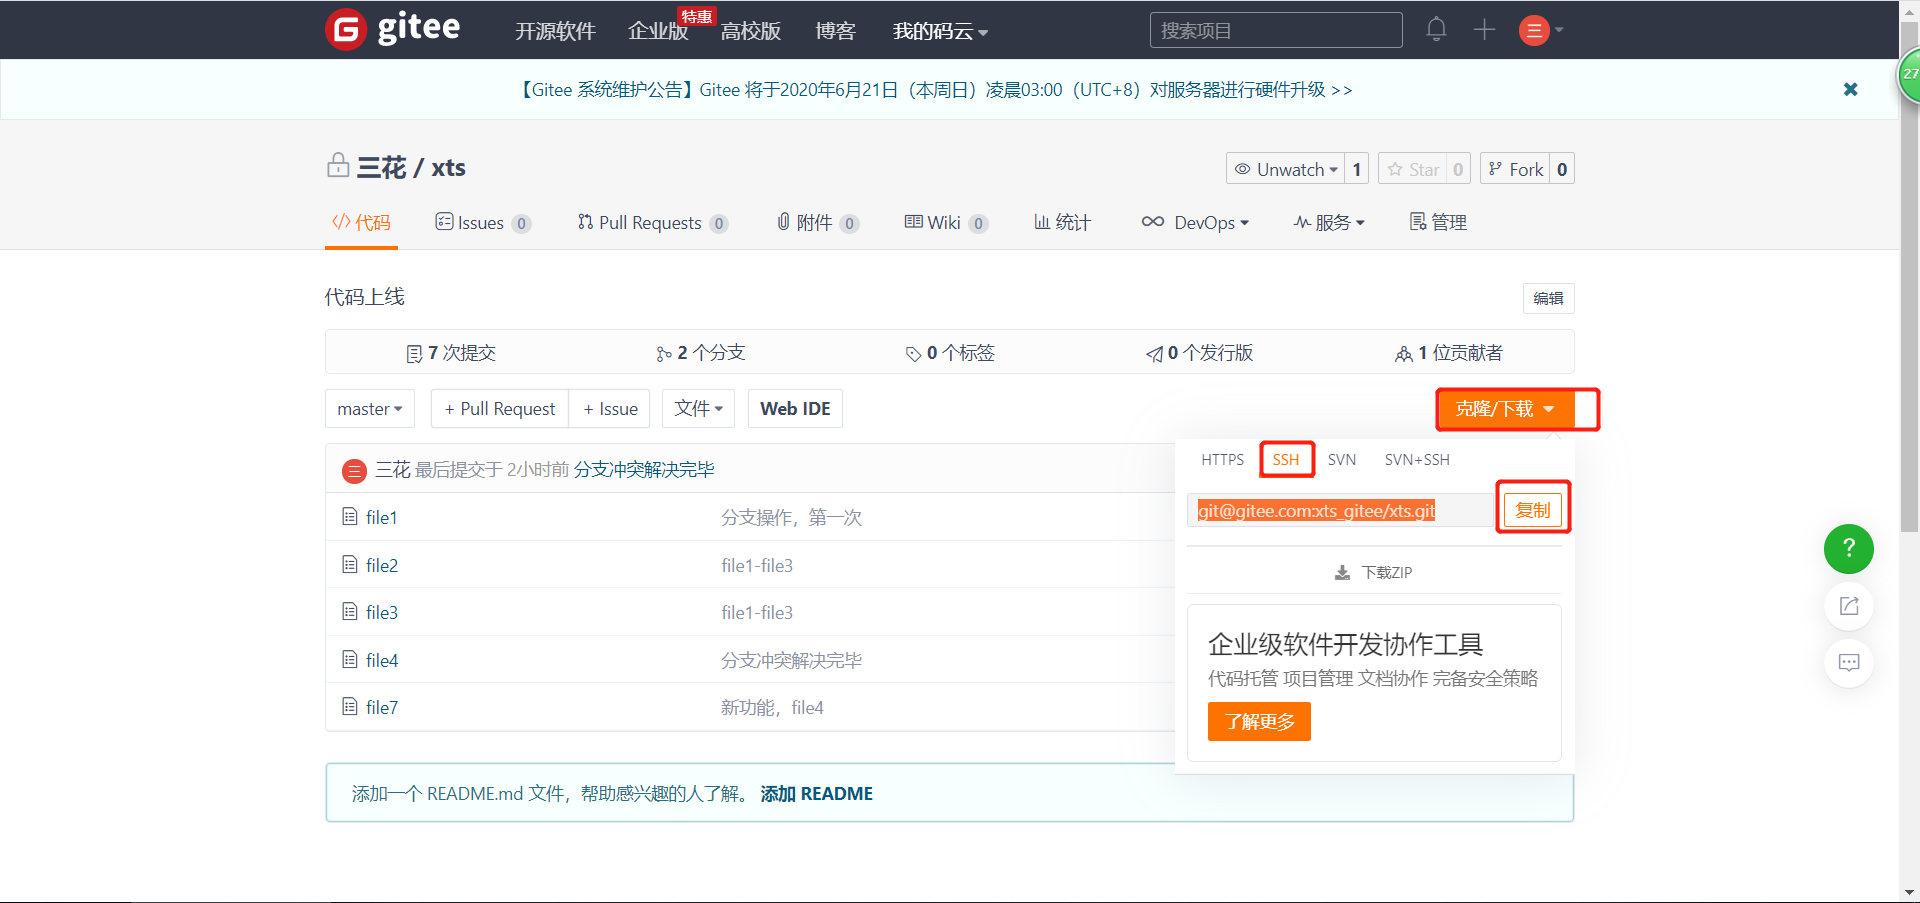
[root@gitlab ~/demo]# git remote add origin git@gitlab.xts.com:dba-01/dsb.git # git@地址,直接在gitlab右上角,克隆,复制ssh克隆类别的地址,见下图
[root@gitlab ~/demo]# git remote -v
origin git@gitlab.xts.com:dba-01/dsb.git (fetch)
origin git@gitlab.xts.com:dba-01/dsb.git (push)

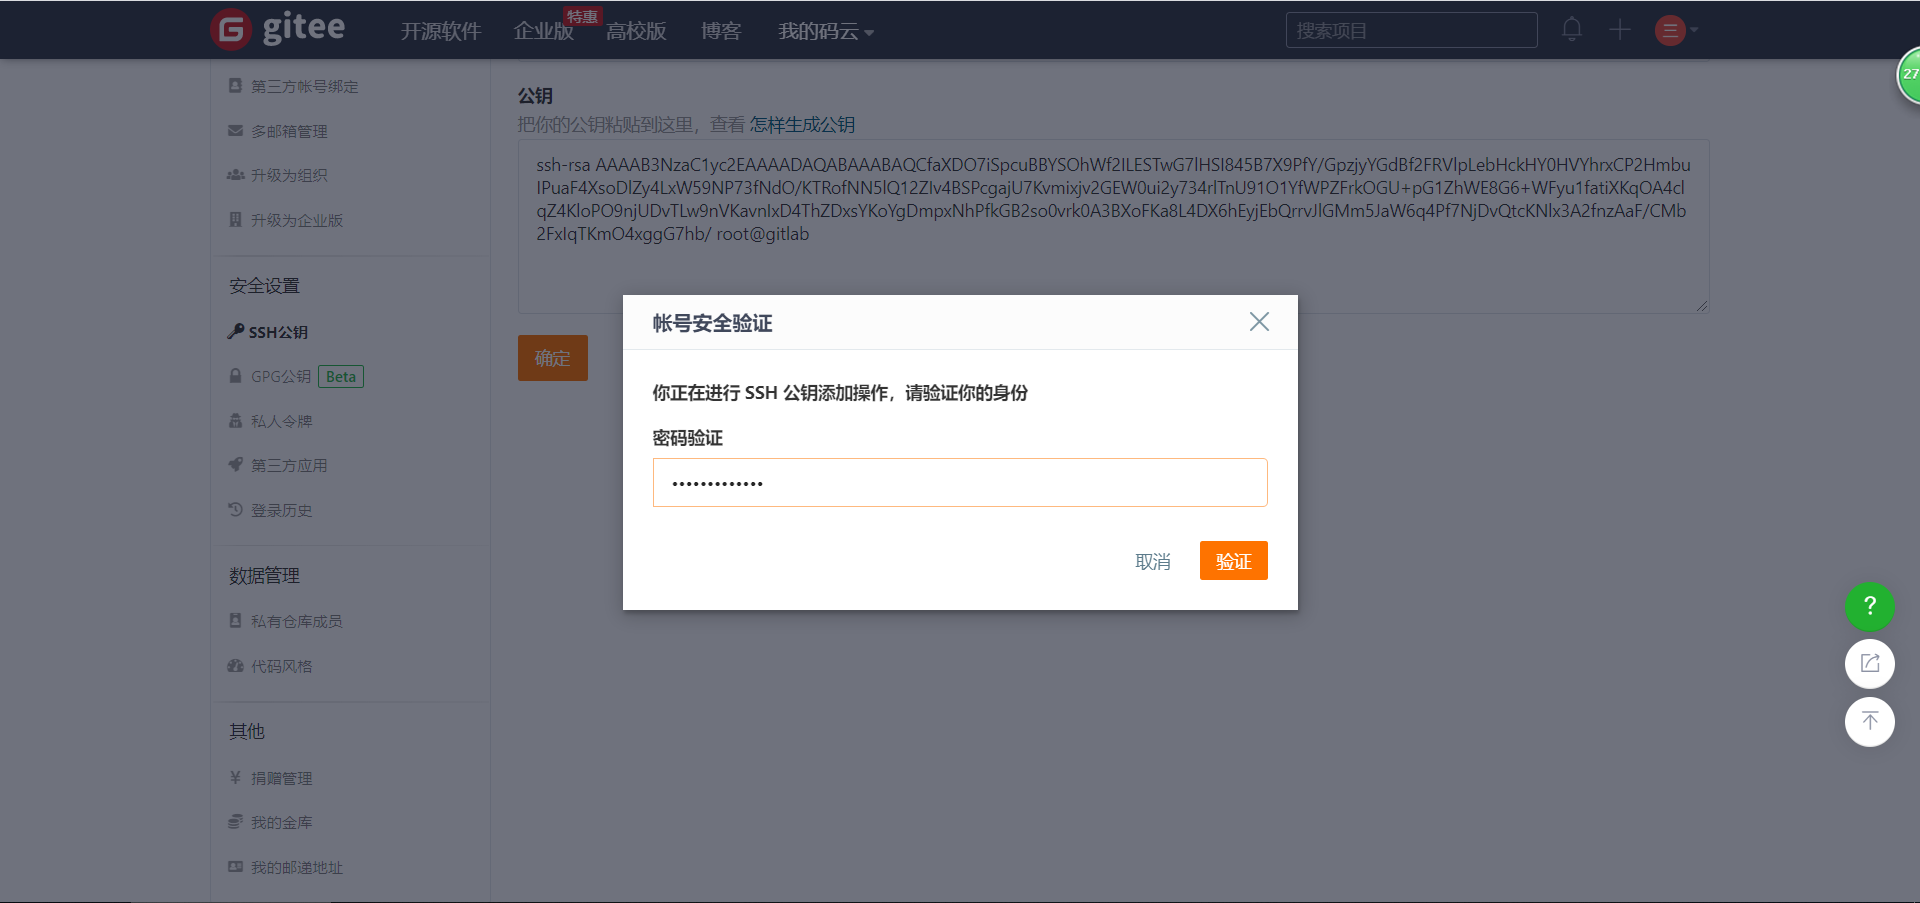
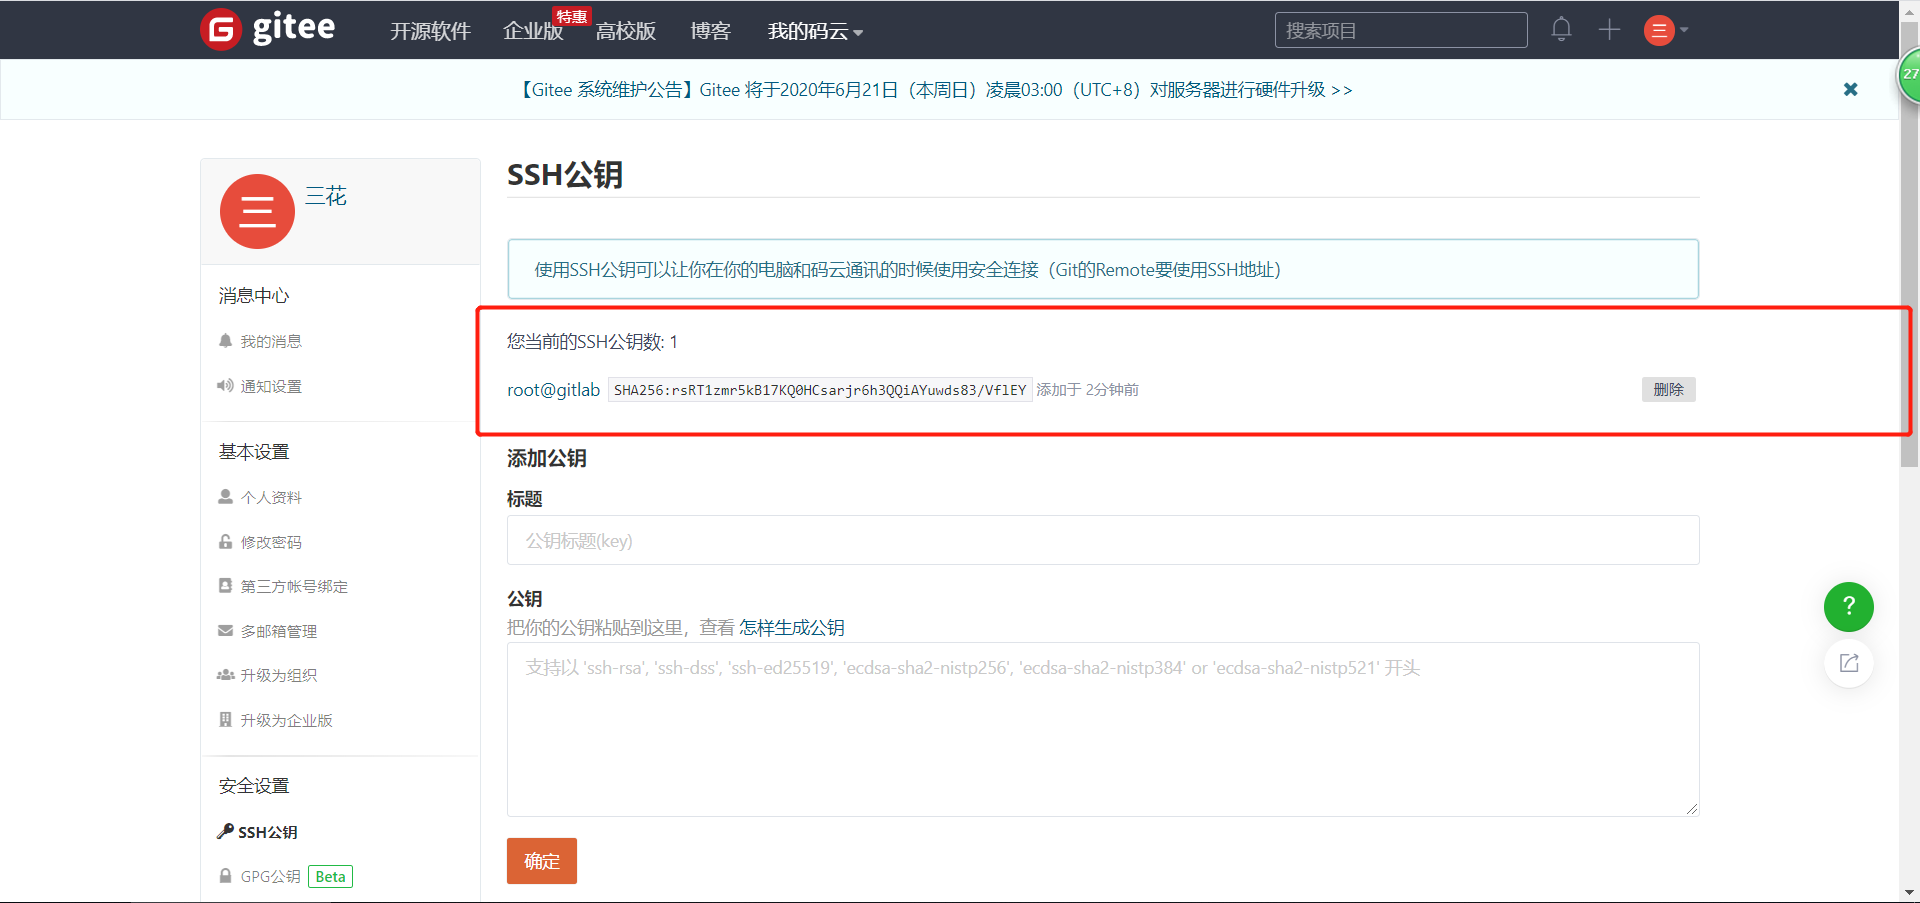
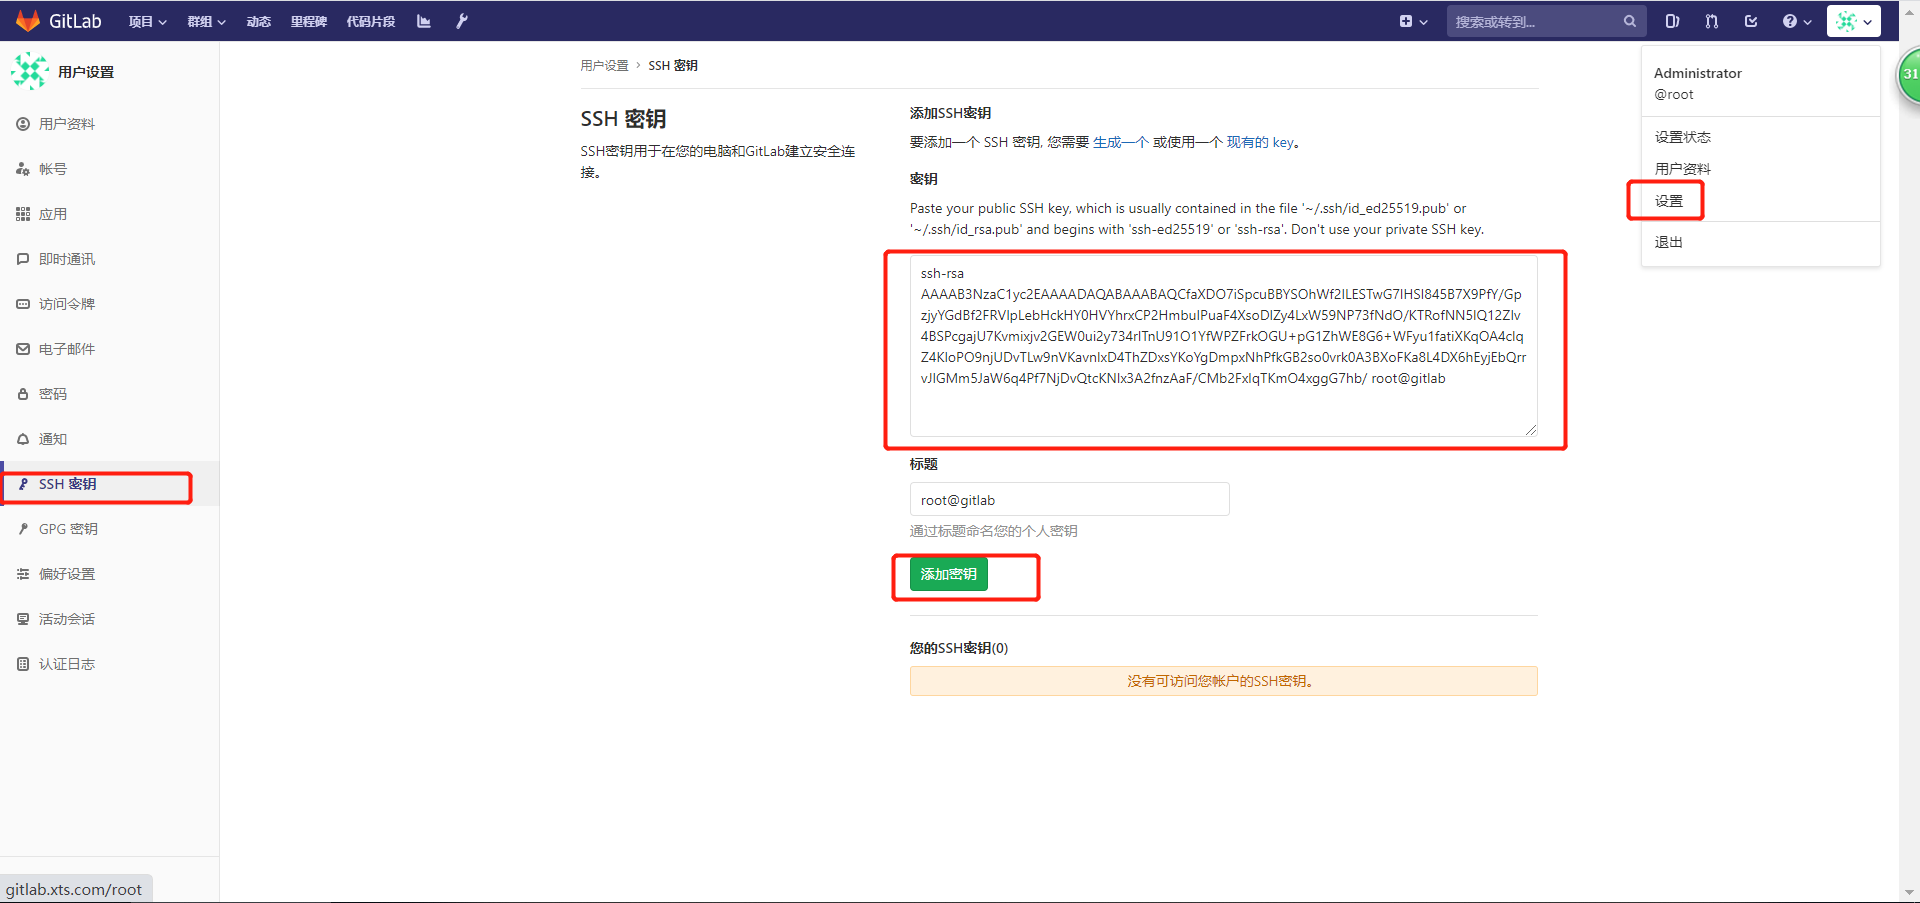
复制公钥到gitlab,做免密

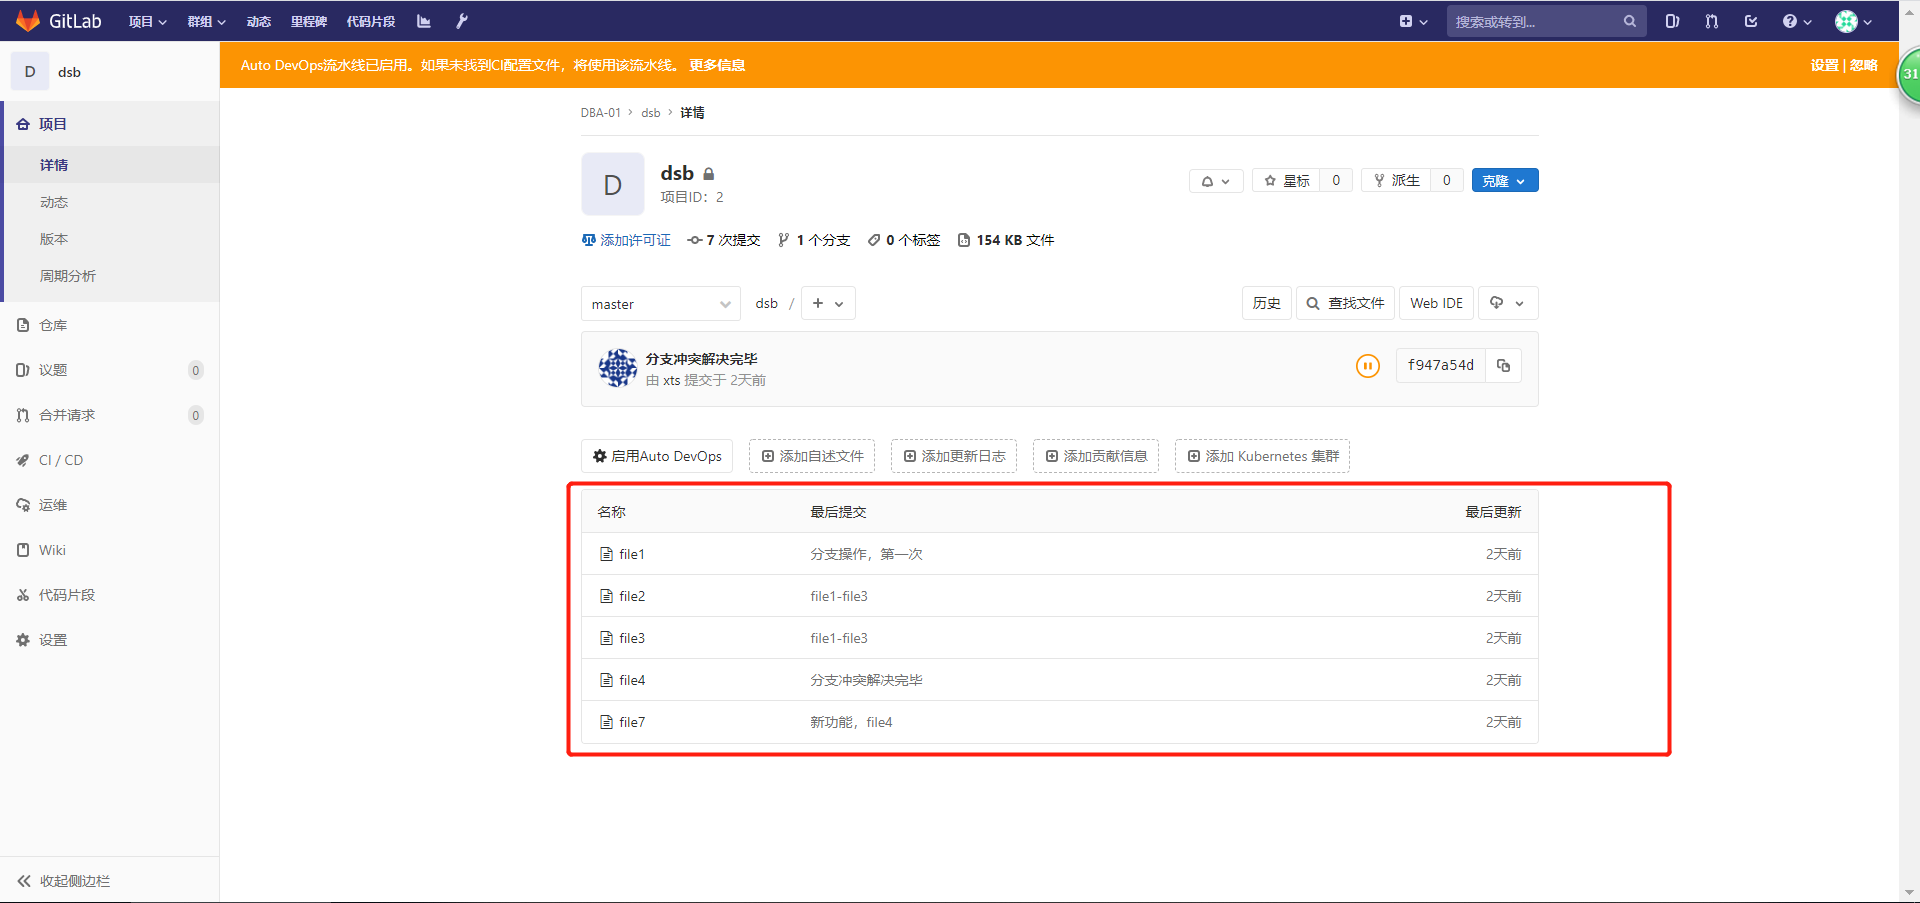
推送本地仓库的所有代码文件到gitlab远程仓库
# 切换到master分支
[root@gitlab ~/demo]# git checkout master
Switched to branch 'master'
[root@gitlab ~/demo]# git status
# On branch master
nothing to commit, working directory clean
# 添加hosts解析
[root@gitlab ~/demo]# tail -1 /etc/hosts
192.168.1.51 gitlab.xts.com
# 推送代码
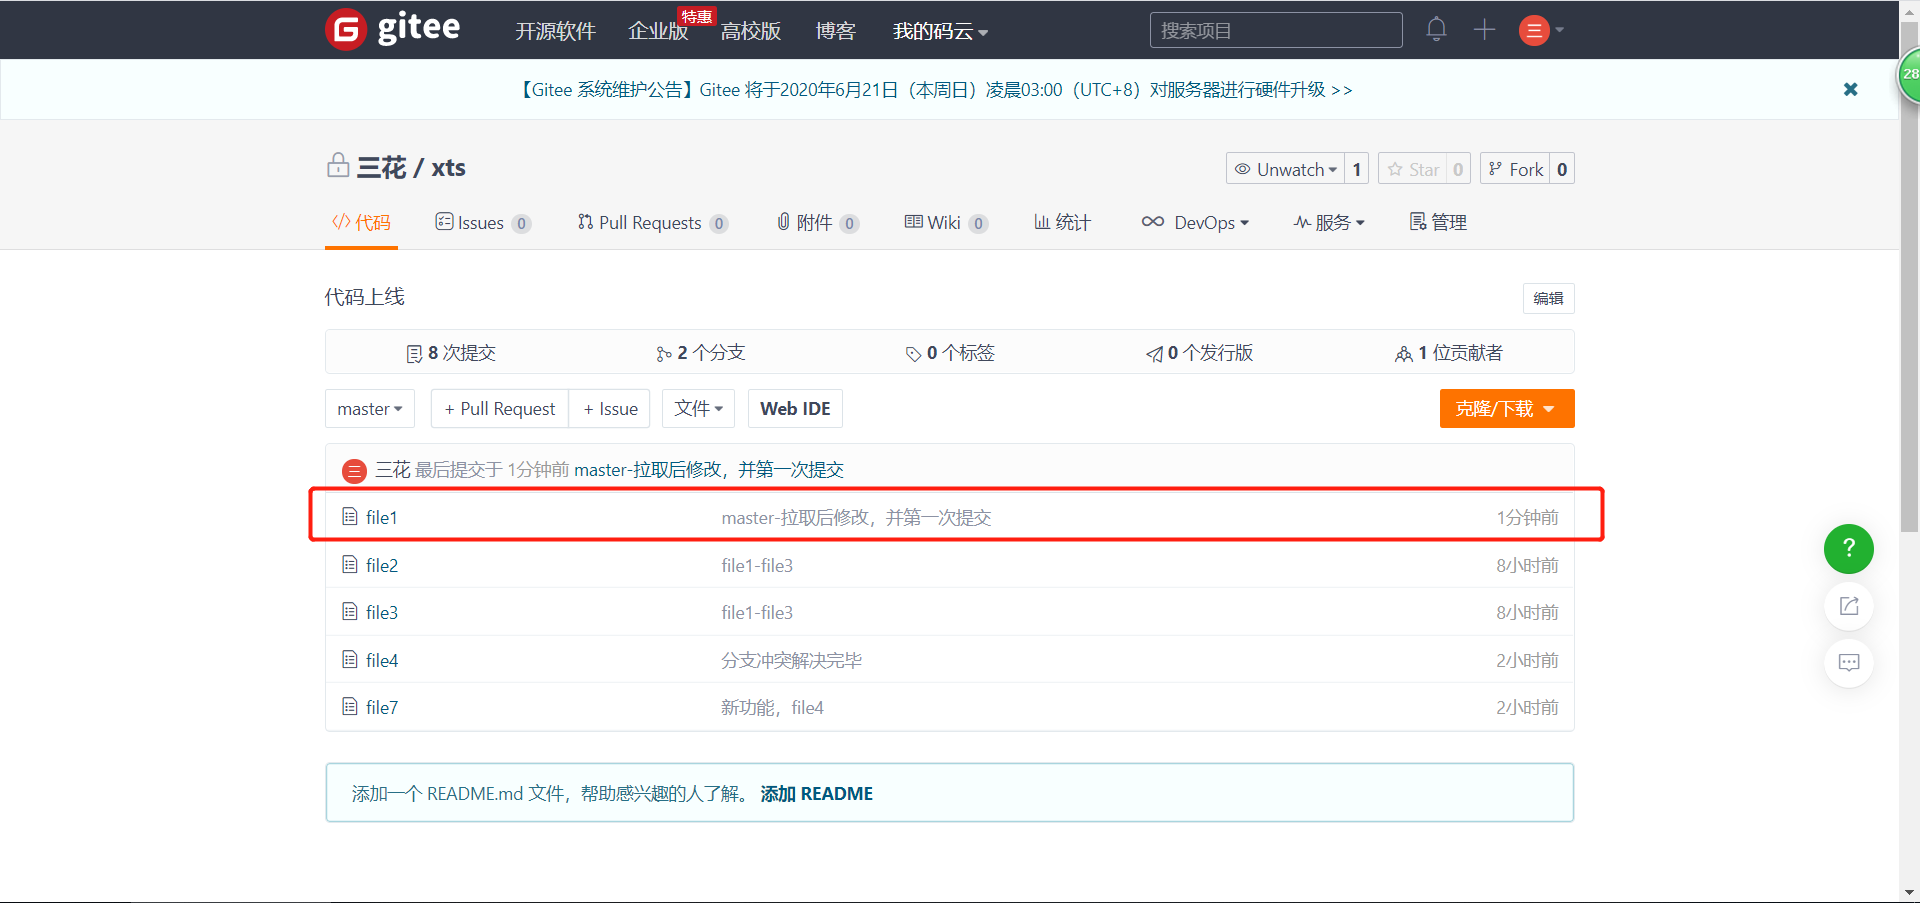
[root@gitlab ~/demo]# git push origin master
The authenticity of host 'gitlab.xts.com (192.168.1.51)' can't be established.
ECDSA key fingerprint is SHA256:TTu0eIxmefjYUd12/DCcn8irm/rmOBQP/U31gIKhbDo.
ECDSA key fingerprint is MD5:a0:f0:7a:09:ef:b7:e8:4b:0f:3c:c8:6e:cb:6c:a4:7e.
Are you sure you want to continue connecting (yes/no)? yes
Warning: Permanently added 'gitlab.xts.com,192.168.1.51' (ECDSA) to the list of known hosts.
Counting objects: 21, done.
Delta compression using up to 4 threads.
Compressing objects: 100% (14/14), done.
Writing objects: 100% (21/21), 1.67 KiB | 0 bytes/s, done.
Total 21 (delta 3), reused 0 (delta 0)
To git@gitlab.xts.com:dba-01/dsb.git
* [new branch] master -> master
# 推送成功后见下图
8.3 创建新用户,并克隆gitlab远程仓库上的代码,修改后再推送上去
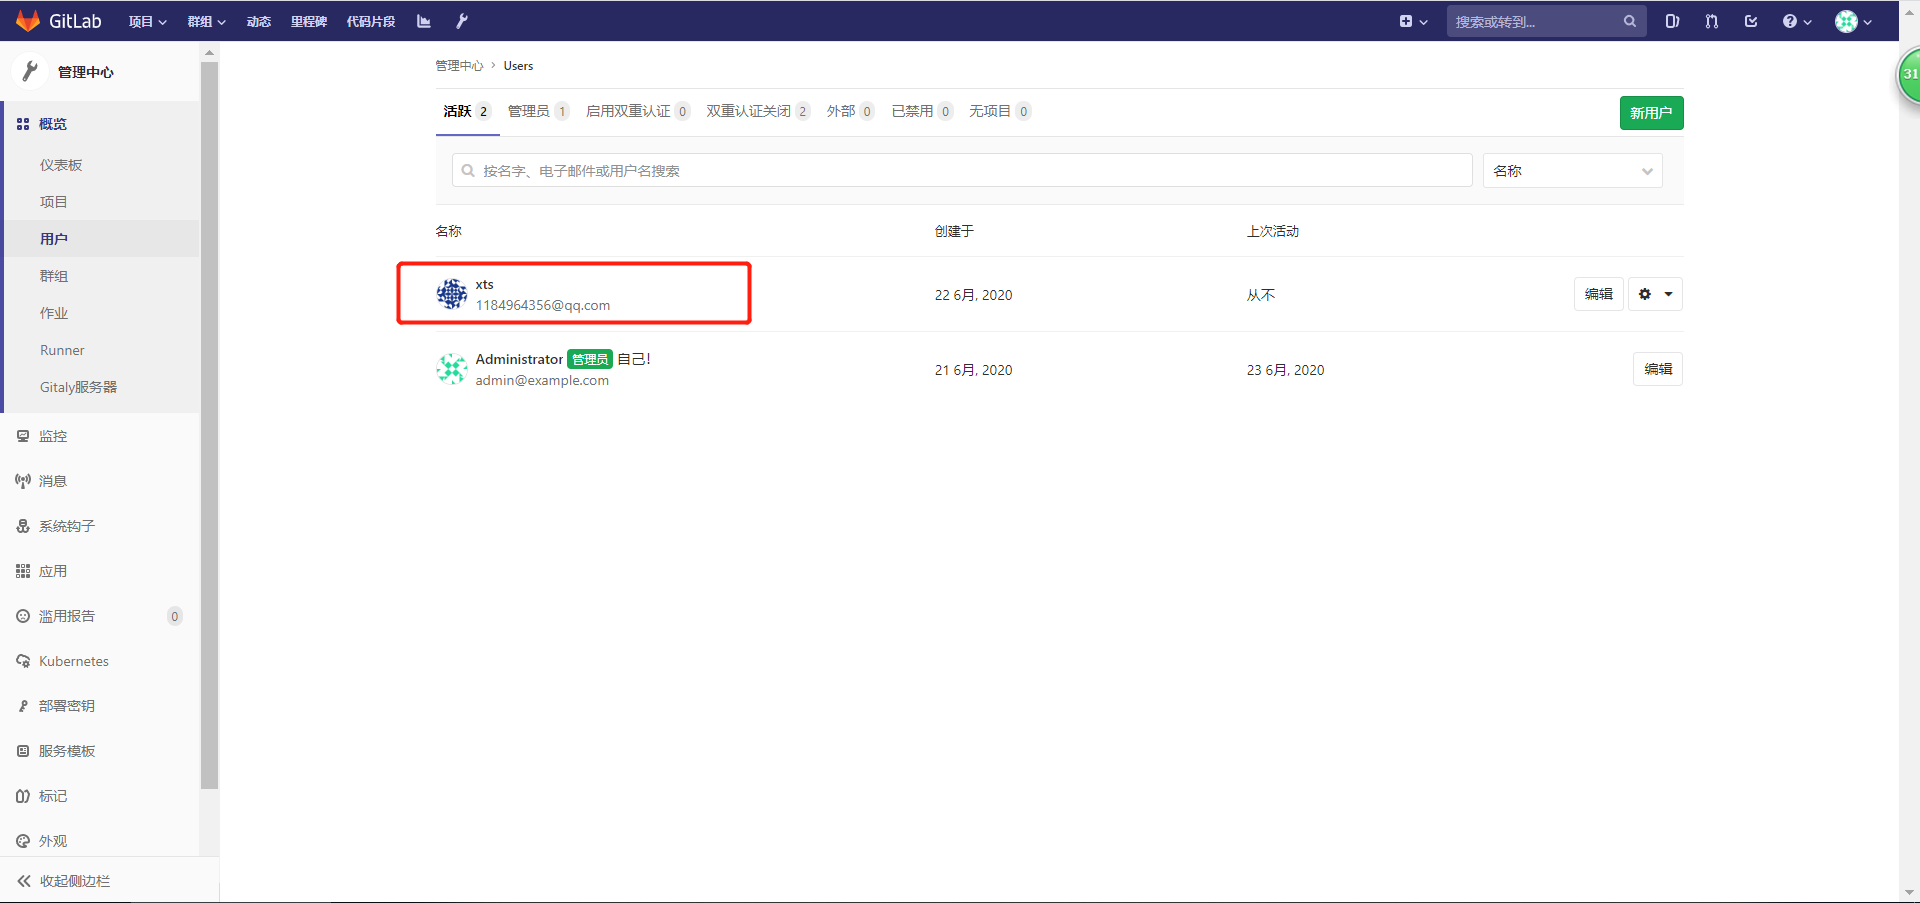
# 这里需要准备另外一台服务器进行测试
[root@db01 ~]# tail -1 /etc/hosts # 添加hosts解析
192.168.1.51 gitlab.xts.com
# 推送公钥到该新用户的gitlab上
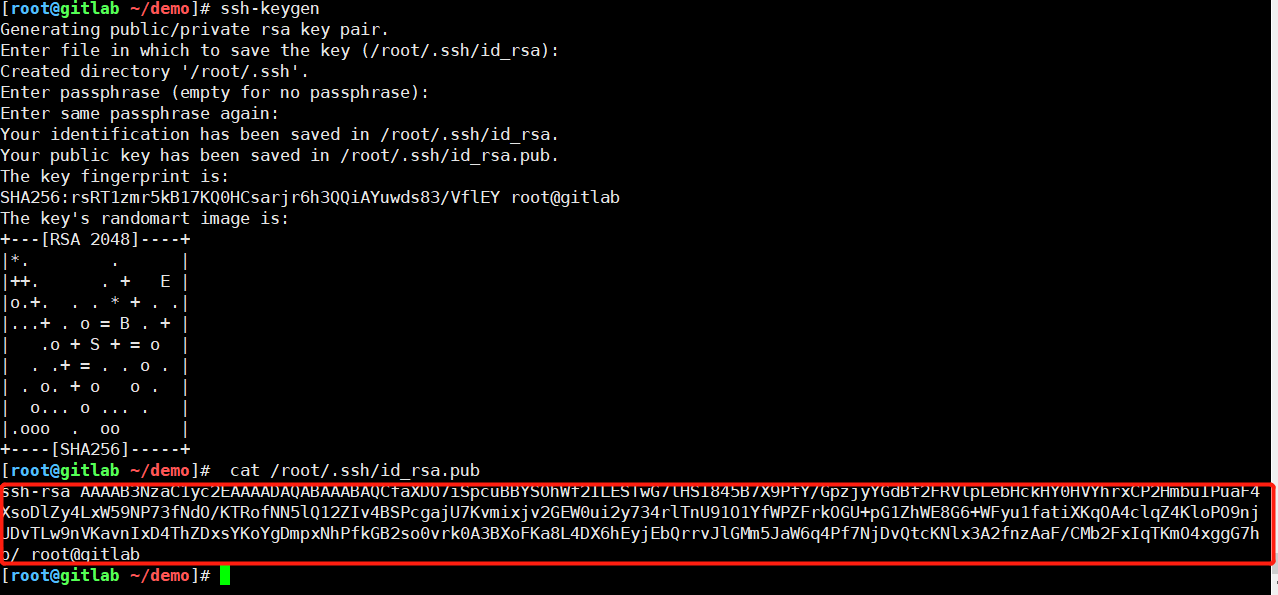
[root@db01 ~]# ssh-keygen
Generating public/private rsa key pair.
Enter file in which to save the key (/root/.ssh/id_rsa):
Created directory '/root/.ssh'.
Enter passphrase (empty for no passphrase):
Enter same passphrase again:
Your identification has been saved in /root/.ssh/id_rsa.
Your public key has been saved in /root/.ssh/id_rsa.pub.
The key fingerprint is:
SHA256:o31yu531rofnb0JLCMonPBwuSB0eaV7nK0iRKmjD8iE root@db01
The key's randomart image is:
+---[RSA 2048]----+
| o |
| B . . |
|.. * = o |
|E+o o = . o |
|oo.+ o *So o . |
| . . ooX.o . o |
| ..o=o o.o |
| + o o+.+|
| o.o .O*|
+----[SHA256]-----+
[root@db01 ~]# cat .ssh/id_rsa.pub
ssh-rsa AAAAB3NzaC1yc2EAAAADAQABAAABAQDgpfYoWAYvWnj1T26zSYiPmuxVFNMy3f7AaKRvw5/83jPmXWtADloi6bm7wWuXAwVVuDy7hrRnCbhWEHqIOfC2IZDX2Un5Z76Y9k4repJODjHkXSojlmVJWvPmbZtIBqyf92wBkPfpvf49SzrlfTp8JRO27207EAKw0b/1xxN8pbBgtCdBfE6AnLjZVzP6A/fSBYiWwpIVrLse/gwPkeJarkoDMLgJSsFDMjL62RXGW8zNYZDmEPyAHzqMr9kyt2d1y7tgEZnh2qd+LSdrzuIALrRCCodYlgaYe5wNUxqk/Gnmv/HVwyenvpta2wNbDmITDS/szjoDP6++vCl6kzGV root@db01 # 复制这一段

克隆远程仓库代码

[root@db01 ~]# git clone git@gitlab.xts.com:dba-01/dsb.git
Cloning into 'dsb'...
The authenticity of host 'gitlab.xts.com (192.168.1.51)' can't be established.
ECDSA key fingerprint is SHA256:TTu0eIxmefjYUd12/DCcn8irm/rmOBQP/U31gIKhbDo.
ECDSA key fingerprint is MD5:a0:f0:7a:09:ef:b7:e8:4b:0f:3c:c8:6e:cb:6c:a4:7e.
Are you sure you want to continue connecting (yes/no)? yes
Warning: Permanently added 'gitlab.xts.com,192.168.1.51' (ECDSA) to the list of known hosts.
remote: Enumerating objects: 21, done.
remote: Counting objects: 100% (21/21), done.
remote: Compressing objects: 100% (14/14), done.
remote: Total 21 (delta 3), reused 0 (delta 0)
Receiving objects: 100% (21/21), done.
Resolving deltas: 100% (3/3), done.
[root@db01 ~]# ls
dsb
[root@db01 ~/dsb]# ls
file1  file2  file3  file4  file7
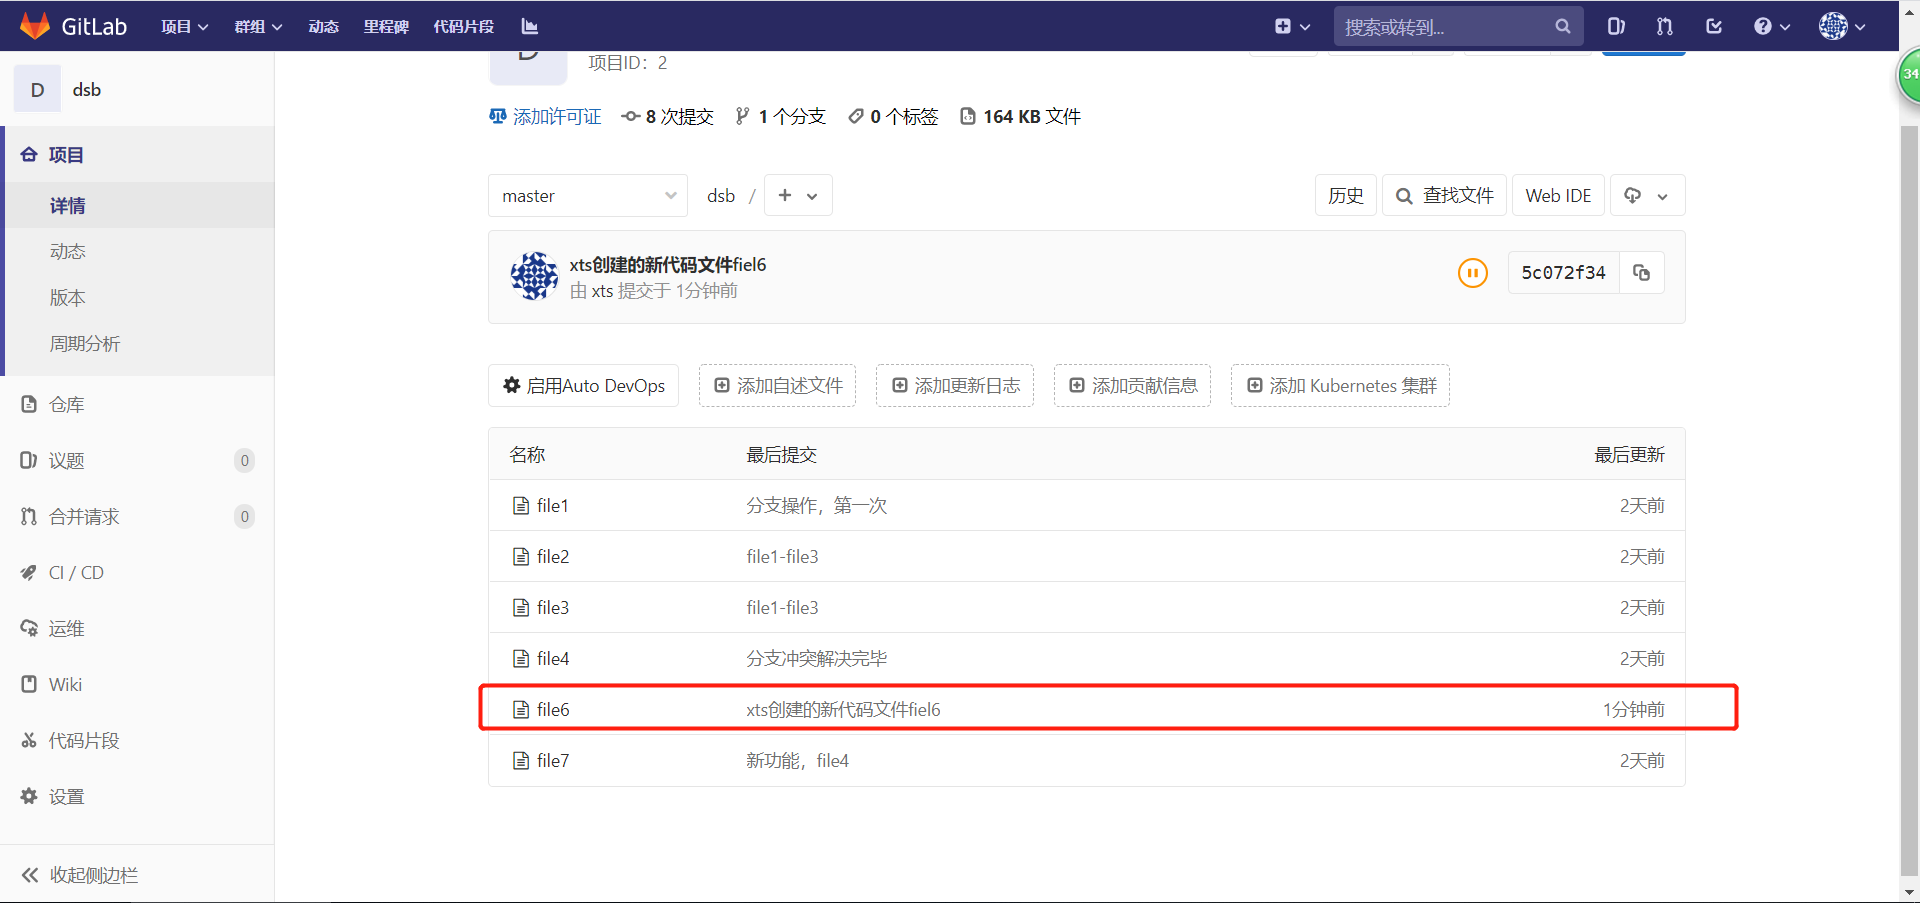
创建新的代码文件
[root@db01 ~/dsb]# touch file6
[root@db01 ~/dsb]# git status
# On branch master
# Untracked files:
# (use "git add <file>..." to include in what will be committed)
#
# file6
nothing added to commit but untracked files present (use "git add" to track)
# 配置用户信息
[root@db01 ~/dsb]# git config --global user.email "1184964356@qq.com"
[root@db01 ~/dsb]# git config --global user.name "xts"
# 提交到本地仓库
[root@db01 ~/dsb]# git add .
[root@db01 ~/dsb]# git commit -m "xts创建的新代码文件fiel6"
[master 5c072f3] xts创建的新代码文件fiel6
1 file changed, 0 insertions(+), 0 deletions(-)
create mode 100644 file6
# 推送到远程仓库
[root@db01 ~/dsb]# git push origin master
Counting objects: 3, done.
Delta compression using up to 4 threads.
Compressing objects: 100% (2/2), done.
Writing objects: 100% (2/2), 260 bytes | 0 bytes/s, done.
Total 2 (delta 1), reused 0 (delta 0)
To git@gitlab.xts.com:dba-01/dsb.git
f947a54..5c072f3 master -> master
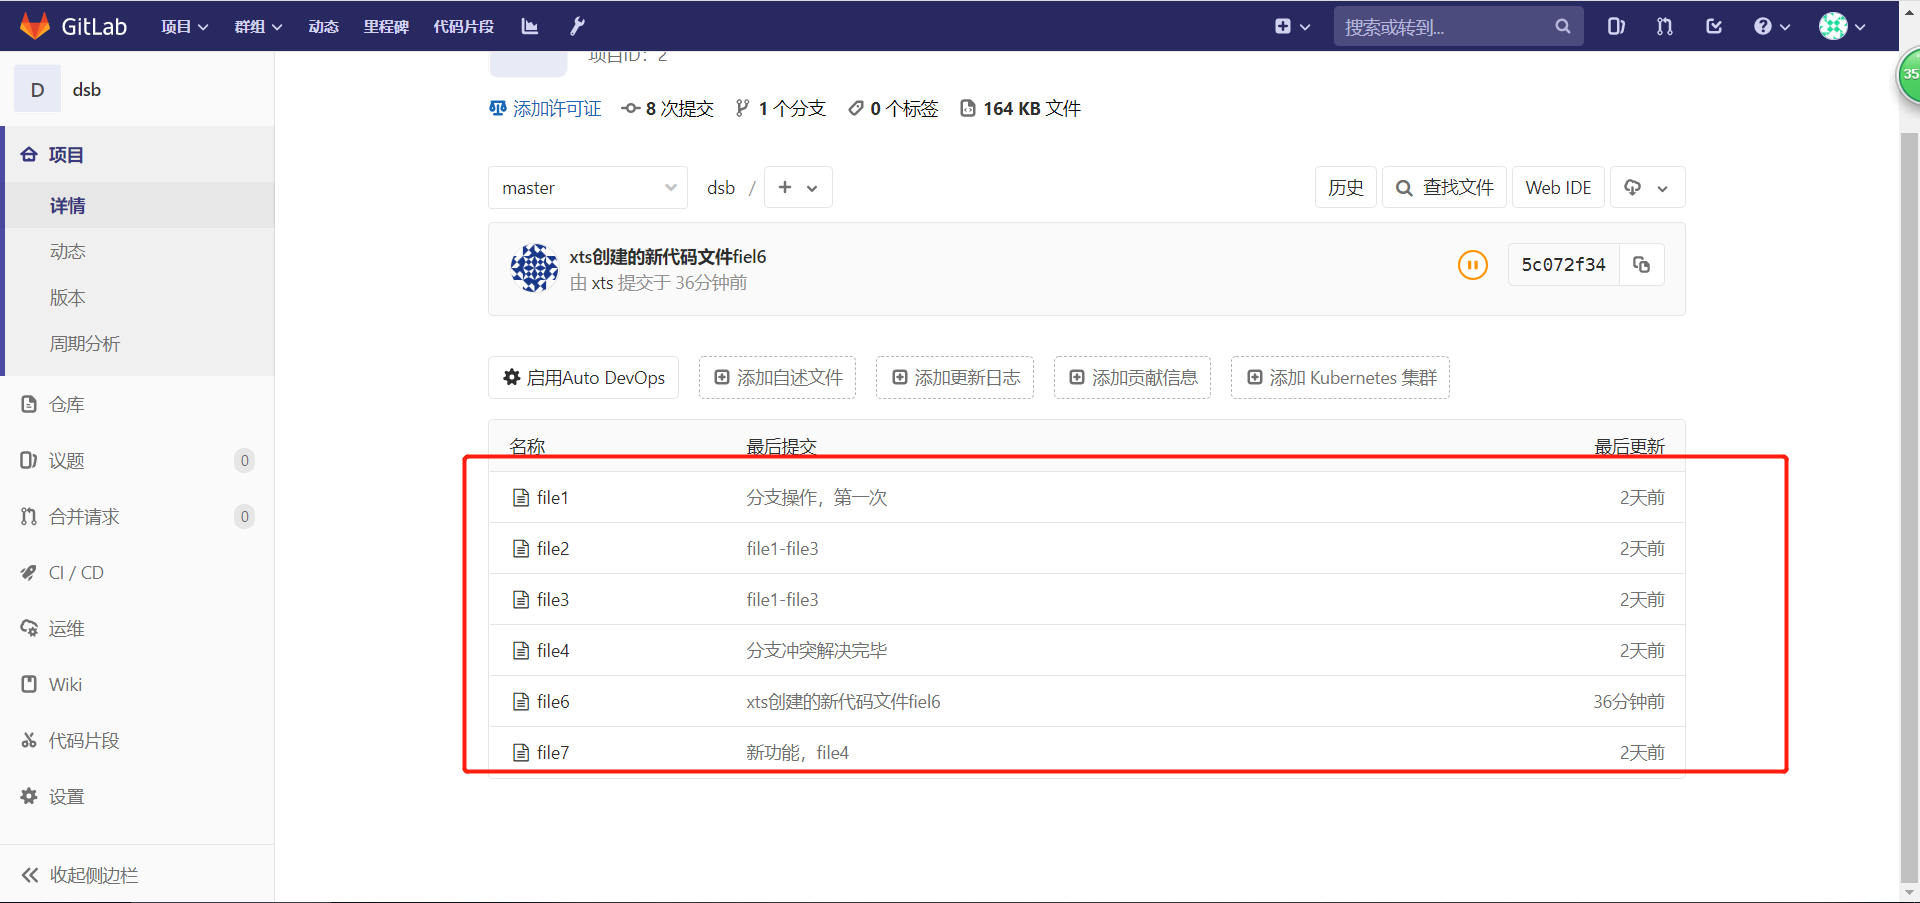
# 提交结果看下图
拉取新上传的代码到本地
[root@gitlab ~/demo]# git pull origin master
remote: Enumerating objects: 3, done.
remote: Counting objects: 100% (3/3), done.
remote: Compressing objects: 100% (2/2), done.
remote: Total 2 (delta 1), reused 0 (delta 0)
Unpacking objects: 100% (2/2), done.
From gitlab.xts.com:dba-01/dsb
 * branch            master     -> FETCH_HEAD
Updating f947a54..5c072f3
Fast-forward
 file6 | 0
 1 file changed, 0 insertions(+), 0 deletions(-)
 create mode 100644 file6
[root@gitlab ~/demo]# ls
file1  file2  file3  file4  file6  file7
9. gitlab备份与恢复
9.1 gitlab备份
# 备份命令 1
[root@gitlab ~/demo]# gitlab-rake gitlab:backup:create
[root@gitlab ~/demo]# ll /var/opt/gitlab/backups/       # gitlab.rb中默认指定的备份路径
total 140
-rw------- 1 git git 143360 Jun 23 07:20 1592868022_2020_06_23_12.0.3_gitlab_backup.tar

# 额外调整,改完后一定要重新初始化一下
[root@gitlab ~/demo]# vim /etc/gitlab/gitlab.rb
# gitlab_rails['backup_path'] = "/var/opt/gitlab/backups"  # 默认备份路径
# gitlab_rails['backup_keep_time'] = 604800                # 默认保留时间,604800为7天

[root@gitlab ~/demo]# gitlab-ctl reconfigure
9.2 gitlab恢复
模拟误删除
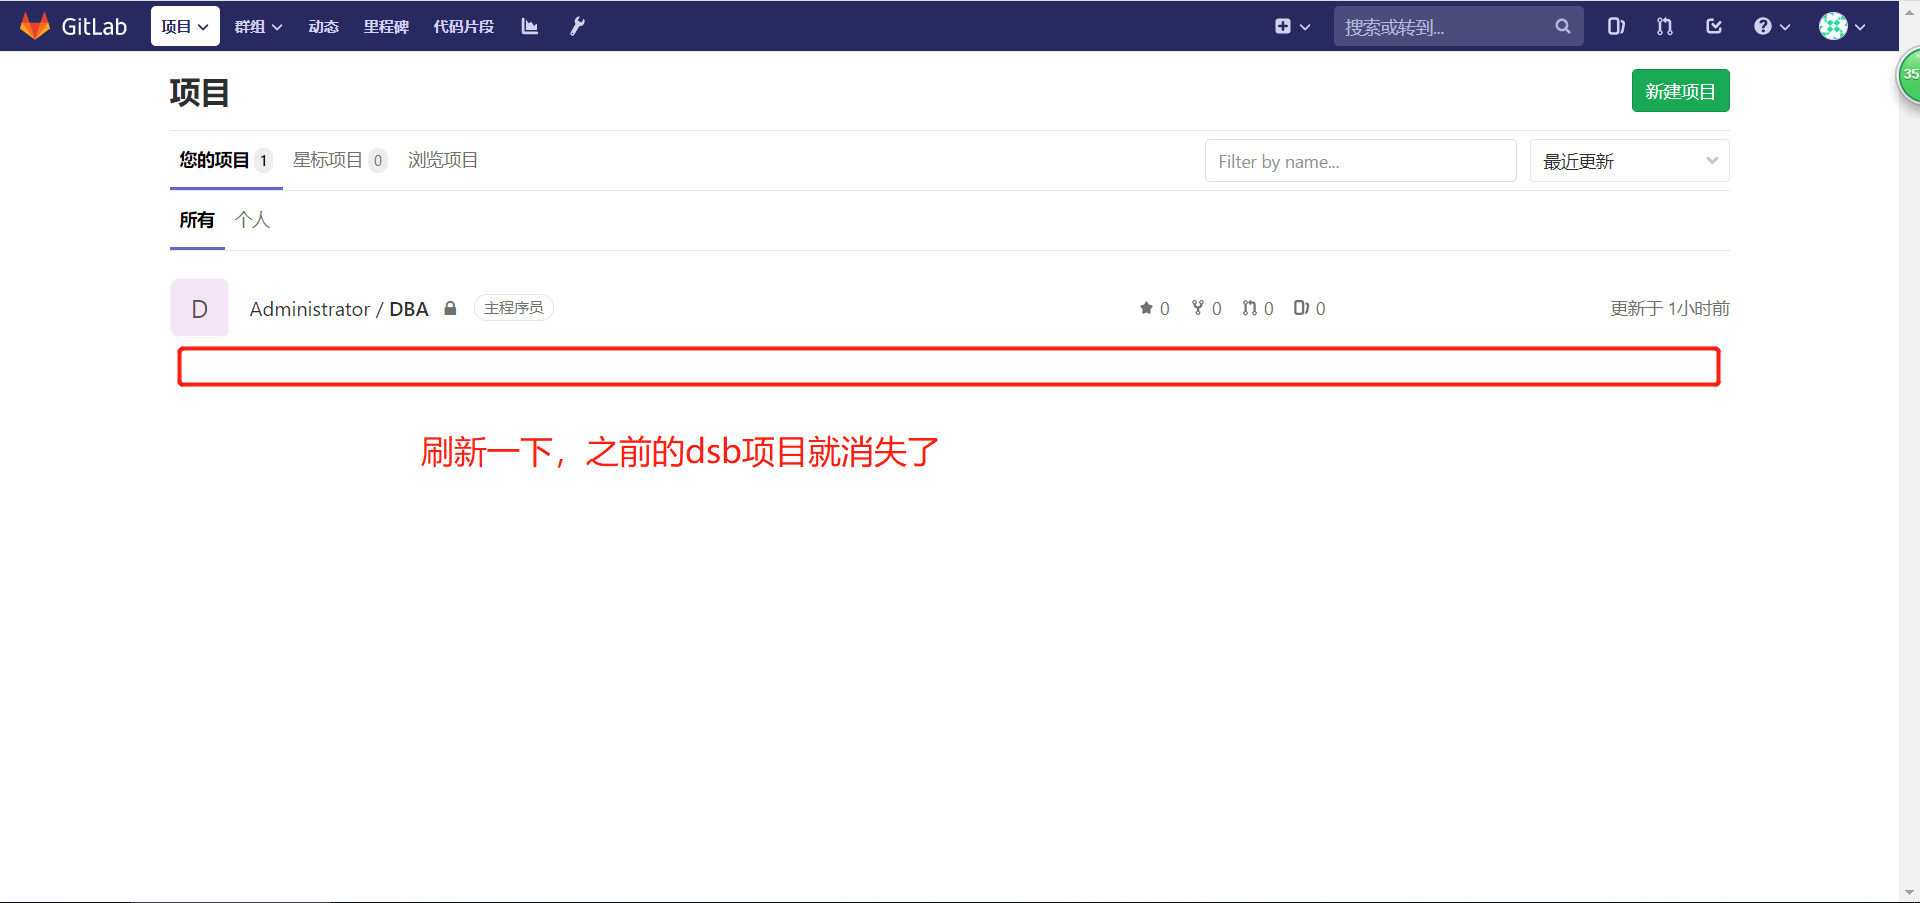
gitlab恢复
# 停止gitlab服务中的sidekiq、unicorn主程序
[root@gitlab ~/demo]# gitlab-ctl stop sidekiq
ok: down: sidekiq: 0s, normally up
[root@gitlab ~/demo]# gitlab-ctl stop unicorn
ok: down: unicorn: 0s, normally up
[root@gitlab ~/demo]# gitlab-ctl status
run: gitaly: (pid 16554) 124s; run: log: (pid 6763) 6481s
run: gitlab-workhorse: (pid 16575) 124s; run: log: (pid 6757) 6481s
run: logrotate: (pid 16594) 123s; run: log: (pid 6755) 6481s
run: nginx: (pid 16600) 123s; run: log: (pid 6751) 6481s
run: postgresql: (pid 16608) 122s; run: log: (pid 6753) 6481s
run: redis: (pid 16617) 122s; run: log: (pid 6764) 6481s
down: sidekiq: 52s, normally up; run: log: (pid 6758) 6481s
down: unicorn: 43s, normally up; run: log: (pid 6760) 6481s

# 基于备份恢复
[root@gitlab ~/demo]# gitlab-rake gitlab:backup:restore BACKUP=1592868022_2020_06_23_12.0.3
[root@gitlab ~/demo]# echo $?
0

# 重启gitlab服务
[root@gitlab ~/demo]#  gitlab-ctl restart
ok: run: gitaly: (pid 17028) 1s
ok: run: gitlab-workhorse: (pid 17049) 0s
ok: run: logrotate: (pid 17070) 1s
ok: run: nginx: (pid 17076) 0s
ok: run: postgresql: (pid 17086) 0s
ok: run: redis: (pid 17095) 0s
ok: run: sidekiq: (pid 17175) 0s
ok: run: unicorn: (pid 17181) 1s
浏览器验证恢复情况