一. 项目优化
1. 生成发布包
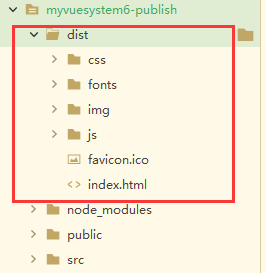
根目录下运行指令【npm run build】,会生出一个dist文件夹,该文件夹就是项目生成的发布包,可以直接放到IIS中部署即可。
2. 生成/分析打包报告


3. 删除console.log
我们想在想在项目的build阶段移除所有的Console信息。
步骤:运行指令【npm i babel-plugin-transform-remove-console -D】,然后在babel.config.js文件中进行添加下面代码:
// 这是项目发布阶段需要用到的 babel-plugin-transform-remove-console 插件
const prodPlugins = []
if (process.env.NODE_ENV === 'production') {
  // 发布时候去掉console
  prodPlugins.push('transform-remove-console')
}

module.exports = {
  presets: [
    '@vue/cli-plugin-babel/preset'
  ],
  plugins: [
    [
      'component',
      {
        libraryName: 'element-ui',
        styleLibraryName: 'theme-chalk'
      }
    ],
    // 发布产品时候的插件数组
    ...prodPlugins
  ]
}
4. 修改webpack的默认配置
module.exports = {
  devServer: {
    port: 8086,
    open: true
  },
  // chainWebpack可以通过链式编程的形式,修改webpack配置   或者   configureWebpack可以通过操作对象的形式,修改webpack配置
  chainWebpack: config => {
    //1. 发布模式
    config.when(process.env.NODE_ENV === 'production', config => {
      //1.1 entry找到默认的打包入口,调用clear则是删除默认的打包入口
      //add添加新的打包入口
      config.entry('app').clear().add('./src/main-prod.js')
    });

    //2. 开发模式
    config.when(process.env.NODE_ENV === 'development', config => {
      config.entry('app').clear().add('./src/main-dev.js')
    })
  },
}
5. 加载外部CDN
步骤:
(1).在vue.config.js中进行代码排除(排除 Vue、VueRouter、axios、echarts、NProgress、VueQuillEditor等第三方包)
//1. 发布模式
    config.when(process.env.NODE_ENV === 'production', config => {
      //1.1 entry找到默认的打包入口,调用clear则是删除默认的打包入口
      //add添加新的打包入口
      config.entry('app').clear().add('./src/main-prod.js')

      //1.2 使用externals设置排除项。默认情况下,依赖项的所有第三方包都会被打包到js/chunk-vendors.******.js文件中,导致该js文件过大;
      // 那么我们可以通过externals排除这些包,使它们不被打包到js/chunk-vendors.******.js文件中
      config.set('externals', {
        vue: 'Vue',
        'vue-router': 'VueRouter',
        axios: 'axios',
        lodash: '_',
        echarts: 'echarts',
        nprogress: 'NProgress',
        'vue-quill-editor': 'VueQuillEditor'
      })

    });
(2). 在main-prod.js文件中注释掉相应的导入


// 生产环境
import Vue from 'vue'
import App from './App.vue'
// 导入路由(等价 import router from './router/index.js')
import router from './router'
// 导入ElementUI
// import './plugins/element.js'
// 导入字体图标
import './assets/fonts/iconfont.css'
// 导入全局样式表
import './assets/css/global.css'

// 导入 NProgress 包对应的JS和CSS
import NProgress from 'nprogress'
// import 'nprogress/nprogress.css'

// 导入富文本编辑器
import VueQuillEditor from 'vue-quill-editor'
//导入富文本编辑器对应的样式
// import 'quill/dist/quill.core.css'
// import 'quill/dist/quill.snow.css'
// import 'quill/dist/quill.bubble.css'
// 将富文本编辑器,注册为全局可用的组件
Vue.use(VueQuillEditor)

// 导入表格自适应方法
import adaptive from './utils/table-adapter'
Vue.use(adaptive)

// 导入axios并进行配置
import axios from 'axios'
axios.defaults.baseURL = 'http://127.0.0.1:8888/api/private/v1/'
axios.interceptors.request.use(config => {
  NProgress.start();
  // 添加表头信息
  config.headers.Authorization = window.sessionStorage.getItem('token');
  return config;
})
// 在 response 拦截器中,隐藏进度条 NProgress.done()
axios.interceptors.response.use(config => {
  NProgress.done();
  return config;
})
Vue.prototype.$http = axios

// 注册全局日期过滤器
Vue.filter('dateFormat', function(originVal) {
  const dt = new Date(originVal);
  const y = dt.getFullYear();
  const m = (dt.getMonth() + 1 + '').padStart(2, '0');
  const d = (dt.getDate() + '').padStart(2, '0');
  const hh = (dt.getHours() + '').padStart(2, '0');
  const mm = (dt.getMinutes() + '').padStart(2, '0');
  const ss = (dt.getSeconds() + '').padStart(2, '0');
  return `${y}-${m}-${d} ${hh}:${mm}:${ss}`;
})

Vue.config.productionTip = false
new Vue({
  router,
  render: h => h(App)
}).$mount('#app')
(3). 在public/index.html中对上述注释掉的包使用cdn的方式进行导入
这里需要注意的是,只有生产环境才需要cdn导入,需要配置一个参数来区分,详见下面的【6. 定制首页内容】
<!DOCTYPE html>
<html lang="">
  <head>
    <meta charset="utf-8">
    <meta http-equiv="X-UA-Compatible" content="IE=edge">
    <meta name="viewport" content="width=device-width,initial-scale=1.0">
    <link rel="icon" href="<%= BASE_URL %>favicon.ico">
        <title><%= htmlWebpackPlugin.options.isProd ? '' : '开发 - ' %>后台管理系统</title>

        <!-- 下面代表只有生产环境才加载cdn -->
        <% if(htmlWebpackPlugin.options.isProd){ %>
        <!-- nprogress 的样式表文件 -->
        <link rel="stylesheet" href="https://cdn.staticfile.org/nprogress/0.2.0/nprogress.min.css" />
        <!-- 富文本编辑器 的样式表文件 no -->
        <link rel="stylesheet" href="https://cdn.staticfile.org/quill/1.3.4/quill.core.min.css" />
        <link rel="stylesheet" href="https://cdn.staticfile.org/quill/1.3.4/quill.snow.min.css" />
        <link rel="stylesheet" href="https://cdn.staticfile.org/quill/1.3.4/quill.bubble.min.css" />
        <!-- element-ui 的样式表文件 -->
        <link rel="stylesheet" href="https://cdn.staticfile.org/element-ui/2.15.1/theme-chalk/index.css" />
        <!-- 下面是相关的js文件 -->
        <script src="https://cdn.staticfile.org/vue/2.6.11/vue.min.js"></script>
        <script src="https://cdn.staticfile.org/vue-router/3.2.0/vue-router.min.js"></script>
        <script src="https://cdn.staticfile.org/axios/0.21.1/axios.min.js"></script>
        <script src="https://cdn.staticfile.org/lodash.js/4.17.21/lodash.min.js"></script>
        <script src="https://cdn.staticfile.org/echarts/5.0.2/echarts.min.js"></script>
        <script src="https://cdn.staticfile.org/nprogress/0.2.0/nprogress.min.js"></script>
        <!-- 富文本编辑器的 js 文件 -->
        <script src="https://cdn.staticfile.org/quill/1.3.4/quill.min.js"></script>
        <script src="https://cdn.jsdelivr.net/npm/vue-quill-editor@3.0.6/dist/vue-quill-editor.js"></script>
        <!-- element-ui 的 js 文件 -->
        <script src="https://cdn.staticfile.org/element-ui/2.15.1/index.js"></script>
        <% } %>


  </head>
  <body>
    <noscript>
      <strong>We're sorry but <%= htmlWebpackPlugin.options.title %> doesn't work properly without JavaScript enabled. Please enable it to continue.</strong>
    </noscript>
    <div id="app"></div>
    <!-- built files will be auto injected -->
  </body>
</html>
6. 定制首页内容
这里我们需要配置一个参数,用来区分是生产 还是 开发,从而决定首页的显示 和 是否加载cdn。
步骤:
(1). 在vue.config.js中进行首页参数的地址,isProd生产环境为ture, 开发环境为falses。
module.exports = {
  devServer: {
    port: 8086,
    open: true
  },
  // chainWebpack可以通过链式编程的形式,修改webpack配置   或者   configureWebpack可以通过操作对象的形式,修改webpack配置
  chainWebpack: config => {
    //1. 发布模式
    config.when(process.env.NODE_ENV === 'production', config => {
      //1.1 entry找到默认的打包入口,调用clear则是删除默认的打包入口
      //add添加新的打包入口
      config.entry('app').clear().add('./src/main-prod.js')

      //1.2 使用externals设置排除项。默认情况下,依赖项的所有第三方包都会被打包到js/chunk-vendors.******.js文件中,导致该js文件过大;
      // 那么我们可以通过externals排除这些包,使它们不被打包到js/chunk-vendors.******.js文件中
      config.set('externals', {
        vue: 'Vue',
        'vue-router': 'VueRouter',
        axios: 'axios',
        lodash: '_',
        echarts: 'echarts',
        nprogress: 'NProgress',
        'vue-quill-editor': 'VueQuillEditor'
      })

      //1.3 定制首页内容
      config.plugin('html').tap(args => {
        //添加参数isProd,true代表生产环境
        args[0].isProd = true
        return args
      })


    });


    //2. 开发模式
    config.when(process.env.NODE_ENV === 'development', config => {
      config.entry('app').clear().add('./src/main-dev.js')

      // 定制首页内容
      config.plugin('html').tap(args => {
        //添加参数isProd, false代表开发环境
        args[0].isProd = false
        return args
      })

    })

  },


}
(2). 在public/index.html中,根据isProd进行判断即可。
<!DOCTYPE html>
<html lang="">
  <head>
    <meta charset="utf-8">
    <meta http-equiv="X-UA-Compatible" content="IE=edge">
    <meta name="viewport" content="width=device-width,initial-scale=1.0">
    <link rel="icon" href="<%= BASE_URL %>favicon.ico">
        <title><%= htmlWebpackPlugin.options.isProd ? '' : '开发 - ' %>后台管理系统</title>

        <!-- 下面代表只有生产环境才加载cdn -->
        <% if(htmlWebpackPlugin.options.isProd){ %>
        <!-- nprogress 的样式表文件 -->
        <link rel="stylesheet" href="https://cdn.staticfile.org/nprogress/0.2.0/nprogress.min.css" />
        <!-- 富文本编辑器 的样式表文件 no -->
        <link rel="stylesheet" href="https://cdn.staticfile.org/quill/1.3.4/quill.core.min.css" />
        <link rel="stylesheet" href="https://cdn.staticfile.org/quill/1.3.4/quill.snow.min.css" />
        <link rel="stylesheet" href="https://cdn.staticfile.org/quill/1.3.4/quill.bubble.min.css" />
        <!-- element-ui 的样式表文件 -->
        <link rel="stylesheet" href="https://cdn.staticfile.org/element-ui/2.15.1/theme-chalk/index.css" />
        <!-- 下面是相关的js文件 -->
        <script src="https://cdn.staticfile.org/vue/2.6.11/vue.min.js"></script>
        <script src="https://cdn.staticfile.org/vue-router/3.2.0/vue-router.min.js"></script>
        <script src="https://cdn.staticfile.org/axios/0.21.1/axios.min.js"></script>
        <script src="https://cdn.staticfile.org/lodash.js/4.17.21/lodash.min.js"></script>
        <script src="https://cdn.staticfile.org/echarts/5.0.2/echarts.min.js"></script>
        <script src="https://cdn.staticfile.org/nprogress/0.2.0/nprogress.min.js"></script>
        <!-- 富文本编辑器的 js 文件 -->
        <script src="https://cdn.staticfile.org/quill/1.3.4/quill.min.js"></script>
        <script src="https://cdn.jsdelivr.net/npm/vue-quill-editor@3.0.6/dist/vue-quill-editor.js"></script>
        <!-- element-ui 的 js 文件 -->
        <script src="https://cdn.staticfile.org/element-ui/2.15.1/index.js"></script>
        <% } %>


  </head>
  <body>
    <noscript>
      <strong>We're sorry but <%= htmlWebpackPlugin.options.title %> doesn't work properly without JavaScript enabled. Please enable it to continue.</strong>
    </noscript>
    <div id="app"></div>
    <!-- built files will be auto injected -->
  </body>
</html>
7.路由懒加载
(1). 通过指令【npm i @babel/plugin-syntax-dynamic-import -D】进行开发依赖的安装。
(2). 在babel.config.js中声明该插件
module.exports = {
  presets: [
    '@vue/cli-plugin-babel/preset'
  ],
  plugins: [
    [
      'component',
      {
        libraryName: 'element-ui',
        styleLibraryName: 'theme-chalk'
      }
    ],
    // 发布产品时候的插件数组
    ...prodPlugins,
    //配置路由懒加载插件
    "@babel/plugin-syntax-dynamic-import"
  ]
}
(3). 在router/index.js中进行路由懒加载的改造
import Vue from 'vue'
import VueRouter from 'vue-router'

// import Login from '../components/Login.vue'
// // @代表根路径
// import Home from '@/components/Home.vue'
// import Welcome from '@/components/Welcome.vue'
// import Users from '@/components/user/Users.vue'
// import Rights from '@/components/power/Rights.vue'
// import Roles from '@/components/power/Roles.vue'
// import Params from '@/components/goods/Params.vue'
// import GoodsList from '@/components/goods/List.vue'
// import Add from '@/components/goods/Add.vue'
// import Order from '@/components/order/Order.vue'
// import Report from '@/components/report/Report.vue'

// 下面改成路由懒加载
const Login = () => import('../components/Login.vue')
const Home = () => import('@/components/Home.vue')
const Welcome = () => import('@/components/Welcome.vue')
const Users = () => import('@/components/user/Users.vue')
const Rights = () => import('@/components/power/Rights.vue')
const Roles = () => import('@/components/power/Roles.vue')
const Params = () => import('@/components/goods/Params.vue')
const GoodsList = () => import('@/components/goods/List.vue')
const Add = () => import('@/components/goods/Add.vue')
const Order = () => import('@/components/order/Order.vue')
const Report = () => import('@/components/report/Report.vue')
Vue.use(VueRouter)

const router = new VueRouter({
  routes: [{
    path: '/',
    redirect: '/login'
  },
  {
    path: '/login',
    component: Login
  },
  {
    path: '/home',
    component: Home,
    redirect: '/welcome',
    children: [{
      path: '/welcome',
      component: Welcome
    },
    {
      path: '/users',
      component: Users
    },
    {
      path: '/rights',
      component: Rights
    },
    {
      path: '/roles',
      component: Roles
    },
    {
      path: '/params',
      component: Params
    },
    {
      path: '/goods',
      component: GoodsList
    },
    {
      path: '/goods/add',
      component: Add
    },
    {
      path: '/orders',
      component: Order
    },
    {
      path: '/reports',
      component: Report
    }
    ]
  }
  ]
})

// 挂载路由导航守卫
router.beforeEach((to, from, next) => {
  // to 将要访问的路径
  // from 代表从哪个路径跳转而来
  // next 是一个函数,表示放行
  // next()  放行    next('/login')  强制跳转
  if (to.path === '/login') return next()
  // 获取token
  const tokenStr = window.sessionStorage.getItem('token')
  if (!tokenStr) return next('/login')
  next()
})

// 默认导出
export default router
8. 重新制作发布包,分析报告
警告没了,生产的js文件缩小的很多!!!

二. 项目部署
1. 直接IIS部署
直接放到IIS下部署即可。

2. 通过express部署
(1). 步骤
A. 创建vue_publish文件夹,
const express = require('express')
const app = express()
app.use(express.static('./dist'))
app.listen(8998,()=>{
    console.log("server running at http://127.0.0.1:8998")
})
E. 运行【npm install】安装所有运行包
F. 运行【node app.js】启动项目,然后 访问 http://127.0.0.1:8998 即可。
(2). 开启Gzip压缩
A. 运行指令【npm i compression -D】
B. app.js中添加两行代码
const express = require('express')
const compression = require('compression')
const app = express()
app.use(compression())
app.use(express.static('./dist'))
app.listen(8998,()=>{
    console.log("server running at http://127.0.0.1:8998")
})
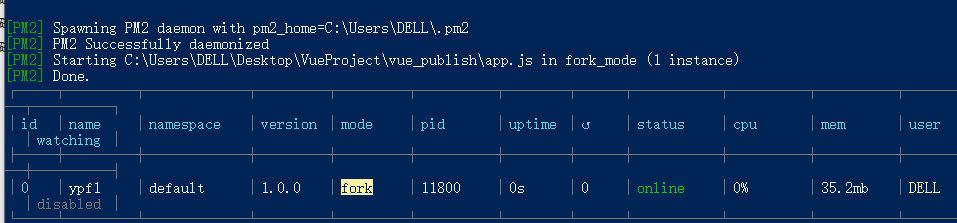
(3). 使用pm2管理应用
A. 全局安装pm2 【npm i pm2 -g】
B. 在发布包根目录下运行指令【pm2 start app.js --name 自定义名称】,启动项目。
PS:其它指令
!
- 作 者 : Yaopengfei(姚鹏飞)
- 博客地址 : http://www.cnblogs.com/yaopengfei/
- 声 明1 : 如有错误,欢迎讨论,请勿谩骂^_^。
- 声 明2 : 原创博客请在转载时保留原文链接或在文章开头加上本人博客地址,否则保留追究法律责任的权利。