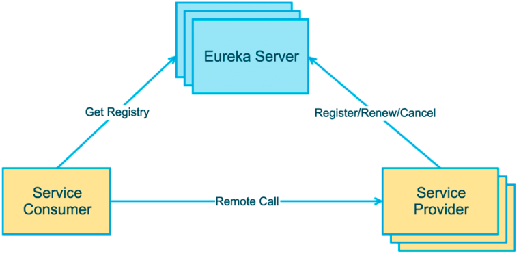
Feign声明式服务调用
1、Feign 是一个声明式的 REST 客户端,它用了基于接口的注解方式,很方便实现客户端配置。
2、Feign 最初由 Netflix 公司提供,但不支持SpringMVC注解,后由 SpringCloud 对其封装,支持了SpringMVC注解,让使用者更易于接受。
Feign 快速入门
一、feign消费方
1、在消费端引入 open-feign 依赖

2、编写yaml文件
server:
  port: 9000

eureka:
  instance:
    hostname: localhost #主机名
  client:
    service-url:
      defaultZone: http://localhost:8761/eureka

spring:
  application:
    name: feign-consumer #设置当前应用的名称。将来会在eureka中Application显示。将来需要使用该名称获取路径
3、编写Feign调用接口

package com.zxj.consumer.feign;

import com.zxj.consumer.config.FeignLogConfig;
import com.zxj.consumer.domain.Goods;
import org.springframework.cloud.openfeign.FeignClient;
import org.springframework.web.bind.annotation.GetMapping;
import org.springframework.web.bind.annotation.PathVariable;

/**
 *
 * feign声明式接口。发起远程调用的。
 *
 String url = "http://FEIGN-PROVIDER/goods/findOne/"+id;
 Goods goods = restTemplate.getForObject(url, Goods.class);
 *
 * 1. 定义接口
 * 2. 接口上添加注解 @FeignClient,设置value属性为 服务提供者的 应用名称
 * 3. 编写调用接口,接口的声明规则 和 提供方接口保持一致。
 * 4. 注入该接口对象,调用接口方法完成远程调用
 *
 */
@FeignClient(value = "FEIGN-PROVIDER")
public interface GoodsFeignClient {

    @GetMapping("/goods/findOne/{id}")
    public Goods findGoodsById(@PathVariable("id") int id);
}
注意和提供方中的方法保持一致

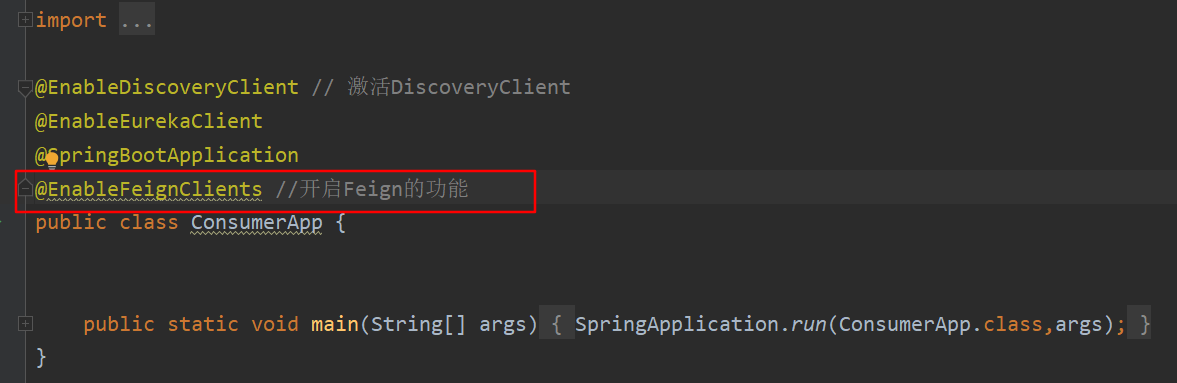
在消费方启动类 添加 @EnableFeignClients 注解,开启Feign功能
二、feign提供方
1、编写yaml文件,定义服务名,并将服务注册到eureka中
server:
  port: 8001

eureka:
  instance:
    hostname: localhost #主机名
    prefer-ip-address: true #将当前实例的ip注册到eureka server中。默认是false注册主机名
    ip-address: 127.0.0.1 #设置当前实例的ip
    instance-id: ${eureka.instance.ip-address}:${spring.application.name}:${server.port} #设置web控制台现实的实例id
  client:
    service-url:
      defaultZone: http://localhost:8761/eureka

spring:
  application:
    name: feign-provider #设置当前应用的名称。将来会在eureka中Application显示,将来需要使用该名称来获取路径
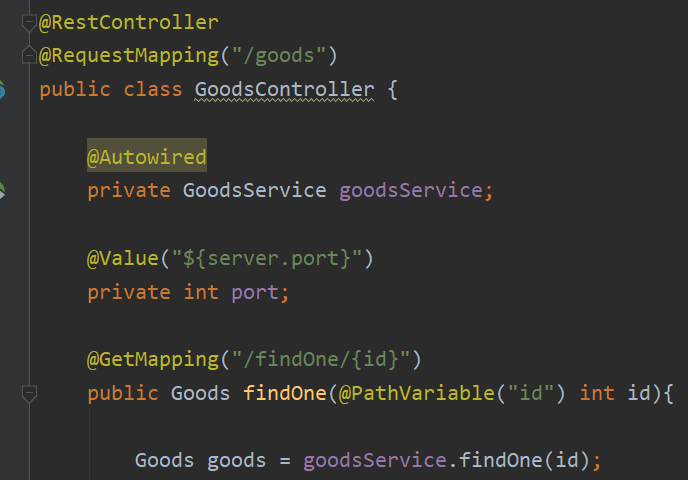
提供方controller
package com.zxj.provider.controller;
import com.zxj.provider.domain.Goods;
import com.zxj.provider.service.GoodsService;
import org.springframework.beans.factory.annotation.Autowired;
import org.springframework.beans.factory.annotation.Value;
import org.springframework.web.bind.annotation.GetMapping;
import org.springframework.web.bind.annotation.PathVariable;
import org.springframework.web.bind.annotation.RequestMapping;
import org.springframework.web.bind.annotation.RestController;
/**
* Goods Controller 服务提供方
*/
@RestController
@RequestMapping("/goods")
public class GoodsController {
@Autowired
private GoodsService goodsService;
@Value("${server.port}")
private int port;
@GetMapping("/findOne/{id}")
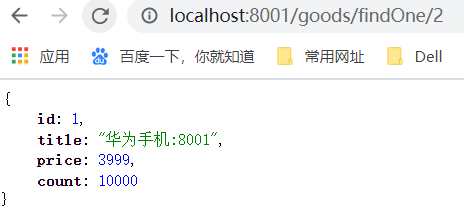
public Goods findOne(@PathVariable("id") int id){
Goods goods = goodsService.findOne(id);
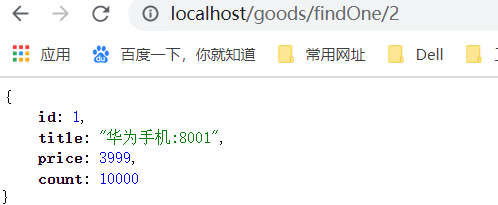
goods.setTitle(goods.getTitle() + ":" + port);//将端口号,设置到了 商品标题上
return goods;
}
}
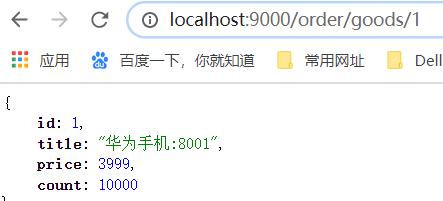
测试调用
三、编写eureka注册中心
1、引入依赖包
<dependency>
        <groupId>org.springframework.cloud</groupId>
        <artifactId>spring-cloud-starter-netflix-eureka-server</artifactId>
    </dependency>
2、编写yaml文件
server:
  port: 8761
eureka:
  instance:
    hostname: localhost #主机名
  client:
    service-url:
      defaultZone: http://${eureka.instance.hostname}:${server.port}/eureka # eureka服务端地址,将来客户端使用该地址和eureka进行通信
    register-with-eureka: false # 是否将自己的路径 注册到eureka上。eureka server 不需要的,eureka provider client 需要
    fetch-registry: false # 是否需要从eureka中抓取路径。eureka server 不需要的,eureka consumer client 需要
  server:
    enable-self-preservation: false # 关闭自我保护机制
    eviction-interval-timer-in-ms: 3000 # 检查服务的时间间隔
3、编写启动类
@SpringBootApplication
@EnableEurekaServer
public class EurekaApp {
    public static void main(String[] args) {
        SpringApplication.run(EurekaApp.class, args);
    }
}
这里的feign的提供方应该在前,消费方应该在后
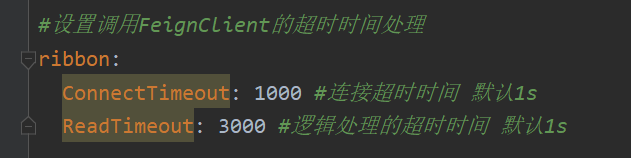
Feign 其他功能 – 超时设置
Feign 底层依赖于 Ribbon 实现负载均衡和远程调用。
Ribbon默认1秒超时。
超时配置:
ribbon:
  ConnectTimeout: 1000   #连接超时时间,毫秒
  ReadTimeout: 1000     #逻辑处理超时时间,毫秒
直接在消费端的application.yml配置文件中添加
Feign 其他功能 – 日志记录
1、Feign 只能记录 debug 级别的日志信息。
logging:
  level:
    com.itheima: debug
2、定义Feign日志级别Bean
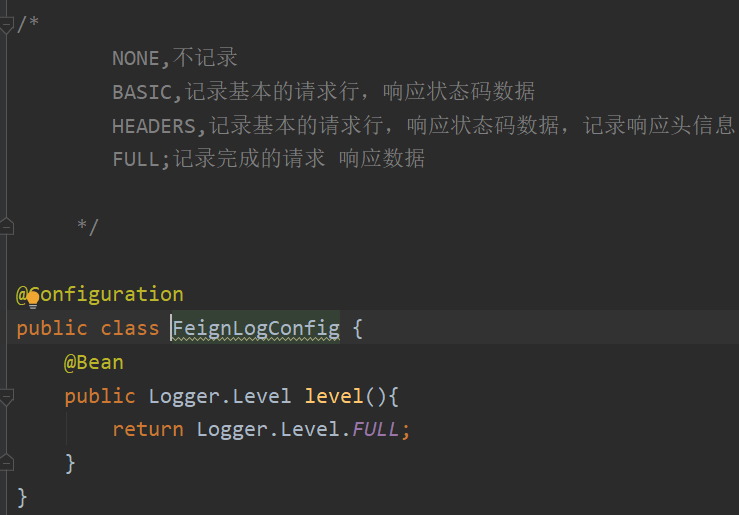
/*
        NONE,不记录
        BASIC,记录基本的请求行,响应状态码数据
        HEADERS,记录基本的请求行,响应状态码数据,记录响应头信息
        FULL;记录完成的请求 响应数据

     */

@Configuration
public class FeignLogConfig {
    @Bean
    public Logger.Level level(){
        return Logger.Level.FULL;
    }
}
3、启用该Bean:
@FeignClient(configuration = XxxConfig.class)
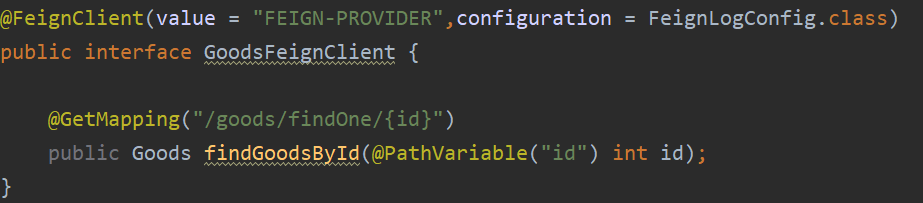
@FeignClient(value = "FEIGN-PROVIDER",configuration = FeignLogConfig.class)
public interface GoodsFeignClient {

    @GetMapping("/goods/findOne/{id}")
    public Goods findGoodsById(@PathVariable("id") int id);
}
** Hystrix 熔断器**
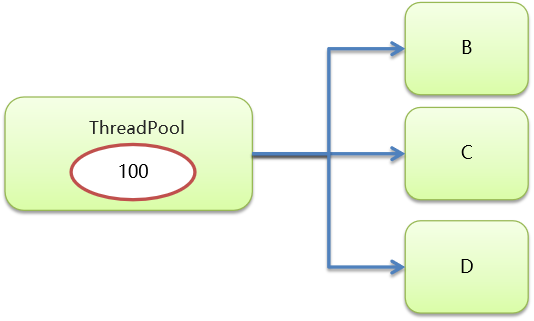
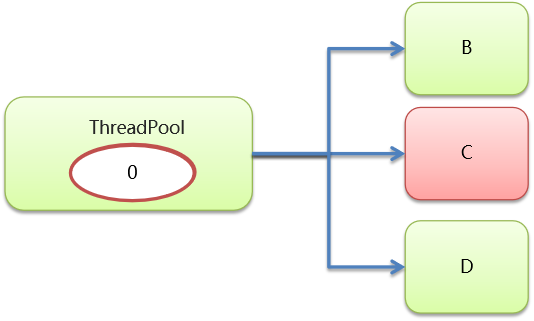
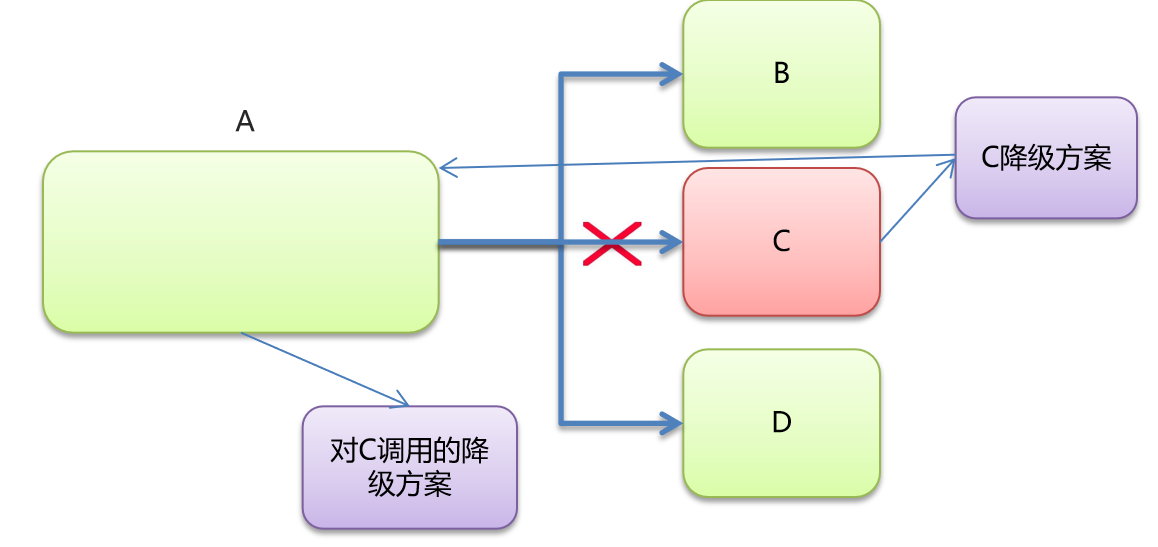
Hystix 是 Netflix 开源的一个延迟和容错库,用于隔离访问远程服务、第三方库,防止出现级联失败(雪崩)。
雪崩:一个服务失败,导致整条链路的服务都失败的情形。

A调用B,B调用C,如果c出现问题,接着b和a也会出现问题
Hystrix 概述
Hystix 是 Netflix 开源的一个延迟和容错库,用于隔离访问远程服务、第三方库,防止出现级联失败(雪崩)。
雪崩:一个服务失败,导致整条链路的服务都失败的情形。
Hystix 主要功能
隔离
-
线程池隔离

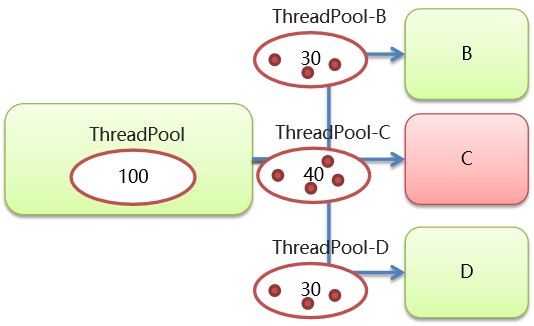
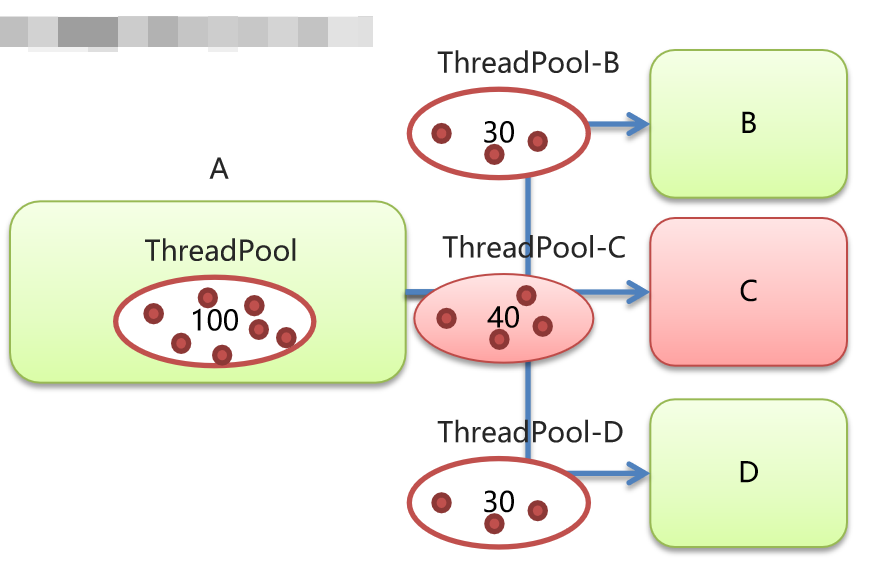
-
信号量隔离
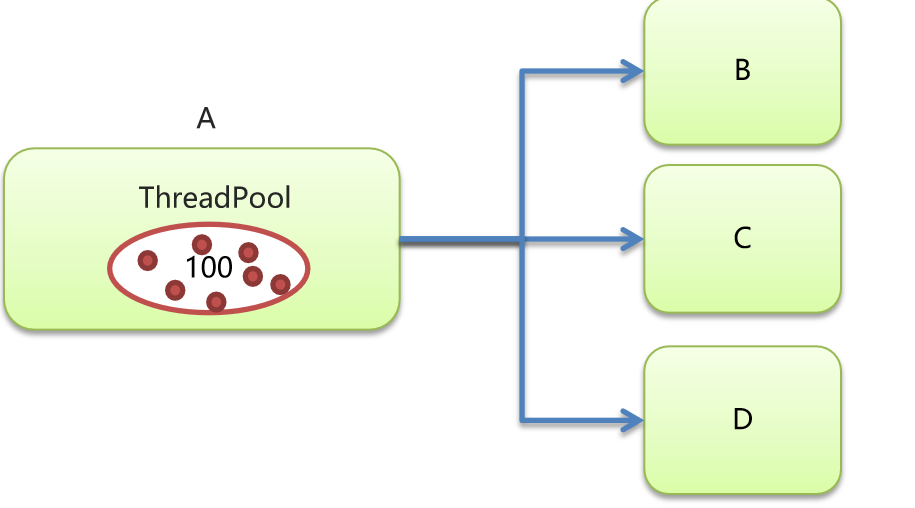
降级: 异常,超时
熔断
限流
Hystrix 降级
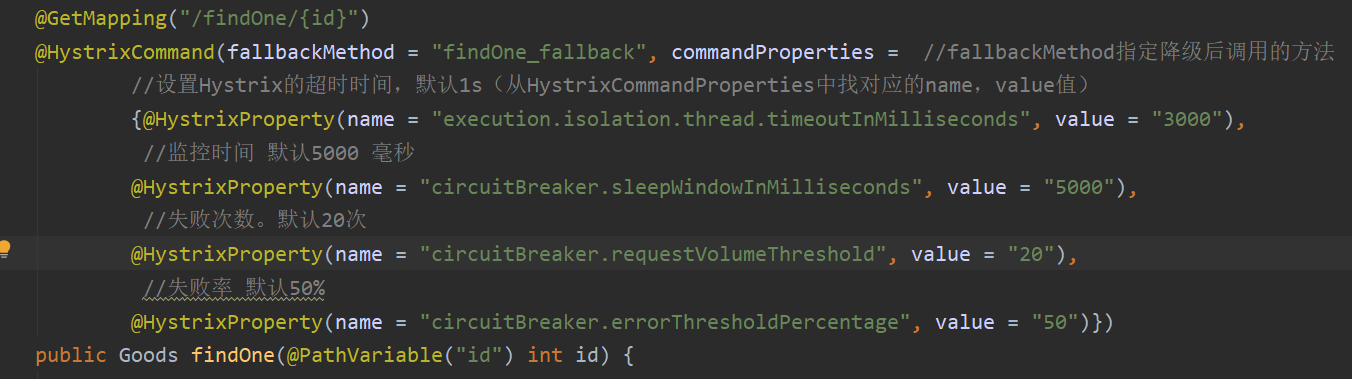
Hystix 降级:当服务发生异常或调用超时,返回默认数据
Hystrix 降级 – 服务提供方
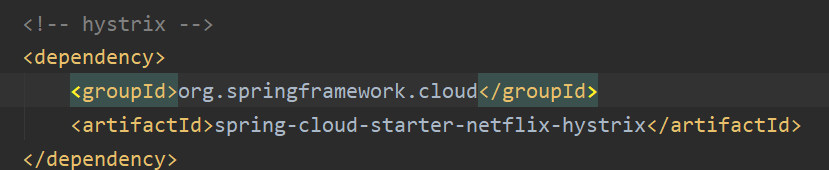
1、在服务提供方,引入 hystrix 依赖
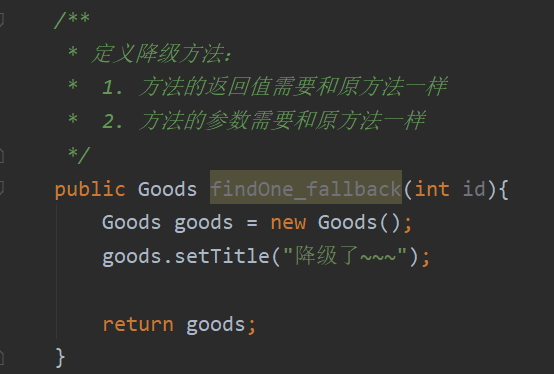
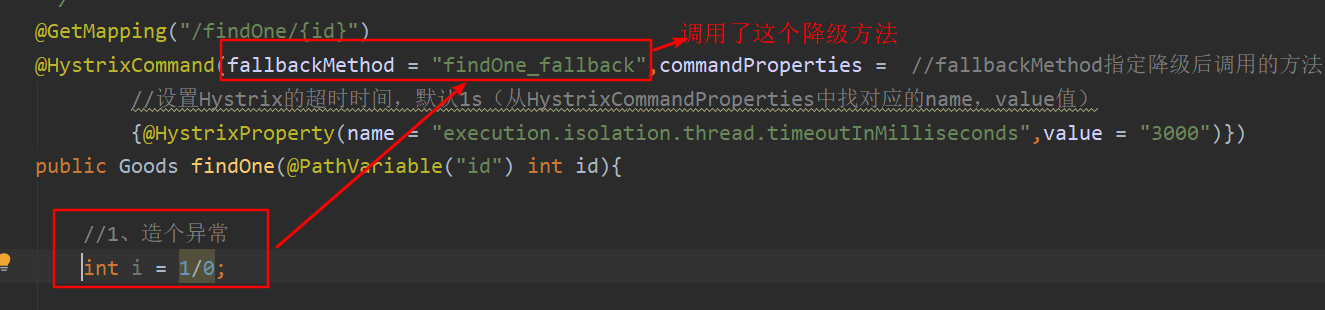
2、定义降级方法
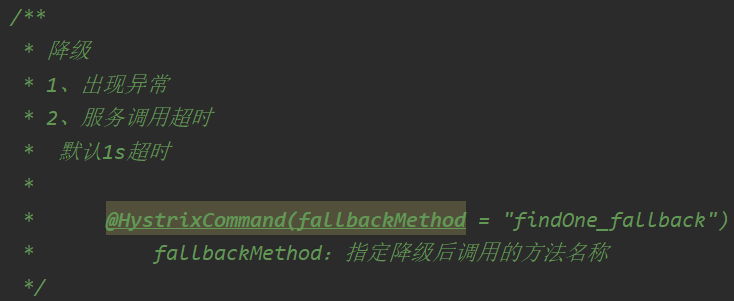
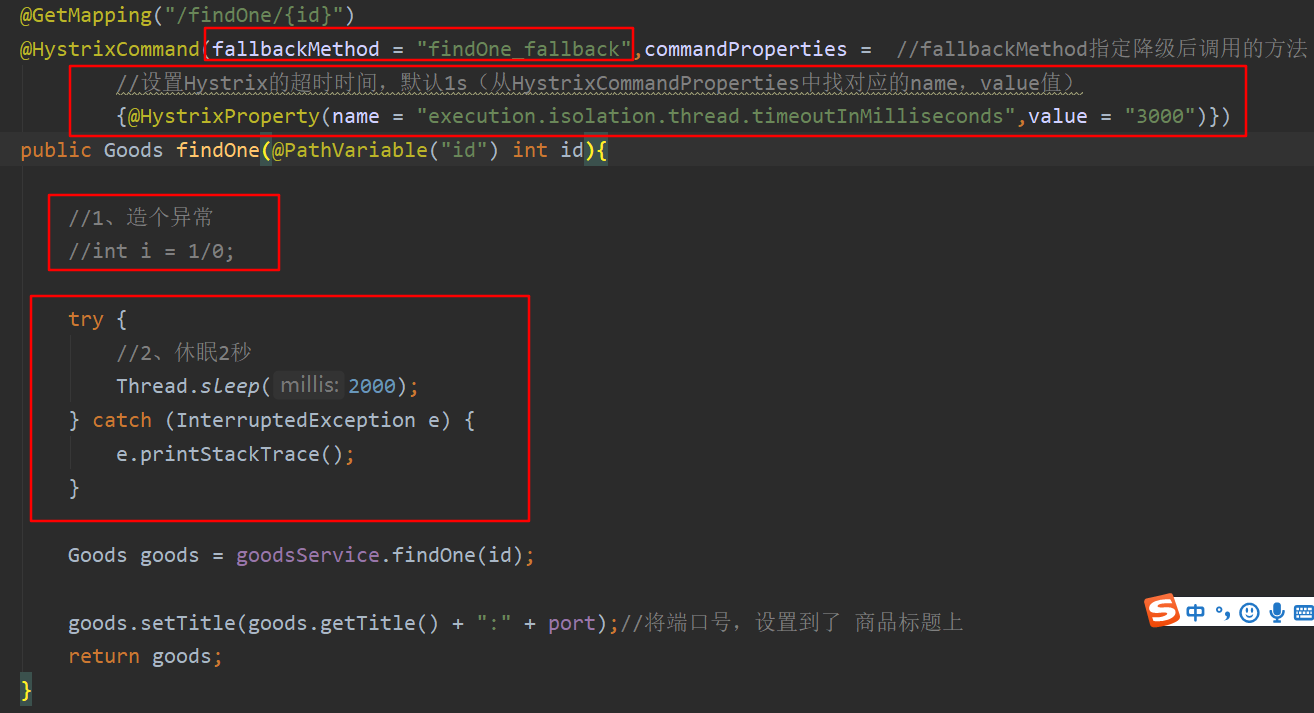
3、使用 @HystrixCommand 注解配置降级方法
4、在启动类上开启Hystrix功能:@EnableCircuitBreaker
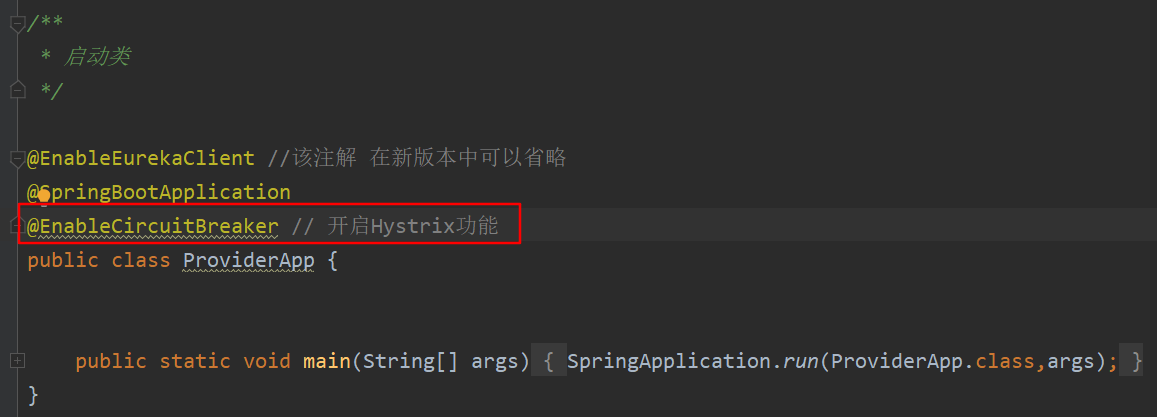
Hystrix 降级 – 服务消费方
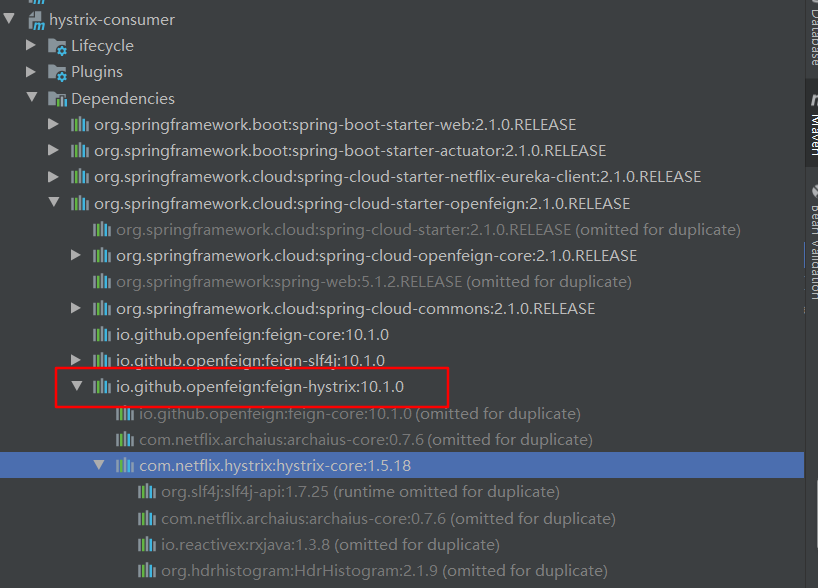
1、feign 组件已经集成了 hystrix 组件。(如果没有引入feign的依赖则需要引入hystrix 的依赖)
2、定义feign 调用接口实现类,复写方法,即 降级方法
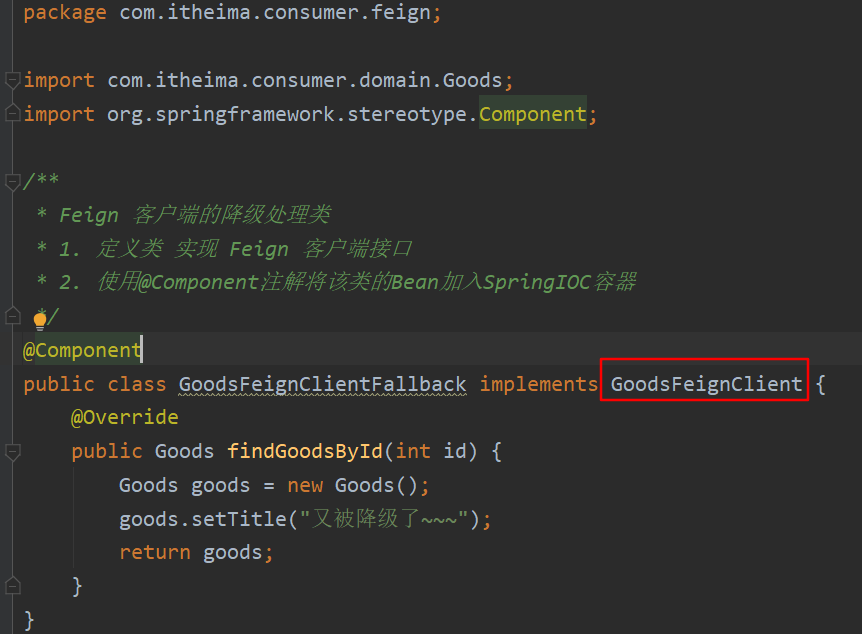
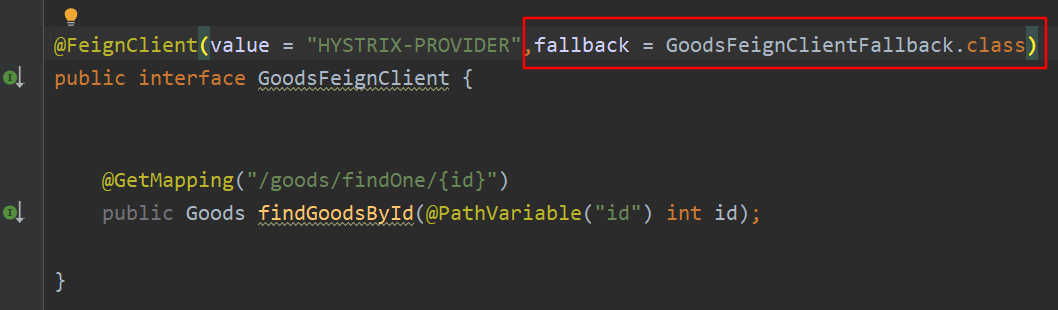
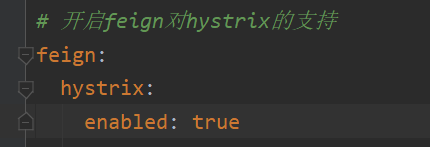
3、在 @FeignClient 注解中使用 fallback 属性设置降级处理类。
4、配置开启 feign.hystrix.enabled = true
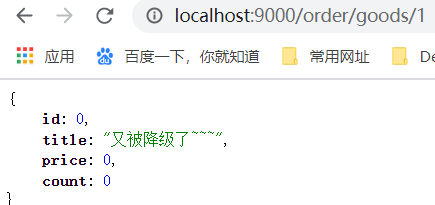
注意:如果服务方返回的是降级后的数据,也就是征程的数据了,消费方就不会再出现降级
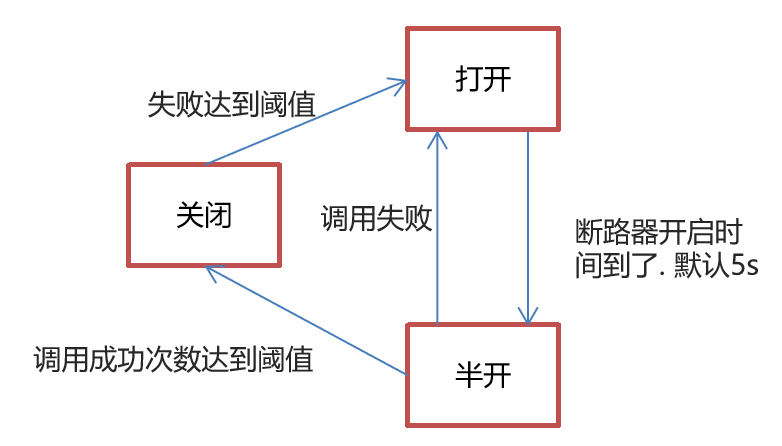
Hystrix 熔断
Hystrix 熔断机制,用于监控微服务调用情况,当失败的情况达到预定的阈值(5秒失败20次),会打开断路器,拒绝所有请求,直到服务恢复正常为止。
熔断器默认的情况下是开启的机制
修改提供方的代码

发现降级了
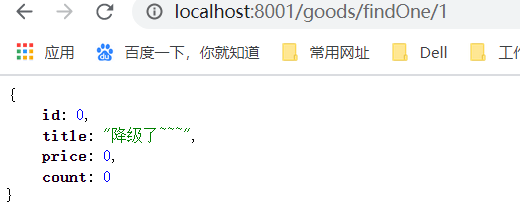
多刷几次降级的页面后发现正常的也降级了

稍等5秒钟左右又恢复正常了
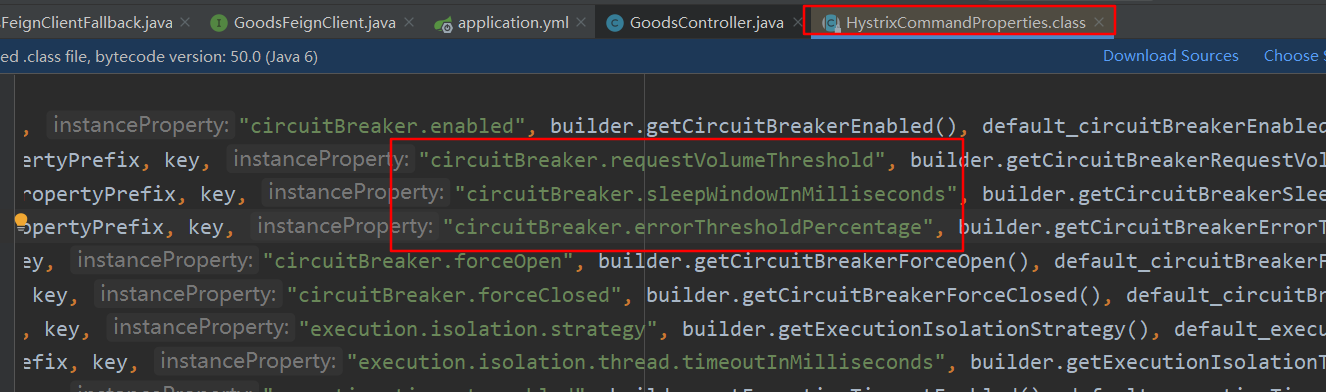
参数设置
circuitBreaker.sleepWindowInMilliseconds:监控时间
circuitBreaker.requestVolumeThreshold:失败次数
circuitBreaker.errorThresholdPercentage:失败率

Hystrix 熔断监控
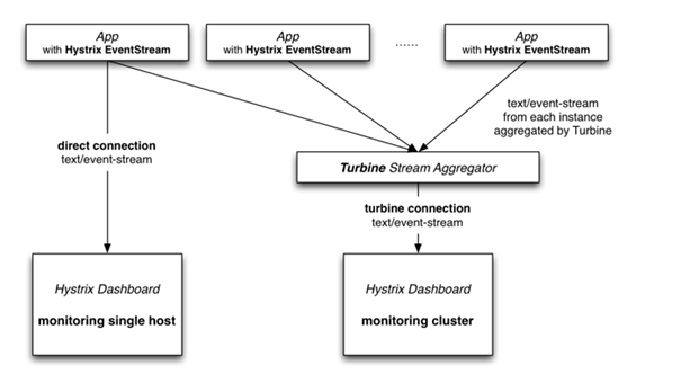
Hystrix 提供了 Hystrix-dashboard 功能,用于实时监控微服务运行状态。
但是Hystrix-dashboard只能监控一个微服务。
Netflix 还提供了 Turbine ,进行聚合监控。
快速入门:
1、创建hystrix-monitor模块,引入坐标
<dependencies>
        <dependency>
            <groupId>org.springframework.cloud</groupId>
            <artifactId>spring-cloud-starter-netflix-hystrix-dashboard</artifactId>
        </dependency>

        <!-- turbine -->
        <dependency>
            <groupId>org.springframework.cloud</groupId>
            <artifactId>spring-cloud-starter-netflix-turbine</artifactId>
        </dependency>

        <dependency>
            <groupId>org.springframework.boot</groupId>
            <artifactId>spring-boot-starter-actuator</artifactId>
        </dependency>

        <dependency>
            <groupId>org.springframework.cloud</groupId>
            <artifactId>spring-cloud-starter-netflix-eureka-client</artifactId>
        </dependency>

        <dependency>
            <groupId>org.springframework.boot</groupId>
            <artifactId>spring-boot-starter-test</artifactId>
            <scope>test</scope>
        </dependency>
    </dependencies>
2、配置application.yml文件
spring:
  application:
    name: hystrix-monitor
server:
  port: 8769
turbine:
  combine-host-port: true
   //#配置需要被监控的服务名称列表
  app-config: hystrix-provider,hystrix-consumer #可以从eureka的页面中获取名称
  cluster-name-expression: "'default'"
  aggregator:
    cluster-config: default
    #instanceUrlSuffix: /actuator/hystrix.stream

eureka:
  client:
    serviceUrl:
      defaultZone: http://localhost:8761/eureka/
3、 创建启动类
@SpringBootApplication
@EnableEurekaClient

@EnableTurbine //开启Turbine 很聚合监控功能
@EnableHystrixDashboard //开启Hystrix仪表盘监控功能
public class HystrixMonitorApp {
    public static void main(String[] args) {
        SpringApplication.run(HystrixMonitorApp.class, args);
    }
}
4、修改被监控模块( hystrix-provider和 hystrix-consumer 模块)
(1)导入依赖
    <dependency>
        <groupId>org.springframework.boot</groupId>
        <artifactId>spring-boot-starter-actuator</artifactId>
    </dependency>

    <dependency>
        <groupId>org.springframework.cloud</groupId>
        <artifactId>spring-cloud-starter-netflix-hystrix</artifactId>
    </dependency>

    <dependency>
        <groupId>org.springframework.cloud</groupId>
        <artifactId>spring-cloud-starter-netflix-hystrix-dashboard</artifactId>
    </dependency>
(2)配置Bean
此处为了方便,将其配置在启动类中。
@Bean
    public ServletRegistrationBean getServlet() {
        HystrixMetricsStreamServlet streamServlet = new HystrixMetricsStreamServlet();
        ServletRegistrationBean registrationBean = new ServletRegistrationBean(streamServlet);
        registrationBean.setLoadOnStartup(1);
        registrationBean.addUrlMappings("/actuator/hystrix.stream");
        registrationBean.setName("HystrixMetricsStreamServlet");
        return registrationBean;
    }
(3)启动类上添加注解@EnableHystrixDashboard
@EnableEurekaClient //该注解 在新版本中可以省略
@SpringBootApplication
@EnableCircuitBreaker // 开启Hystrix功能
@EnableHystrixDashboard // 开启Hystrix仪表盘监控功能
public class ProviderApp {

    public static void main(String[] args) {
        SpringApplication.run(ProviderApp.class,args);
    }

    @Bean
    public ServletRegistrationBean getServlet() {
        HystrixMetricsStreamServlet streamServlet = new HystrixMetricsStreamServlet();
        ServletRegistrationBean registrationBean = new ServletRegistrationBean(streamServlet);
        registrationBean.setLoadOnStartup(1);
        registrationBean.addUrlMappings("/actuator/hystrix.stream");
        registrationBean.setName("HystrixMetricsStreamServlet");
        return registrationBean;
    }
}
5、启动测试
(1)、启动服务:
- eureka-server
- hystrix-provider
- hystrix-consumer
- hystrix-monitor
(2)、访问:
在浏览器访问http://localhost:8769/hystrix/ 进入Hystrix Dashboard界面
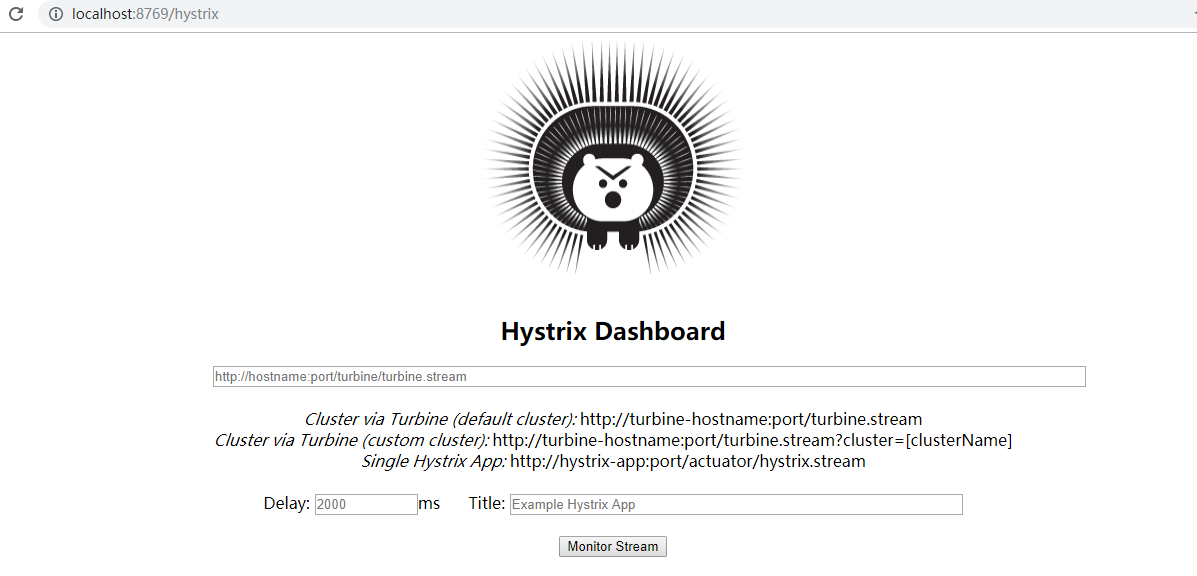
界面中输入监控的Url地址 http://localhost:8769/turbine.stream,监控时间间隔2000毫秒和title,如下图

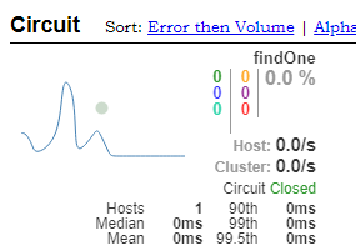
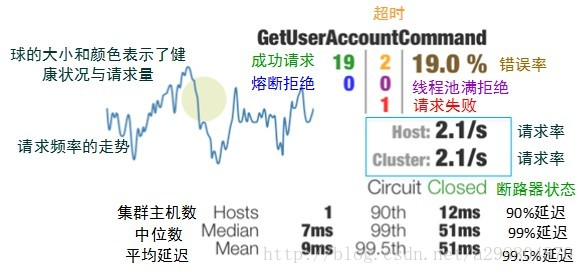
- 实心圆:它有颜色和大小之分,分别代表实例的监控程度和流量大小。如上图所示,它的健康度从绿色、黄色、橙色、红色递减。通过该实心圆的展示,我们就可以在大量的实例中快速的发现故障实例和高压力实例。
- 曲线:用来记录 2 分钟内流量的相对变化,我们可以通过它来观察到流量的上升和下降趋势。
** Gateway 网关**
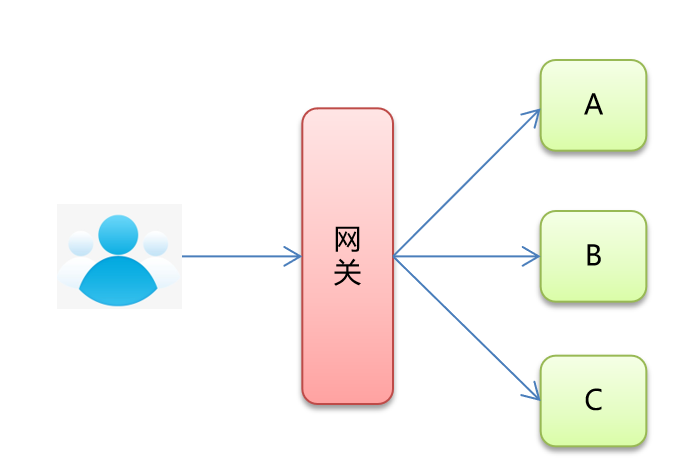
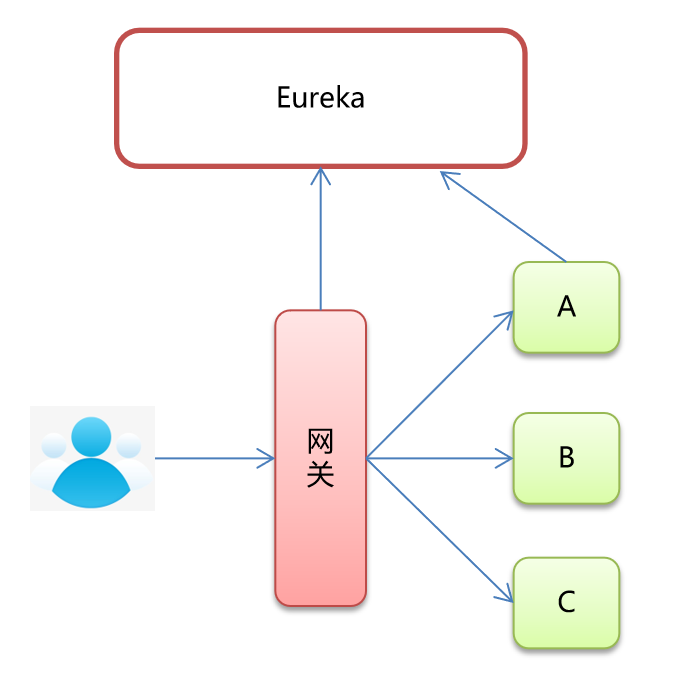
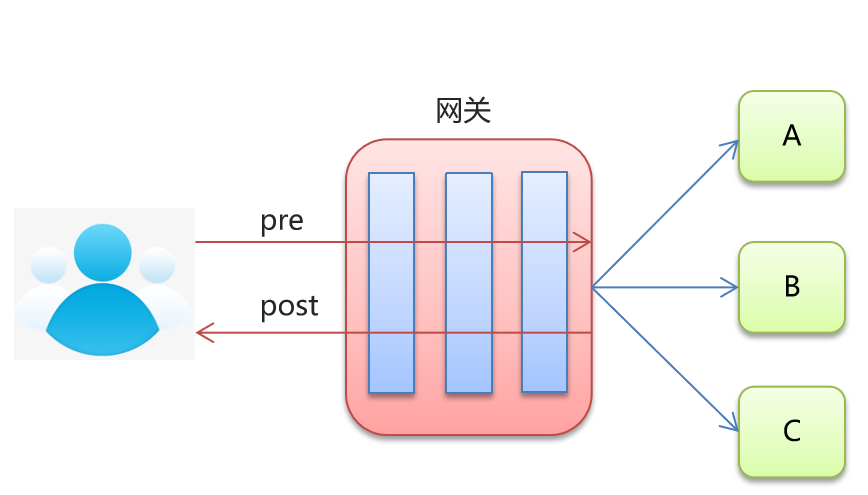
网关旨在为微服务架构提供一种简单而有效的统一的API路由管理方式。
在微服务架构中,不同的微服务可以有不同的网络地址,各个微服务之间通过互相调用完成用户请求,客户端可能通过调用N个微服务的接口完成一个用户请求。
存在的问题:
客户端多次请求不同的微服务,增加客户端的复杂性
认证复杂,每个服务都要进行认证
http请求不同服务次数增加,性能不高
网关就是系统的入口,封装了应用程序的内部结构,为客户端提
供统一服务,一些与业务本身功能无关的公共逻辑可以在这里实现,
诸如认证、鉴权、监控、缓存、负载均衡、流量管控、路由转发等
在目前的网关解决方案里,有Nginx+ Lua、Netflix Zuul 、Spring Cloud Gateway等等

Gateway 网关快速入门
1.搭建网关模块
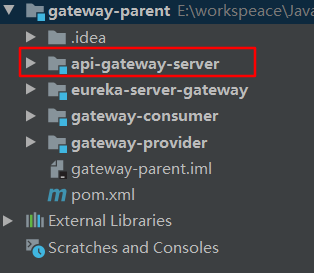
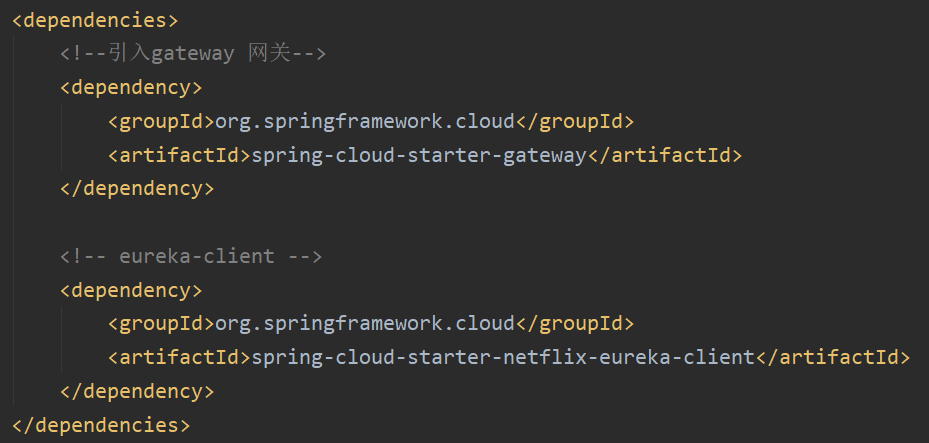
2.引入依赖:starter-gateway
3.编写启动类
@SpringBootApplication
@EnableEurekaClient
public class ApiGatewayApp {
    public static void main(String[] args) {
        SpringApplication.run(ApiGatewayApp.class, args);
    }
}
4.编写配置文件
server:
port: 80
spring:
application:
name: api-gateway-server
cloud:
# 网关配置
gateway:
# 路由配置:转发规则
routes: #集合
# id: 唯一标识。默认是一个UUID
# uri: 转发路径
# predicates: 条件,用于请求网关路径的匹配规则
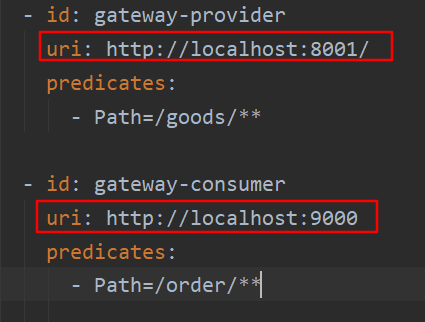
- id: gateway-provider
uri: http://localhost:8001/
predicates:
- Path=/goods/**
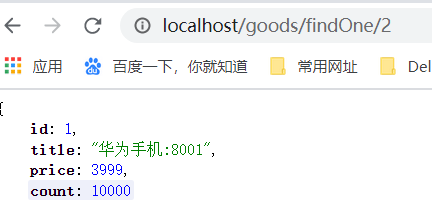
5.启动测试

结果如下图片所示时表示访问成功
Gateway 网关路由配置 – 静态路由
访问地址固定不变
Gateway 网关路由配置 – 动态路由
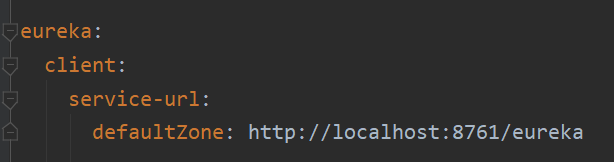
引入eureka-client配置
修改uri属性:uri: lb://服务名称
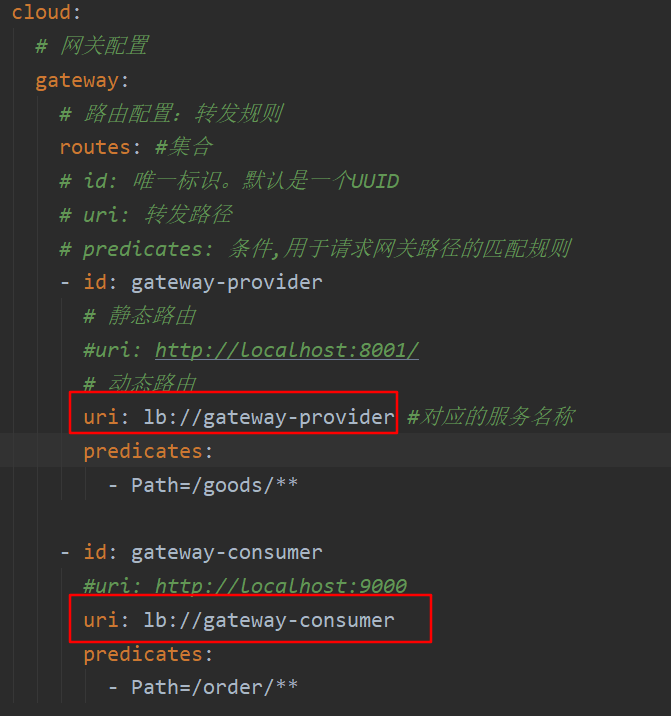
Gateway 网关路由配置 – 微服务名称配置
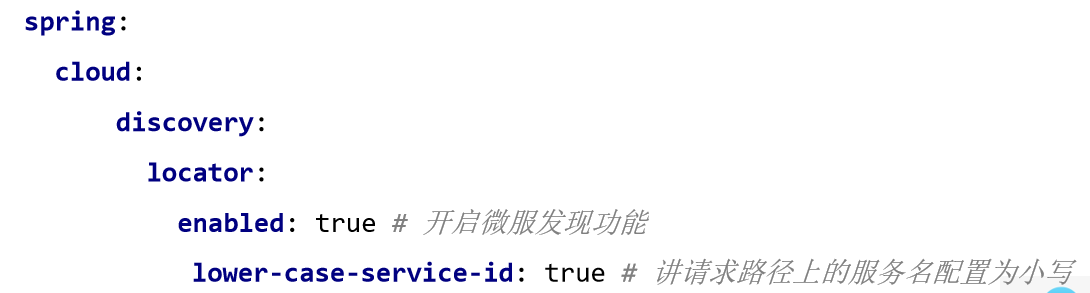
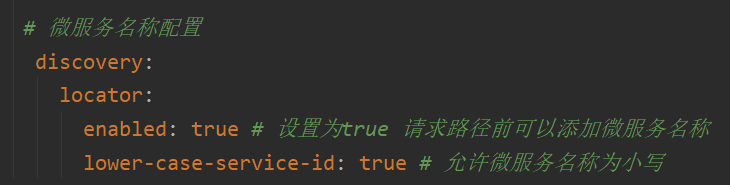
能够访问成功

Gateway 过滤器
Gateway 支持过滤器功能,对请求或响应进行拦截,完成一些通用操作。
Gateway 提供两种过滤器方式:“pre”和“post”
pre 过滤器,在转发之前执行,可以做参数校验、权限校验、流量监控、日志输出、协议转换等。
post 过滤器,在响应之前执行,可以做响应内容、响应头的修改,日志的输出,流量监控等。
Gateway 还提供了两种类型过滤器
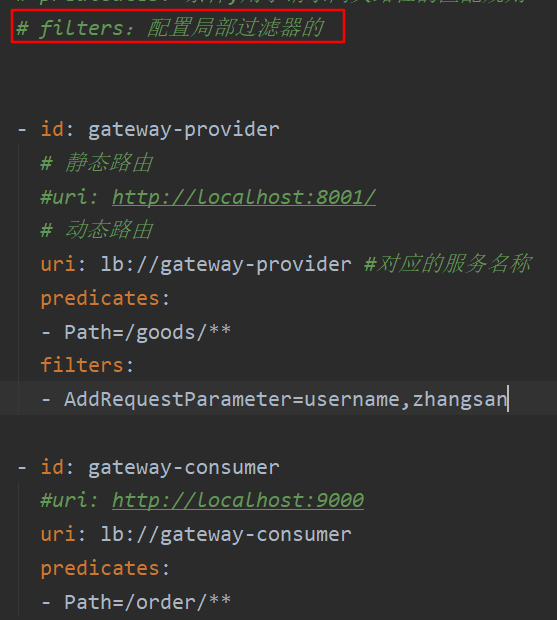
GatewayFilter:局部过滤器,针对单个路由
GlobalFilter :全局过滤器,针对所有路由
Gateway 过滤器 – 局部过滤器
1.GatewayFilter 局部过滤器,是针对单个路由的过滤器。
2.在Spring Cloud Gateway 组件中提供了大量内置的局部过滤器,对请求和响应做过滤操作。
3.遵循约定大于配置的思想,只需要在配置文件配置局部过滤器名称,并为其指定对应的值,就可以让其生效。
Gateway 过滤器 – 全局过滤器
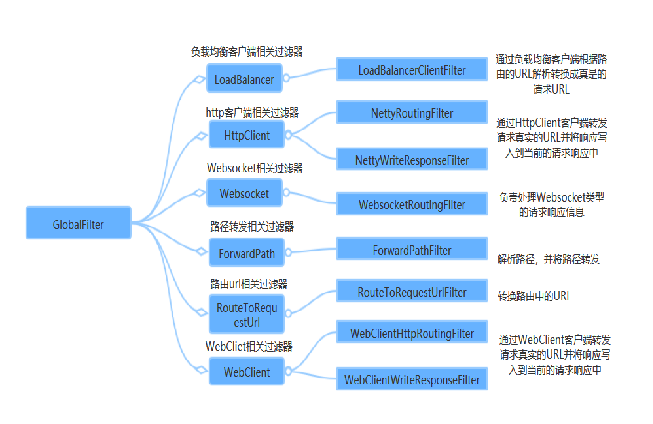
GlobalFilter 全局过滤器,不需要在配置文件中配置,系统初始化时加载,并作用在每个路由上。
Spring Cloud Gateway 核心的功能也是通过内置的全局过滤器来完成。
自定义全局过滤器步骤:
1.定义类实现 GlobalFilter 和 Ordered接口
2.复写方法
3.完成逻辑处理
@Component
public class MyFilter implements GlobalFilter, Ordered {
    @Override
    public Mono<Void> filter(ServerWebExchange exchange, GatewayFilterChain chain) {

        System.out.println("自定义全局过滤器执行了~~~");

        return chain.filter(exchange);//放行
    }

    /**
     * 过滤器排序
     * @return 数值越小 越先执行
     */
    @Override
    public int getOrder() {
        return 0;
    }
}
随便访问一个页面成功后